background image


MAN#650334:A 

ROAD GLIDE FLTR  

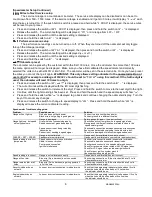
You will need to remove the speedometer and tachometer instrument bezel.  To do this, remove two small 

screws on the left and right side of the bezel.  Then lift up on the back of the bezel and slide the tab that is under the 
ignition switch out from under the switch cover, see photos below of ignition switch cover removed to show detail.  Now 
unplug the gauge connections (cable where applicable).  Remove switch, and unplug the idiot lights so the bezel can be 
completely removed for easier installation of the new gauges.  Remove the clamp(s) that hold the gauges to the bezel 
and remove the gauges and grommets/gaskets.   


              Picture of tab (switch cover removed)                  Bezel removed                       Gauges/Grommets removed 


Install New Gauge 

Note:  This step is only for those with out a factory switch or cable drive applications since the switch 

was mechanical and attached to the speedometer.  Now is a good time to install the function switch for cable drive 
applications, it can be hard to mount once the gauges are installed.  Remove the rubber boot, insert the switch from the 
back of the fairing and then tighten the rubber boot on from the front.     
 

Next you are ready to install the new gauges into the fairing.  The new speedometer comes supplied with a 

new gasket and clamp.  Install the gauge and secure using the supplied clamp and gasket.  Be sure the alignment tab 
on the clamp lines up with the notches in the fairing.  Some fairings may only have one notch, line up at least one tab 
on the clamp with the notch in the fairing, this will insure the gauge is centered and aligned correctly.   


Speedometer 


Summary of Contents for MCL-30K-SPD

Page 1: ...ready to start Remove the outer fairing for FLHT models this will vary from model to model please follow the service manual to expose the wiring and gauges Road Glide FLTR models will not need the outer fairing removed Ultra FLHT with outer removed Remove Factory Gauges Now you are ready to start unplugging and removing the original speedometer ULTRA FLHT batwing fairings Remove the clamps that ho...

Page 2: ...uges Grommets removed Install New Gauge Note This step is only for those with out a factory switch or cable drive applications since the switch was mechanical and attached to the speedometer Now is a good time to install the function switch for cable drive applications it can be hard to mount once the gauges are installed Remove the rubber boot insert the switch from the back of the fairing and th...

Page 3: ...nder You have to take the cable off at the wheel so the nut can slide down and off the end of the cable and allow the new nut to slide on After the nut has been replaced the speedometer cable can be connected back to the wheel and also to the sender Secure the sender with a zip tie and make sure there is no binding in the cable and that the cable has engaged fully into the sender Switch wiring Usi...

Page 4: ...l MCL 3K gauges setup may seem a little strange since they are designed to work as a set The first step in the setup procedure is to select which gauge you are going to adjust Each gauge will either show a number or a label If the gauge is showing a label then that gauge will be selected to enter setup All of the other gauges will exit setup and allow the selected gauge to be changed To get into s...

Page 5: ...splayed Release the switch The display will switch to vnit and light up the current speed unit MPH or km h Press and hold the switch to keep the current unit or press and release the switch to change the unit Next the speedometer will display CAL and the message display will show zeroes You should now begin driving the measured mile The message display will count the number of pulses received from...

Page 6: ...and continue changing the odometer display Turn the key off to cancel any changes Press and release the switch to change to speed display to yes Press and hold the switch while yes is displayed to save the current odometer reading Speedometer Troubleshooting guide Problem Possible cause Solution Gauge will not light up Red wire does not have power Connect to a location that has power Black wire is...

Page 7: ...ng Guide There you will find the solution to most problems Should you ever need to send the unit back for repairs please call our technical support line 605 332 6513 to request a Return Merchandise Authorization number Package the product in a good quality box along with plenty of packing material Ship the product by UPS or insured Parcel Post Be sure to include the RMA number on the package and i...

Reviews: