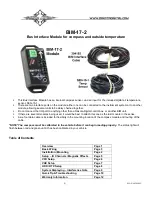
Dakota Digital BIM-17-2 Quick Start Manual Download Page 10


[10] 


MAN #650506C 


Quick tips: 


While the BIM is operating, the status light will flash green. 


A steady green indicates it is powered up but not receiving any bus activity. 


The display will flash green-yellow-green-yellow-red-red (rapid red flash with slow green flash) until it has been 
calibrated in your vehicle.  It cannot begin reading correctly until after this is completed. 


A flashing yellow-red (steady red with a flashing green) indicates an open or shorted temperature sensor 
connection. 

 
Troubleshooting guide: 


Problem 

Possible cause 

Solution 

- No BIM data on instrument 
readout 
- BIM will not light up


- Power/data harness is not connected or 
is damaged 
- Module is damaged


- Inspect power/data harness and reseat 
 
- Return for service.  (See page [10])


- No BIM data on instrument 
readout 
 
 
- BIM has a steady-lit green 
LED


- Interface cable is not connected 
 
- On VHX systems, the BIM data is not 
assigned to an LCD 
- Interface cable is loose, or green data 
wire is loose 

- Connect the power/data cable to the BIM unit and the 
instrument system control box 
- Follow VHX instructions for Display / Locations to 
enable the BIM display screen. 
- Ensure both ends of the cable are properly seated 
  

- BIM LED is flashing green-
red-red 
- No BIM data on instrument 
readout 
  

- Another BIM is set with the same 
channel ID 

- Disconnect any other BIM and test alone 
 
- Change ID of BIM following steps on page [4]  

- Compass shows 
interference (direction is 
flashing or inverted color) 

- Compass is not calibrated correctly 
- Unit is picking up interference from 
nearby steel in vehicle or roadway 

- Follow Compass calibration instructions on pages 5-7 
- Move BIM unit to location away from steel and higher 
in vehicle 

- Compass reads incorrectly 

- Compass is not calibrated correctly 
True North offset is incorrect 

- Follow Compass calibration instructions on pages 5-7. 
- Change the North offset (pages 5-7) 

- Temperature does not read 
correctly


- Loose connection on sensor wires 
- Air temperature sensor is not getting 
proper air flow 
- Voltage or wiring problem in the vehicle 
wiring harness 

- Inspect and reconnect wires. 
- Move the air temperature sensor to get clean air flow 
and avoid engine heat 
- Check wiring harness for loose or damaged wires 

- Temperature reading 
displays “---” 

- SND terminal is shorted to ground 
 
- Sender is damaged  

- Check wire for damaged insulation. Repair/replace as 
necessary.  
- Replace sender 

- Temperature reading 
displays “EEE” / status LED 
blinking yellow-red 

- Sender is not connected to BIM-17-2 
- Wire between BIM and sender is broken 
- Sender is damaged 
- Module is damaged 

- Connect sensor to SND terminal.  
- Test and replace wire.  
- Replace sender. 
- Return module for service.  (see instructions) 

- Temperature is always 
 

“-40F” or “-40C” 

- The temp sender is not connected 
- Sender is damaged 

- Check wire connections to the temperature sender 
- Replace sender 


Input specs: 
 

Sensor 


Range


Resolution


Warning


Internal compass


N-NE-E-SE-S-SW-W-NW


1° internally


When outside interference is present


SEN-15 


-40 to 255 °F (-40 to 124 °C)


1°F


-40 to 73 °F (-40 to 23 °C)


Summary of Contents for BIM-17-2

Page 1: ...re several modules being used it would be best to attach this one as the last module in the series A six foot data cable is included for flexibility in the mounting location of the compass module and routing of the cable NOTE The compass must be calibrated in the vehicle before it can begin reading properly The status light will flash between red and green until it has been calibrated in your vehi...

Page 2: ... 2 MAN 650506C THIS PAGE IS INTENTIONALLY LEFT BLANK ...

Page 3: ... 3 MAN 650506C Basic BIM 17 2 Wiring ...

Page 4: ...n interior of the vehicle Avoid any strong magnets such as fan motors and speakers high current wiring such as alternator or fan wires or steel bars Sheet steel is much better than steel bars or brackets since the bars and brackets can bend the magnetic fields causing compass errors Mounting the module higher in the vehicle helps Magnetic interference drops off very rapidly with distance o Even sm...

Page 5: ...t will rapidly flash RED Release the switch The status light will flash a slow red When the status light begins flashing green it is finished turn the key off Programming notes Calibration and warning points are set up through the instrument system VFD VHX HDX RTX setup menu Temperature unit will follow the unit set for the main water temp gauge The calibration should be done in an open area such ...

Page 6: ...d the label compass are displayed 9 Press and hold SW1 I until and LABEL are displayed a The label cannot be changed 10 Release SW1 I Speed will display and the message center will display COMPASS 11 Hold SW1 I until and WARN is displayed This for the low temperature warning point 12 Release SW1 I The displays show and LO 40F a If the low warning point had already been set that previous value will...

Page 7: ... BIM CH 08 and COMPASS a Default channel is 08 if not conflicting with another BIM 7 Press and hold SW1 I until CH 08 LABEL and COMPASS a Label cannot be changed 8 Press and hold SW1 I until CH 08 LOW and WARN SET is displayed 9 Release SW1 I and the display will show AIR TEMP 40F and N a AIR TEMP 40C if water sender was set to Celsius 10 Tap SW1 I to increase the temp reading to desired low temp ...

Page 8: ...WARN LO N OFFSET CALIBRATE BACK a Any menu item that does not apply to this BIM will be grey and cannot be selected 8 To change the temperature low warning point tap either switch until WARN LO is highlighted 9 Press and hold either switch to enter the WARN LO setting Release when instructed 10 The message display will show the current low temperature warning a Tap either switch to change the low ...

Page 9: ...eens the direction and temp will be at the top of the right screen o Single small 1 5 or 1 8 screens A section of a group screen must be designated to show the compass temp Follow the HDX RTX setup for group screens or use the app to designate one for compass When done tap the right or SW2 II to change to the group screen with the compass Interference notes Traffic light sensors mounted into the r...

Page 10: ...ference direction is flashing or inverted color Compass is not calibrated correctly Unit is picking up interference from nearby steel in vehicle or roadway Follow Compass calibration instructions on pages 5 7 Move BIM unit to location away from steel and higher in vehicle Compass reads incorrectly Compass is not calibrated correctly True North offset is incorrect Follow Compass calibration instruc...

Page 11: ... 11 MAN 650506C THIS PAGE IS INTENTIONALLY LEFT BLANK ...

Page 12: ...is product that should it under normal use and condition be proven defective in material or workmanship for the lifetime of the original vehicle it was installed in such defect s will be repaired or replaced at Dakota Digital s option This warranty does not cover nor extend to damage to the vehicle s systems and does not cover diagnosis removal or reinstallation of the product This Warranty does n...

Reviews: