background image

6/02 

ELECTRICAL CONTROL DIAGRAMS 


Summary of Contents for J-10

Page 1: ... Johnson manufactured J JH horizontal bandsaws from 1985 to current If your model is prior to 1985 please contact the factory for manual and parts information 1938 1965 Johnson manufactured J saws 1965 1984 Kysor Johnson manufactured J JH saws ...

Page 2: ...0 JH 10 Dake Johnson Horizontal Bandsaw DAKE Division of JSJ 724 Robbins Road Grand Haven MI 49417 Phone 1 800 937 3253 616 842 7110 Fax 1 800 846 3253 616 842 0859 E mail customerservice dakecorp com technicalservice dakecorp com Web www dakecorp com ...

Page 3: ...ted in the space provided below Machine Model ___________________________ Serial Number ___________________________ Date Received _________________ Voltage ___________________________ Phase _______ Cycle _______ Motor H P ______ Please give the machine model and serial number in correspondence and include the parts numbers on parts orders to speed the filling of your requirements and to minimize y...

Page 4: ...Standard Drive 12 Blade Selection 13 Blade Removal Installation 13 14 Blade Guide Adjustment 14 15 Balance Spring Adjustment 15 Feed Cylinder Bleeding 15 SECTION 2 MAINTENANCE Lubrication 16 Sawing Problems and Solutions 17 SECTION 3 ASSEMBLIES PARTS LISTS Machine Assembly Front View 18 19 Machine Assembly Top View 20 Gear Box Assembly 21 Hydraulic Assembly 22 23 Guide Arm Assembly 24 Vise Unit 25...

Page 5: ...30V 1 PH 60 Hz JH 10 Dry 901 lbs 409 kgs 208 230 460V 3 PH 60 Hz JH 10 Wet 934 lbs 424 kgs Coolant Capacity 3 gallons Water soluble only do not use oil INSTALLATION UNCRATING Remove crating carefully For ease in handling do not remove from skid until machine has been moved to its approximate location CAUTION BE SURE ELECTRICAL CHARACTERISTICS OF MOTOR AND SWITCH CORRESPOND WITH ELECTRICAL POWER SU...

Page 6: ...your saw be alert to the potential for personal injury Follow recommended precautions and safe operating practices Carefully read all safety messages in these instructions and on your saw safety signs Keep safety labels in good condition Replace missing or damaged safety labels LABEL 84605 LABEL 84604 LABEL 84395 LABEL 76462 ...

Page 7: ... and safe operating practices Carefully read all safety messages in these instructions and on your saw safety signs Keep safety labels in good condition Replace missing or damaged safety labels SAFETY This is the safety alert symbol When you see this symbol on your saw be alert to the potential for personal injury ...

Page 8: ...6 02 8 ELECTRICAL CONTROL DIAGRAMS ...

Page 9: ...6 02 9 SINGLE PHASE ELECTRICAL DIAGRAM ...

Page 10: ...6 02 10 THREE PHASE ELECTRICAL DIAGRAM ...

Page 11: ...6 02 11 MACHINE FEATURES SECTION 1 Head Feed Control Blade Tension Handle Guide Arm Off On Switch Starter Balance Spring Stock Stop Gauge Vise Handwheel ...

Page 12: ...n block to which the swivel jaw is attached Move the vise lift handle toward front of the machine to disengage the vise nut from the vise screw this allows the swivel jaw to be moved freely Move the lift handle towards the rear of the vise to engage the vise nut when clamping VISE HANDWHEEL Used to open and close the vise jaws vise nut must be fully engaged Turn handwheel counterclockwise to open ...

Page 13: ...nsion Consult blade manufacturer for proper PSI tension 6 Turn coolant valve on wet machines only CAUTION DO NOT OPERATE MACHINE WITHOUT SUFFICIENT COOLANT IN TANK COOLANT MUST BE WATER SOLUBLE DO NOT USE OIL 7 Check blade speed for material you are cutting Refer to blade manufacturer for proper speeds for the material you are cutting 8 To change blade speed loosen thumbscrew on right end of machi...

Page 14: ...rrous materials c Hook Tooth Similar to skip tooth except teeth have positive rake Effective in sawing non ferrous metals and large ferrous sections when heavy feed pressures are required Fast cutting 3 Tooth Spacing Tooth spacing is determined by hardness of material and or the cross section The harder the material the more teeth per inch Thin cross sections require more teeth to avoid straddle R...

Page 15: ...or proper PSI tension 8 Install blade cleaning brushes and guards that were removed earlier BLADE TRACKING ADJUSTMENT Saw blade should track on each wheel with the back of blade up to but not riding on the wheel flange Adjust as follows 1 Idle Wheel Open top cover on left end of machine to gain access to idle wheel Idle wheel is mounted on a slide block which contains the blade height adjustment s...

Page 16: ... scale Frame should weigh 12 15 pounds if no adjust by turning nut on the tension screw at bottom of spring FEED CYLINDER BLEEDING Air trapped in the hydraulic cylinder can cause the down feed of the machine head to be erratic or bouncy Before taking corrective steps observe CAUTION CAUTION UNDER NO CIRCUMSTANCES SHOULD THE HYDRAULIC TUBING CONNECTIONS BE LOOSENED OR DISCONNECTED WITH THE MACHINE ...

Page 17: ... 3 ounces 3 Pivot bar 2 fittings Monthly C Use grease gun 4 Tension screw 6 months C Clean threads before lubricating 5 Idle wheel slide ways 6 months C Clean thoroughly before lubricating 6 Feed cylinder Maintain level A Maintain level at top of oil cup RECOMMENDED LUBRICANTS A Mobil DTE 24 or 26 oil Viscosity range 310SSU 100ºF B Gear oil 80 90 Mobil SHC635 synthetic gear lube C General purpose ...

Page 18: ...6 02 18 SAWING PROBLEMS SOLUTIONS ...

Page 19: ...6 02 19 ASSEMBLIES AND PARTS LIST Section 3 ...

Page 20: ...1 19 10268 05A Right Leg Pan 1 20 10093 00 Frame Handle 1 21 10229 00 Brush holder Guard 1 22 72295 Dake Johnson Name Plate 1 23 71541 Submersible Coolant Pump Electric 110 volt 1 PARTS NOT ILLUSTRATED PART NO DESCRIPTION QTY 10079 05 Motor 230 460 volt 60 Hz 3 phase 1 H P 1 10079 07 Motor 110 230 volt 60 Hz 1 phase 1 H P 1 10042 10 Motor Pulley 5 8 Bore 1 10077 10 Drive Belt 1 10223 10A Pulley Gu...

Page 21: ... 2 10 10067 00 Slideway Bottom 1 12 10064 10 Drive Wheel and Frame Mounting Bracket Inboard 1 13 10063 00 Gear Box Mounting Plate 1 14 10064 06 Drive Wheel and Frame Mounting Bracket Outboard 1 15 10043 10 Driven Pulley 3 4 Bore Key Part No 71061 1 16 10510 01 Drive Wheel Assembly J 10 1 10010 01 Drive Wheel Only J 10 1 10052 00 Ring Gear Used on J 10 and JH 10 1 10510 03 Drive Wheel Assembly JH 1...

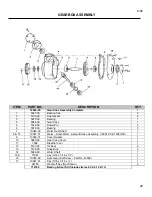
Page 22: ...0 Worm Gear Shaft 1 8 15 10051 51 Worm Steel Worm Gear Bronze Assembly 10051 00 10050 00 1 9 13080 01 Cover Gasket 1 10 5045 00 Gear Case Cover 1 11 7368 Breather Vent 1 12 5137 22 Oil Seal 2 13 5136 00 Snap Ring 2 14 5048 00 Worm Shaft 1 15A 71061 Key 3 16 x 3 16 x 1 1 16 10053 00 Spur Gear Set Screw Part No 43558 1 17 10047 01 Key 3 16 x 3 16 x 1 26189 Woodruff Key Not Shown 2 714706 Bearing Sea...

Page 23: ...6 02 23 HYDRAULIC ASSEMBLY ...

Page 24: ...00 Yoke 1 11 43905 10 24 Nut 3 12 71357 Elbow Includes furrow and nut 2 13 10203 02 Cylinder Body 1 14 5119 00 Piston 1 15 5120 00 Piston Nut 1 16 5130 00 Leather Cup 1 10530 08 Control Valve Assembly 1 17 40600 00 Straight Fitting 2 18 1738 Nipple 1 4 x 2 1 2 1 19 70466 Reducer 3 8 x 1 20 588 3 8 Pipe Plug 1 21 1115 Tee 1 22 70465 Coupler 1 4 x 1 8 2 23 5131 00 Valve 1 24 44143 90 St Elbow 1 25 1...

Page 25: ...0 Side Guide Bushing 1 8 10022 10 Outside Eccentric Axle with Nut Washer 1 9 5122 00 Brush Holder 1 10 5133 S Blade Cleaning Brush Kit 6 Pairs 1 11 715342 Coolant Nozzle Assembly 1 12 34528 Tube Fitting Poly Tite 1 13 67762 Tubing 10 ft 14 10512 10 T Bolt 1 15 70462 Spacer Washer JH Model Only 8 10520 10 Guide Holder Assembly Includes Items 2 4 5 6 7 8 15 715104 Guide Bearing Kit Includes Items 4 ...

Page 26: ...le 1 4 10008 00 Movable Vise Jaw Bolt Part No 43348 1 5 10009 00 Stationary Vise Jaw Bolt Part No 43348 1 7 10116 00 Lift Pin 1 8 10201 00 Vise Nut Plate Self Tapping Screw 10 24 Part No 43882 2 9 10016 00 Vise Nut 1 10 10015 10 Vise Screw 1 11 10014 00 Handwheel 1 12 70464 Stop Collar 1 13 70287 Drive Pin 1 or 2 ...

Page 27: ...Presses for All Your Application needs A complete line of Arbor H Frame and custom engineered Hydraulic Presses for production maintenance and research work DAKE Division of JSJ 724 Robbins Road Grand Haven MI 49417 Phone 1 800 937 3253 616 842 7110 Fax 1 800 846 3253 616 842 0859 E mail customerservice dakecorp com technicalservice dakecorp com Web www dakecorp com ...

Reviews: