Unpacking
1.
Carefully remove the unit from the carton.
2.
Examine the unit for any signs of shipping damage. If you notice damages to the box and
contents, contact Daimer Industries for instructions.
3.
All the necessary accessories are packed with the unit. Make sure you have removed all
accessories from within the box. We suggest you retain the box and packaging material.
Getting Started
Please follow the below steps before using your
KLEENJET® PRO PLUS 300CS
.
IMPORTANT:
Setting the proper pressure level helps you maximize the vapor flow from your new
steam cleaner.
1.
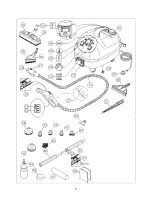
Make sure there is no pressure on the Pressure Gauge (6) located on the top front of your
KLEENJET® PRO PLUS 300CS
.
2.
Twist off the Cap for Water Tank (1). The cap may have been applied tightly at the factory, but it
is not threaded to the unit.
3.
Place Filler Bottle (46) into tank opening and fill with two liters of clean water. You may use tap
water. If your tap water is hard, we suggest you use distilled water, or clean the boiler more
frequently. Do not use water treated with a water softening system as it may harm your steam
cleaner.
4.
Replace the Cap for Water Tank (1).
5.
Plug the Power Cord with Plug (9) into an ordinary grounded 110-120 volt wall socket. Insert the
steam plug (26) located on the steam hose into the steam oulet (7) placed on the unit and push
until the blocking hook (27) has entered into its seat.
6.
Press the Main Power Switch (2A), Accessory Switch (2), and Boiler Switch (3) to the
lower “on” position. Heating time is approximately 10 minutes. Note: The switches (22
and 23) on the handgrip have to be switched off.
7.
When the green Ready Steam Indicator Light (5) comes on, the
KLEENJET® PRO PLUS
300CS
is ready to use.
8.
Activate the switches as follows: Press switch (22) for minimum steam. Press switch (23) for
medium steam. Press both switches (22 and 23) for maximum steam. Press the safety switch (21)
to let the steam out. Switch (22) Turn on the Steam Command Switch (11) and vent water into
sink or towel.


