Installation and Maintenance Manual IM 926-3
Group:
Applied Air Systems
Part Number:
IM 926
Date:
October 2018
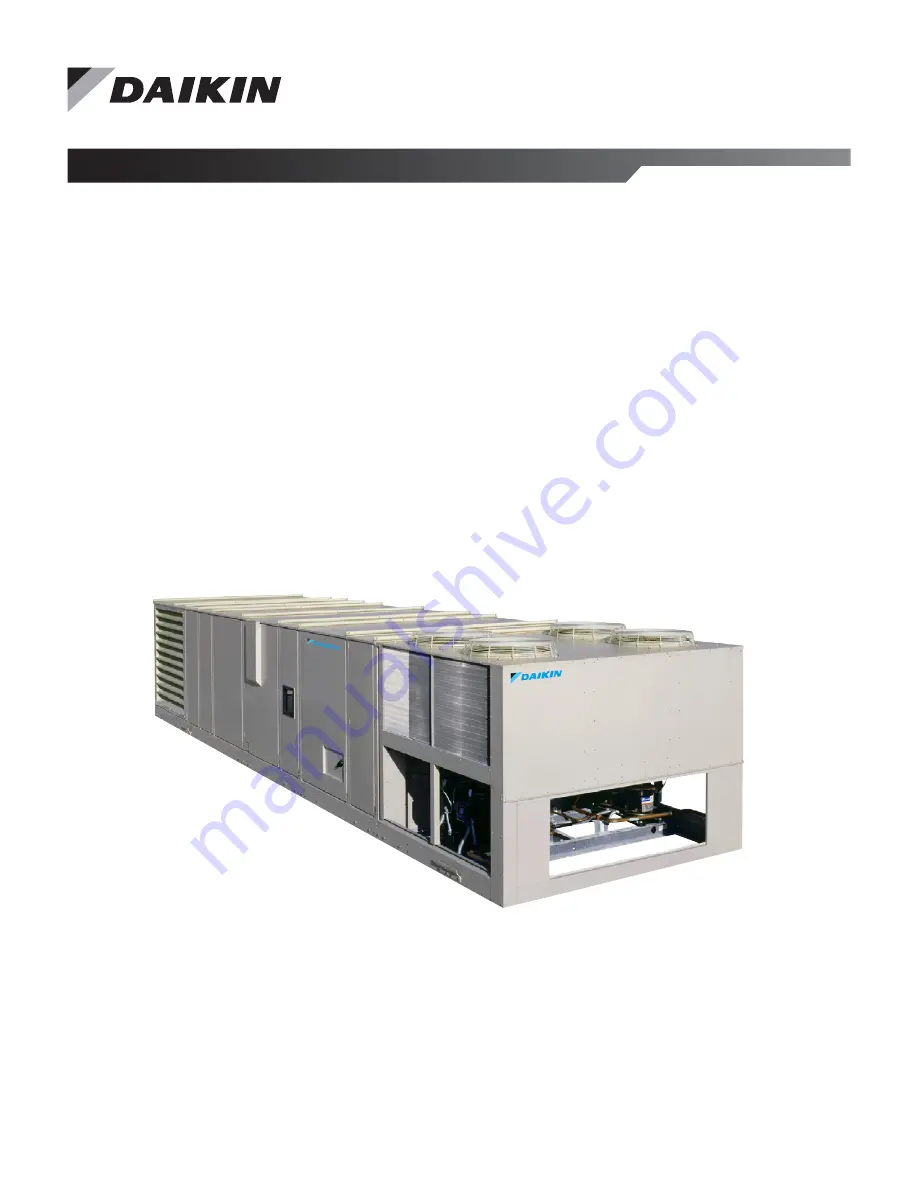
RoofPak
®
Roof Mounted
Singlezone Heating and Cooling Units
RPS/RDT/RFS/RCS
Models 015C–105C
with MicroTech
III Unit Controllers
Page 1: ...Maintenance Manual IM 926 3 Group Applied Air Systems Part Number IM 926 Date October 2018 RoofPak Roof Mounted Singlezone Heating and Cooling Units RPS RDT RFS RCS Models 015C 105C with MicroTech III...
Page 2: ...asswords 59 Navigation Mode 60 Edit Mode 60 Menu Structure 61 Wiring Diagrams 63 Unit Options 82 Control Actuators 82 Enthalpy Control 82 Ground Fault Protection 83 Phase Voltage Monitor 83 Hot Gas By...
Page 3: ...nameplate is located on the outside lower right corner of the main control box door It includes the unit model number serial number unit part number electrical characteristics and refrigerant charge C...
Page 4: ...injury or death if not avoided CAUTION Cautions indicate potentially hazardous situations which can result in personal injury or equipment damage if not avoided Unit Description Typical Component Loca...
Page 5: ...ood Return air fan Outside air louvers Bottom return air opening Bottom discharge air opening Outside and return air dampersa Return air Return air Optional back return opening Side View Top View Evap...
Page 6: ...hows the condenser fan numbering conventions and locations for each unit size Table 2 Condenser Fan Arrangement Unit size Refrigerant circuit Arrangement Unit size Refrigerant circuit Arrangement 015C...
Page 7: ...N M C H G F I E Legend A Compressor 1 2 or 3 per circuit B Discharge line C Condenser coil D Evaporator coil E Manual shutoff valve F Filter drier G Liquid line solenoid valve H Sightglass I Liquid li...
Page 8: ...n Legend 1 Filter drier 2 Liquid line solenoid valve 3 Sightglass 4 Hot gas bypass and solenoid valve optional 5 Thermostatic expansion valve 6 Distributor L i q u i d L i n e C i r c u i t 1 2 1 L i...
Page 9: ...Locations RPS Units Figure 10 Control Locations RDT Units R eturn air economizer Filter se ction Supply fan Heat DX se ction Discharge plenum se ction Condensor se ction R AT LT11 optional S11 REC11 O...
Page 10: ...t configuration Specific unit configurations may differ slightly from these figures depending on the particular unit options Figure 11 Control Panel Locations Figure 12 Typical Main Control Panel 015C...
Page 11: ...Introduction www DaikinApplied com 11 IM 926 3 ROOFPAK APPLIED SYSTEMS Figure 13 Typical Main Control Panel 036C 040C 208 Volt Figure 14 Typical Main Control Panel 045C 075C 460 Volt...
Page 12: ...ure 15 Typical Main Control Panel 080C 105C 460 Volt Figure 16 Typical Gas Heat Panel 1000 MBH Figure 17 Typical Prop Exhaust Panel 3 Fans 460 Volt Figure 18 Figure 18 VFD Bypass Panel 40 HP 460 Volt...
Page 13: ...040C Figure 20 RCS Control Panel with MicroTech III RPS 045C 075C Figure 21 RCS Control Panel with MicroTech III RPS 080C 105C DS4 GND LUG DS4 M1 M2 MMP1 MMP2 GFS2 Sensor F1A F1B F1C PVM4 GFR4 M12 M1...
Page 14: ...nnector Detail M41 M42 M41 M33 M32 M31 FB33 FB32 FB31 FB43 FB42 FB41 PB3 SR2 SR3 SR1 TB11 GLG3 DS3 M41 M43 FB41 FB42 FB43 H53 TB11 M31 M32 M33 FB31 FB32 FB33 M42 GLG3 DS3 M41 M42 M43 FB41 FB42 FB43 H5...
Page 15: ...section B or as required A D Temperature 3 5 F 2 C Humidity 5 fixed 030706702 Enthalpy control electronic Returns outside air dampers to minimum position when outside air enthalpy is higher than retur...
Page 16: ...h MicroTech III Controls RPS RCS RDT RPR Degrees Farenheit B05 B06 B07 B08 Setpoint Differential Setpoint Differential Setpoint Differential Setpoint Differential 015 to 020C 0 5 60 5 025 to 030C 0 5...
Page 17: ...ully gasketed access doors and cabinet caulking to provide weather resistant operation After the unit is set in place inspect all door gaskets for shipping damage and replace if necessary Protect the...
Page 18: ...verhead obstructions above the furnace flue or within 9 229 mm of the flue box b Overhead obstructions must be no less than 96 2438 mm above the top of the unit c There must be no overhead obstruction...
Page 19: ...oors to open and close without binding Integral supply and return air duct flanges are provided with the RPS RFS roof curb allowing connection of duct work to the curb before the unit is set The gaske...
Page 20: ...rdinated see Figure 35 Figure 29 RPS RFS Roof Curb Assembly Table 6 Roof Curb Assembly Dimensions Unit size Fan X Y XX YY Unit size Z W in mm in mm in mm in mm in mm in mm 015 040C None 24 0 610 82 0...
Page 21: ...ted IMPORTANT An acceptable IBC seismic installation provides a direct positive attachment to both the building structure and the roof mounted equipment Refer to the roof curb manufacturer s submittal...
Page 22: ...wn bracket Unit power wiring by factory Unit control wiring by factory High temp Insulation Roof curb Acceptable weld zone Field attachment weld Weld zone 25 50 Unit base Seismic hold down bracket Uni...
Page 23: ...gure 33 and Figure 34 The total number of welds required is dependent on the length of the unit a Make the fillet welds 2 inches long spaced 48 inches apart on centers b Place the end welds 6 to 12 in...
Page 24: ...he structural member If resilient material is placed between the unit and the rail insert a heavy steel plate between the unit and the resilient material to distribute the load Seal cabinet penetratio...
Page 25: ...g the length of the base rail 2 Level the unit no twists or uneven ground surface 3 Provide proper drainage around the unit to prevent flooding of the equipment 4 Provide adequate protection from vand...
Page 26: ...r Y 38 0 sizes 110 115 For all units or shipping sections without condensers Y 0 Z Z total base rail length of the units NOTE Z excludes hoods and overhung parts extending past base rails of the unit...
Page 27: ...D SYSTEMS Figure 40 Unit Type RCS Figure 41 Unit Type RCS or Condenser Section from RPS RDT Factory Split at Condenser Figure 42 RPS Factory Split at Supply Fan Section 4 lifting points 045C 060C B mi...
Page 28: ...ions are coupled together only field provided couplings are required to connect the piping 3 The RPS unit factory split at the fan ships as two pieces split at the supply fan bulkhead to recouple toge...
Page 29: ...ions Steps 1 4 RPS Factory Split at Supply Fan Figure 44 Re Assemble Cabinet 1 2 3 4 4 Reinstall top cap saved in step 1 Caulk ends of splice cap See detail Splice cover provided 10 screws provided Nu...
Page 30: ...aceway covers on either side of the unit split 4 Remove the excess harness length from the external raceway on the DX side of the split then route along the raceway through the bushed hole in the fan...
Page 31: ...ting bracket and save for Step 12 7 Install condenser support on air handler unit as shown in Figure 48 Fill unused holes in unit base with bolts saved in Step 6 If unit is post and rail mounted on a...
Page 32: ...move pipes to prevent piping interference during reassembly suction liquid and hot gas bypass lines Step 2 Remove piping cover and discard Reinstall screws to prevent water leakage Step 6 Remove bolt...
Page 33: ...d 9 Figure 50 Caulk and Install Parts Steps 10 14 l o w e r c o n d e n s i n g u n i t u n t i l n e a r l y l e v e l w i t h m a i n u n i t R C S U n i t R F S U n i t C o n d e n s e r S u p p o...
Page 34: ...coil Field piping is required Figure 52 RFS RCS 036 and 040 Refrigerant Piping Connections NOTE RFS units with front discharge do NOT include refrigerant piping to the DX coil Field piping is require...
Page 35: ...2 7 8 7 8 7 8 7 8 7 6 28 0 21 0 6 25 15 0 25 0 23 5 25 0 HG1 HGBP line Ckt 1 7 8 7 8 7 8 7 8 52 0 10 0 60 8 6 25 67 0 6 7 64 6 6 6 HG2 HGBP line Ckt 2 7 8 7 8 7 8 7 8 36 0 16 0 35 5 6 25 32 0 6 7 29...
Page 36: ...line solenoid valve harness is split into two harnesses Install one half in the plug patch panel in the main control box see Figure 54 3 The other half of the harness is located in conduit on the bul...
Page 37: ...exceed more than 25 feet install a small trap at the midpoint and at a maximum of 20 foot intervals Use caution in sizing the liquid line in applications where the evaporator is above the outdoor sect...
Page 38: ...ith halide or electronic leak detector After making any necessary repair the system should be evacuated as described in he following paragraphs Evacuation CAUTION Before replacing refrigerant sensors...
Page 39: ...8 050C 34 33 35 34 2 5 3 0 108 060C 35 34 35 34 2 5 3 0 108 070C 39 39 40 40 2 5 3 0 134 075C 39 39 40 40 2 5 3 0 134 080C 40 41 37 38 4 1 4 7 140 090C 46 47 44 47 4 1 4 7 160 105C 50 51 45 48 4 9 6 5...
Page 40: ...11 53 10 92 0 61 1 38 0 156 0 142 0 232 0 214 7 8 0 336 23 92 22 65 1 26 2 87 0 324 0 294 0 480 0 444 1 1 8 0 573 40 80 38 62 2 14 4 89 0 552 0 501 0 819 0 756 1 3 8 0 872 62 09 58 77 3 26 7 44 0 840...
Page 41: ...r reconnect the refrigerant drum and charging line to the suction side of the system Again purge the connecting line stand the drum with the connection side up and place the service valve in the open...
Page 42: ...the water out of the trap and causing air leakage dimension A should be two times the maximum static pressure encountered in the coil section in inches wc Draining condensate directly onto the roof ma...
Page 43: ...with female threading see Figure 58 Refer to the certified drawings for the recommended piping entrance locations Seal all piping penetrations to prevent air and water leakage NOTE Factory installed w...
Page 44: ...ith manufacturers recommendations Be certain that the required pressure differential will always be available Do not undersize 2 Float and thermostatic or bucket traps are recommended for low pressure...
Page 45: ...section The damper is set so that the crankarm moves through a 90 degree angle to bring the economizer dampers from full open to full close see Figure 61 Access to the actuator and linkage is from the...
Page 46: ...resh air quantities from 0 to 30 of the total system airflow depending on the damper setting This setting is made at the linkage rod on units with manually adjustable linkages On units provided with M...
Page 47: ...r the unit s duct opening Do not support the total weight of the ductwork from the unit or these duct flanges See Figure 64 Units with optional back return side discharge or end discharge on RFS units...
Page 48: ...ure 4 Locate the duct tap in a nonturbulent flow area of the duct Keep it several duct diameters away from take off points bends neckdowns attenuators vanes or other irregularities 5 Use a static pres...
Page 49: ...sor SPS2 5 Locate the reference pressure LO tap on the roof Keep it away from the condenser fans walls or anything else that may cause air turbulence Mount it high enough above the roof so it is not a...
Page 50: ...s are provided with internal power wiring for single or dual point power connection The power block or an optional disconnect switch is located within the main control panel Field power leads are brou...
Page 51: ...e unit to supply the factory mounted service receptacle outlet and optional unit lights This circuit is powered by a field connected 15A 115V power supply Leads are brought into the RFS and RPS units...
Page 52: ...Mate with Power Wiring Wire gauge Qty pole Insulation rating C No of conduits Conduit trade size in For MCA up to amps 10 1 75 1 1 2 35 8 1 75 1 3 4 50 6 1 75 1 1 65 4 1 75 1 1 1 4 85 3 1 75 1 1 1 4 1...
Page 53: ...olt receptacle and lights are made at terminal block TB7 which is also located in the main control panel Refer to Figure 72 and Control Panel on page 10 Two 7 8 knockouts are provided for wire entry F...
Page 54: ...ount Note that the 3 8 hold down bolt securing the fan base to the unit cross channel must be removed Figure 76 After removing the hold down fasteners rock the fan assembly by hand to check for freedo...
Page 55: ...mended and make sure that when adjusting the slotted bolt that the upper rebound plate also turns This action allows the bolt to push the compression plate up or down with the lease friction occuring...
Page 56: ...e fan moves back to a level position and the thrust restraint spring compresses Thrust Restraint Adjustment with Fan OFF 1 Loosen jam nuts A Figure 79 Detail A 2 Turn nut C until spring cup and washer...
Page 57: ...team heat only not shown Smoke detectors SD1 and SD2 line 237 The time clock S7 switch and emergency shutdown terminals lines 217 222 control fan operation NOTE Unit ships with factory installed jumpe...
Page 58: ...lines 836 848 853 and motor protectors MP1 2 3 and 4 lines 836 848 854 This same 115 V ac source also goes through System switch S1 line 203 Figure 88 on page 72 The optional phase voltage monitors P...
Page 59: ...p the unit for general operation These include such things are control mode occupancy mode and heating and cooling setpoints Extended Menus include more advanced items for tuning unit operation such a...
Page 60: ...f the Back button is repeated pressed the display continues to revert one page back along the current navigation path until the main menu is reached When the Menu Home Button is pressed the display re...
Page 61: ...Menu Structure www DaikinApplied com 61 IM 926 3 ROOFPAK APPLIED SYSTEMS Menu Structure Figure 83 Keypad Accessible Menu Structure...
Page 62: ...IM 926 3 ROOFPAK APPLIED SYSTEMS 62 www DaikinApplied com Menu Structure Figure 83 continued Keypad Accessible Menu Structure...
Page 63: ...n flow right hand sensor Return section DHL Duct hi limit Main control box DS1 Disconnect total unit or cond heat Main control box DS2 Disconnect SAF RAF controls Main control box DS3 Disconnect elect...
Page 64: ...tr bypass sup fan Inverter bypass box MMP40 Manual motor protector invrtr bypass ret fan Inverter bypass box MMP51 52 53 Manual motor protector exhaust fan s Prop exhaust box ID Description Standard l...
Page 65: ...ntrol output 115 24 V ac Main control box T4 Transformer exh damper actuator 115 12 V dc Main control box T5 Transformer electric heat Electric heat box T6 Transformer dew point controller 115 24 V ac...
Page 66: ...IM 926 3 ROOFPAK APPLIED SYSTEMS 66 www DaikinApplied com Wiring Diagrams Figure 84 VAV Fan Power With SAF and RAF VFDs and Unit Powered Outlet Light Circuit...
Page 67: ...Wiring Diagrams www DaikinApplied com 67 IM 926 3 ROOFPAK APPLIED SYSTEMS Figure 84 continued VAV Fan Power With SAF and RAF VFDs and Unit Powered Outlet Light Circuit...
Page 68: ...1 CUSTOMER SUPPLIED POWER 106 107 108 109 110 111 112 113 133 134 135 136 137 138 139 140 141 426 109 426 MTR T3 T2 T1 T3B T3A T2B T2A T1B T1A L3B L3A L2B L2A L1B L1A T3 T2 L3 L2 1 L 1 T G T3 T2 T1 L...
Page 69: ...147 148 149 150 151 152 161 162 163 164 165 166 167 168 169 170 109 431 109 426 MTR 2 1 2 1 2 1 X3 2 X 1 X H4 H3 H2 H1 1 2 3 4 5 6 7 8 GRD L3 1 L2 1 L1 1 T3 T2 T1 T3 T2 L3 L2 1 L 1 T T3B T3A T2B T2A...
Page 70: ...IM 926 3 ROOFPAK APPLIED SYSTEMS 70 www DaikinApplied com Wiring Diagrams Figure 86 RPS 75 Condensing Unit Power With SpeedTrol and Scroll Compressors...
Page 71: ...Wiring Diagrams www DaikinApplied com 71 IM 926 3 ROOFPAK APPLIED SYSTEMS Figure 87 VFD Control SAF and RAF...
Page 72: ...IM 926 3 ROOFPAK APPLIED SYSTEMS 72 www DaikinApplied com Wiring Diagrams Figure 88 VAV Control Inputs...
Page 73: ...Wiring Diagrams www DaikinApplied com 73 IM 926 3 ROOFPAK APPLIED SYSTEMS Figure 88 continued VAV Control Inputs...
Page 74: ...19 3 TB 3_174 10 PL 19 2 5 9 1 3 5 13 14 PL19 4 NB R2 4 T1_N 16 8 PL19_5 13 14 S1 _1 201 M29 2 4 M29 1 3 GV4A GV4B GV1A 8 9 BM 4 6 SIG_ 2 427 PL 18 6 T1 N 168 LP5 R W HP5 R B optional T3 T2 CO M NO FA...
Page 75: ...e of Operation When the 120V power is furnished through the System ON OFF Switch S1 through the Burner ON OFF Switch S3 and through the High Limit Control FLC Terminal 6 on the Flame Safeguard FSG is...
Page 76: ...IM 926 3 ROOFPAK APPLIED SYSTEMS 76 www DaikinApplied com Wiring Diagrams Figure 90 Electric Heat Control...
Page 77: ...Wiring Diagrams www DaikinApplied com 77 IM 926 3 ROOFPAK APPLIED SYSTEMS Figure 90 continued Electric Heat Control...
Page 78: ...IM 926 3 ROOFPAK APPLIED SYSTEMS 78 www DaikinApplied com Wiring Diagrams Figure 91 RPS 60 Condensing Unit Control with Scroll Compressors...
Page 79: ...Wiring Diagrams www DaikinApplied com 79 IM 926 3 ROOFPAK APPLIED SYSTEMS Figure 91 continued RPS 60 Condensing Unit Control with Scroll Compressors...
Page 80: ...C 426B 426A 431A TB2 42 TB2 45 2 R68 10 2 R67 10 R68 3 404 1 R67 3 401 1 M20 A2 A1 M10 A2 A1 jprs 24V SRC MCB 2 2NO BO2 RETURN FAN 207 jprs 24V SRC MCB 1 1NO BO1 SUPPLY FAN 207 6 1 9 C R S MCB 207 11...
Page 81: ...ceptacle Power Field Power 1003B 1003A 1004B 1005B 1005A N TB7 G TB7 H TB7 REC1 CP SL GRD SL CP PL32 1 S11 PL31 1 S10 G1004 2 PL32 G1012 N G REC11 H 31 LT11 BLK WHT w 2 PL31 G1009 N G REC10 H 30 LT10...
Page 82: ...ch III controller Differential Enthalpy Control OAE RAE An optional electric differential enthalpy control arrangement OAE RAE is available on units with MicroTech III control In this configuration a...
Page 83: ...ied limits Hot Gas Bypass CAUTION Do not touch gas liner during valve checkout The hot gas line can become hot enough in a short time to cause personal injury Hot gas bypass is a system for maintainin...
Page 84: ...rk can be coordinated with the units operation through the unit controller s binary input D14 This input in wired to TB2 and the supply air smoke detector can be wired between terminals 103 and 104 an...
Page 85: ...e freezestat detects a freezing condition and closes the MicroTech III controller takes different actions depending on whether the fans are ON or OFF The freezestat is an auto reset type of control ho...
Page 86: ...xternal Time Clock or Tenant Override There are several methods of switching the rooftop unit between occupied and unoccupied operation It can be done by the controller internal schedule a network sch...
Page 87: ...l Output 10 MCB DO10 may be selected as either the Fan Operation output or the VAV output via the keypad The VAV Fan Op selection can be selected by accessing the Unit Setup menu in the Extended Menu...
Page 88: ...pleted without use of the MicroTech III controls 2 Unlock and open the louvered outdoor air intake door on the side of the unit see Figure 101 3 The swinging vane on the measurement station is locked...
Page 89: ...o thumbscrews rest on the top edge of the fulcrum b Its top thumbscrew rests against the vertical alignment mark on the vane NOTE The alignment mark is located 0 50 inch in from the bend on the outer...
Page 90: ...tdoor air dampers away from the back end of the unit Do this by turning the long adjuster nut to increase the L dimension in Figure 106 If the LH Lvl Pos or RH Lvl Pos value obtained in step 15 above...
Page 91: ...inApplied com 91 IM 926 3 ROOFPAK APPLIED SYSTEMS Figure 104 DesignFlow Frame Figure 105 Remove Covers From Access Opening Figure 106 Leveling Adjustment Top lock nuts Vane Bottom lock nut Pivot point...
Page 92: ...at the factory for the specified fan RPM Fan speed can be increased by closing or decreased by opening the adjustable pulley Two or three groove variable pitch pulleys must be adjusted an equal number...
Page 93: ...haust fans do not have to always run while the supply fan is on as does a return fan They are turned on and off through output MCB B02 on the Main Control Board For detailed information on Propeller E...
Page 94: ...earings Under no circumstances should motors or bearings be sprayed with steam or water Ultraviolet Lights Option WARNING UVC exposure is harmful to the skin and eyes Looking at an illuminated bulb ca...
Page 95: ...lowing is required 1 Connect a separate field supplied 115 V power wiring circuit to the 115V field terminal block TB7 located in the main control box 2 Select the factory powered outlet option at tim...
Page 96: ...izing the control panel see page 115 for instructions Disconnect all electric power to the unit when servicing control panel components located behind the protective deadfront panels Always inspect un...
Page 97: ...el and the LEDs on MCB1 should follow the normal startup sequence Fan Start Up 1 Verify all duct isolation dampers are open Unit mounted isolation dampers may be mounted in the supply or return sectio...
Page 98: ...mper MinOA Pos Change this entry to another value Verify that the dampers move to the new minimum position setpoint 5 If the unit is equipped with the electromechanical enthalpy changeover control Hon...
Page 99: ...t 2 is disabled and the MT III board starts its 5 minute timing cycle Note that if the unit has an economizer and the outdoor air enthalpy is low the economizer must fully open before the controller w...
Page 100: ...roximately the same for all valves in the circuit NOTE If low oil level is accompanied by heavy foaming visible in the oil sightglass it is possible that excess liquid refrigerant is returning to the...
Page 101: ...ctuator should open the valve to the coil The three way hot water valve is open to the coil when the valve stem is down If the unit loses power the spring in the actuator should drive the valve wide o...
Page 102: ...115 2 Place belt tension checker squarely on one belt at the center of the belt span Apply force to the checker perpendicular to the belt span until the belt deflection equals belt span distance divi...
Page 103: ...ts a small amount to provide a grip for removing 3 Adjust the sheave pitch diameter for the desired fan speed by opening the moving parts by half or full turns from closed position Do not open more th...
Page 104: ...A securely Adjusting 1 Slack off all belt tension by moving the motor toward the driven shaft until the belts are free from the grooves For easiest adjustment remove the belts 2 Loosen setscrews D 3...
Page 105: ...uter ring 1 2 to 3 4 turn until the inner and outer ring screw holes line up Reinsert locking screws A but do not tighten them until after adjustment is made 3 Adjust the sheave to the desired pitch d...
Page 106: ...ay need to be kept at the default of no schedule a Schedules Daily Schedule b Schedules Holiday Schedule 16 Temporarily disconnect static pressure sensor tubing from sensors SPS1 and SPS2 if installed...
Page 107: ...s by a qualified service technician The required frequency of inspections depends upon the total operating time and the indoor and outdoor environmental conditions Routine maintenance should cover the...
Page 108: ...y that no moisture or debris is accumulating in the unit Cooling Circuits The steps below are necessary only if the unit has been started 1 Provide that each circuit is properly pumped down 2 Pull the...
Page 109: ...For safety stop rotating equipment and lockout tagout the disconnects Add one half of the recommended amount shown in Table 25 Start bearing and run for a few minutes Stop bearing and add the second...
Page 110: ...for Fan Shaft Ball Bearings Name Temperature Base Thickener NLGI grade Texaco Premium RB 30 to 350 F 34 to 177 C Parafinic mineral oil Lithium 2 Mobile AW2 40 to 437 F 40 to 175 C Mineral oil Lithium...
Page 111: ...ws Setscrews are used to lock bearings sheaves locking collars and fan wheels to their shafts They must be checked periodically to see that they have not loosened If this is not done severe equipment...
Page 112: ...e setscrews over the keyway first tighten those at 90 degrees to the keyway last 4 Verify that the radial clearance around the fan is uniform Radial clearance can be adjusted by slightly loosening the...
Page 113: ...witches disable their associated compressors on a rise to 425 psig discharge pressure b The switches have a differential of 100 psig The low pressure and SpeedTrol sensors switches sense refrigerant p...
Page 114: ...and insert a lockout pin Ambient compensated 20 C to 40 C Single phase sensitivity if one phase exceeds setpoint all three phases open Trip test insert a 9 64 screw driver in the test slot to simulate...
Page 115: ...switch is in the power ON position a Obtain a small standard head screwdriver b Insert the head of the screwdriver into the slotted release located on the right hand side of the disconnect faceplate F...
Page 116: ...and phase sensing circuit constantly monitors the three phase voltages to detect harmful power line conditions When a harmful condition is detected its output relay is deactivated after a specified tr...
Page 117: ...second sensor SPS2 is not installed or the pressure tubing to it is not connected make sure the 2nd DSP Sensor parameter in the Unit Configuration menu of the keypad display is set to No so that the c...
Page 118: ...urn Air Temperature Sensor 50 ft cable length field cut to length 060004705 SPS1 Static Pressure Sensor Duct No 1 049545007 SPS2 Static Pressure Sensor Duct No 2 049545007 Static Pressure Sensor Build...
Page 119: ...om the following two sources Daikin Service Parts maintains a stock of replacement compressors Copeland Refrigeration has stocking wholesalers throughout the U S who maintain a limited stock of replac...
Page 120: ...turn Goods Tag has instructions on where to send the compressor If the compressor is not returned you will be billed for the replacement compressor 5 Consideration may be given at this time to a compr...
Page 121: ...iod determination and this warranty shall expire twelve 12 months from that date Exceptions 1 If free warranty labor is available as set forth above such free labor does not include diagnostic visits...
Page 122: ...________ State _________________________________ Name of person doing start up ____________________________________________________________________________________ Company name _______________________...
Page 123: ...kcase heaters operating and have they been operating 24 hours prior to start up Yes No N A J Are all electrical power connections tight Check compressorelectrical box Yes No N A K Is the condensate dr...
Page 124: ...5 Phase 1________ Phase 2 ________ Phase 3 _______ Compressor 6 Phase 1________ Phase 2 ________ Phase 3 _______ C Low pressure cut out Circuit 1 __________ psig Circuit 2 __________ psig D Low pressu...
Page 125: ...mp draw across each phase at each heating stage Stage 1 Stage 2 Stage 3 Stage 4 Stage 5 Stage 6 Phase L1 ___________ ____________ ____________ ___________ ___________ ____________ Phase L2 ___________...
Page 126: ...___ in Wc 75 ______ in Wc 100 ______ in Wc 100 ______ in Wc VII Hot Water Coil A Pressure test OK Yes No N A VIII Heat Recovery A Heat wheel rotates freely Yes No N A B Heat wheel VFD operates properl...
Page 127: ...oubleshooting of the system operation and facilitates restoration after a controller replacement Thank you for completing this form Please sign and date below Signature _______________________________...
Page 128: ...________________________________________________________ 2 How would you rate the overall appearance of the product i e paint fin damage etc Excellent Good Fair Poor 3 Did all sections of the unit fit...
Page 129: ......
Page 130: ...nt to its standard terms and conditions of sale including Limited Product Warranty Consult your local Daikin Applied representative for warranty details To find your local Daikin Applied representativ...