background image

4 User interface

Operation manual

10

EZESHP20 EZLSHP20AUAW1B

Exigo E1500 Trailer Refrigeration Unit

4P726855-1 – 2023.03

Function of the HMI buttons

The physical buttons of the display are divided in two sections:

▪ Commands:  All  the  buttons  on  the  right  side  are  reserved  for

basic  commands  of  the  unit.  The  functionality  of  these  buttons
never changes, no matter which page is displayed.

▪ Navigation: All the left side buttons are reserved for navigation

commands.  The  functionality  of  these  buttons  can  change
depending on the active page.

▪ Homepage (n):

Whatever page the HMI is showing, pushing the homepage button
(n) makes the HOME page appear.

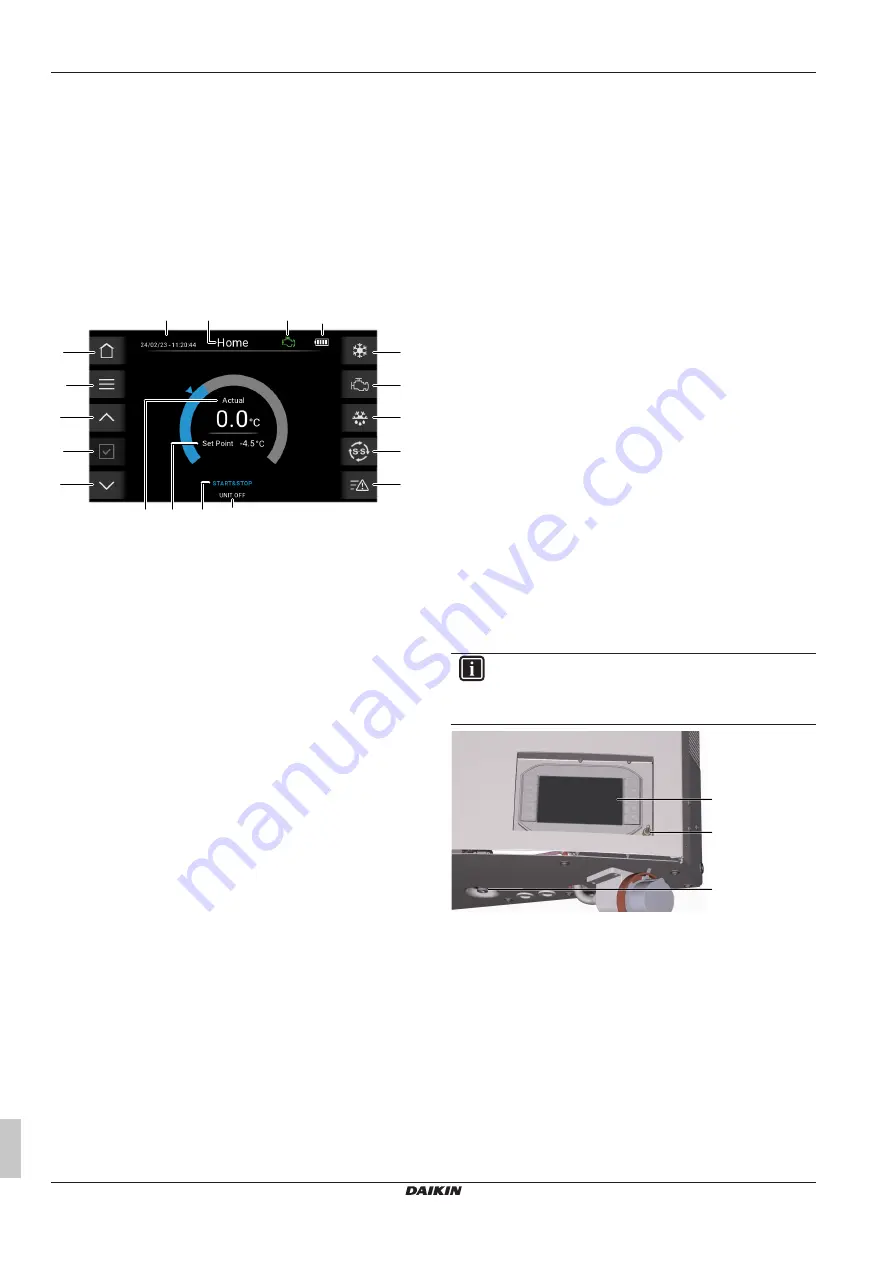
All the main information is on the HOME page of the HMI:

i

n

m

l

k

j

c

d

e

f

g

b

a

o

p

q

r

s

On the home page you can see:

▪ Date and time (a).

▪ Page name (b).

▪ Engine condition (o).

▪ Battery condition (p).

▪ Thermoregulation status (c).

▪ Road or grid mode status (d).

▪ Manual defrost status (e).

▪ Start & stop or continuous mode activated (f).

▪ Alarms menu status (g).

▪ Unit status (e.g. UNIT OFF) (i).

▪ Start & stop or continuous mode status (q).

▪ Set point value (e.g. –4.5°C) (r).

▪ Actual temperature inside the cold room (e.g. 0.0°C) (s).

On the home page you can control:

▪ The set point; using the "Up" or "Down" buttons to set, and the

"Enter" button to confirm.

▪ The  status  of  the  thermoregulation  (c),  the  road  or  grid  mode

(d),  the  manual  defrost  (e)  and  the  start  &  stop  or  continuous
mode (f).

▪ Active alarms (g).

▪ Menu (m):

Pushing  the  Menu  button  (n)  makes  the  menu  page  appear.  To
enter the page, see 

"4.2.7 To go through the menu"

 [

4

 14].

▪ Up arrow (l):

This Push button allows to navigate in the upward direction.

▪ Enter (k):

This Push button allows to select the desired value.

▪ Down arrow (j):

This Push button allows to navigate in the downward direction.

▪ Thermoregulation ON/OFF (c):

This  Push  button  allows  to  change  the  thermoregulation  status
from  ON  →  OFF  and  OFF  →  ON,  see 

"4.2.4  To  change  an

operation mode from ON to OFF"

 [

4

 13].

▪ Road/grid mode selection (d):

This Push button allows to select the desired mode; road or grid.
See 

"4.2.6 To select a working mode"

 [

4

 13].

When  pressed  for  a  long  time,  the  automatic  road  mode  start-up
function  is  disabled,  see 

"4.2.3  To  disable  automatic  road  mode

start-up"

 [

4

 13].

▪ Manual defrost (e):

This Push button allows to activate the defrost operation manually,
see 

"4.2.13 To manually start the defrost mode"

 [

4

 16].

▪ Start & stop/continuous (f):

This  Push  button  allows  to  change  the  thermoregulation
management,  see 

"4.2.14  To  change  the  start  &  stop/continuous

mode selection"

 [

4

 17].

▪ Alarms menu (g):

This  Push  button  allows  users  to  see  if  there  are  any  active
alarms, see 

"4.3 About the Alarms"

 [

4

 17].

4.2

Basic functions

4.2.1

To update the HMI and PCB software

There are two ways of updating:

▪ From a USB drive

▪ From telematics

The  first  way  requires  the  operator  to  be  physically  in  contact  with
the  Exigo  1500  to  insert  the  USB  drive  in  the  USB  Serial  Port  (a)
situated below the HMI (b).

INFORMATION

Only  USB  2.0  flash  drives  (single  partition,  formatted  as
FAT32)  are  compatible  with  the  USB  Host  port.  Do  not
connect other USB devices. Max 100 mA.

a

b

c

a

HMI

b

ON/OFF switch

c

USB Serial Port

The second way allows remote updating using the interface platform
with the telematics device of the unit.

The procedure for updating itself is the same for both ways.

To update the HMI software:

1

Go  to  Daikin  Business  Portal  and  download  the  update  HMI
software  in  a  .zip  format  named  “UpdatePackage.zip”  onto  a
USB drive.

2

Turn the unit ON with the ON/OFF switch.

3

Insert  the  USB  drive  with  the  update  files  for  the  HMI  or  the
PCB software into the USB Serial Port of the HMI.

Summary of Contents for Exigo E1500

Page 1: ...Operation manual Exigo E1500 Trailer Refrigeration Unit English Operation manual Exigo E1500 Trailer Refrigeration Unit EZESHP20AUAW1B EZLSHP20AUAW1B ...

Page 2: ...ou for purchasing this product Please Read the documentation carefully before operating the user interface to ensure the best possible performance Keep the documentation for future reference Always keep this document together with the unit After use always store it in the storage compartment Target audience End users INFORMATION This appliance is intended to be used by expert or trained users Docu...

Page 3: ...ot start unexpectedly by disconnecting the battery DANGER RISK OF BURNING SCALDING Allow the PM generator the engine the engine exhaust the engine cooling system the evaporator defrost heaters and the water discharge heater to cool down before touching any of these parts WARNING Improper installation or attachment of equipment or accessories could result in electrical shock short circuit leaks fir...

Page 4: ...ocked Only qualified authorized and trained persons have access to the service compartment WARNING The unit has several cutting parts and sharp edges Use adequate personal protective equipment when working on or near these parts CAUTION Working on or around the unit raises multiple risks Use adequate personal protective equipment as indicated when installing maintaining or servicing the system INF...

Page 5: ...side the cold room Risk of frostbite Risk of freezing to death DANGER Always use a safety harness when working at height CAUTION The top panel of the unit is fragile Do not lean sit or stand on it Do not place any objects or equipment on it CAUTION Use a door lock system to block the service doors when working inside the service compartment CAUTION Turn on the light before entering the cold room a...

Page 6: ...ring diagram Do NOT touch electrical components with wet hands Do NOT leave the unit unattended when the service cover is removed WARNING Never touch a person receiving an electrical shock or you could suffer one too Do not touch the person until you are sure power is turned off Electrical shocks always need emergency medical attention even if the victim seems to be fine afterwards WARNING After f...

Page 7: ...y for corrosion resistance An inverter driven variable speed compressor with vapor injection and economizer A programmable microcontroller developed by Daikin Electronic Expansion Valves EEV Electrical heaters for heating and defrost operations A high resolution color HMI accessible from the outside to control and command the unit A telematics module with IP67 protected box mounted on the front of...

Page 8: ...oling system This information allows the engine control unit to regulate the cooling appropriately and so prevent overheating The information of the engine coolant temperature sensor can also lead to a shutdown of the engine Low oil pressure switch The oil pressure switch is installed in the oil circuit of the engine It monitors the oil pressure and sends a signal to the controller when the oil pr...

Page 9: ...fuel level in the tank Fuel pre filter heater Heater based on a PTC heating element controlled by bi metallic switch The heating element is designed to create a small channel in the filter head where diesel remains liquid instead of becoming gel at low ambient temperatures Cold chain data logger Temperature recorder that allows continuous temperature monitoring and proof of compliance from origin ...

Page 10: ...n allows to navigate in the downward direction Thermoregulation ON OFF c This Push button allows to change the thermoregulation status from ON OFF and OFF ON see 4 2 4 To change an operation mode from ON to OFF 413 Road grid mode selection d This Push button allows to select the desired mode road or grid See 4 2 6 To select a working mode 413 When pressed for a long time the automatic road mode st...

Page 11: ...ses a high risk of damaging the PCB k j j HMI UPDATE IN PROGRESS PLEASE WAIT k BOARD UPDATE IN PROGRESS PLEASE WAIT 8 Wait for the complete update process to finish Result The UPDATE IN PROGRESS message l appears together with the starting symbol m Result The LAUNCHING EXIGO message n appears together with the status bar o Result The LAUNCHING UPDATER message p appears together with the status bar...

Page 12: ...he icon 2 If you press the STOP button during start up a STOP IN PROGRESS screen pops up UNIT OFF Result Only the HMI switches on the thermoregulation does not start Result The unit goes in stand by mode 3 If you do not press the STOP button during start up the start up continues Result After the end of the countdown the thermoregulation starts c d The icons highlighted in blue indicate the active...

Page 13: ...ic road grid mode icon d Result Automatic road mode start up is OFF To change the automatic road mode start up from OFF to ON o d 2 On any page press short the button o next to the automatic road grid mode icon d Result Automatic road mode start up is ON 4 2 4 To change an operation mode from ON to OFF e g thermoregulation o c 1 In the home page press the button o next to the thermoregulation icon...

Page 14: ...d by password 4 2 8 To view the TRENDS page 1 Push the Menu button m Result The Menu page appears 2 Use the Up l or Down j button to scroll to the TRENDS page 3 Push the Enter button k to select the page v u Result The Trends page appears showing a graphic comparing the Acual temperature u against the Set Point temperature v over a Time period INFORMATION Sampling time is 1 second 4 Push the Menu ...

Page 15: ...ton m Result The Menu page appears 2 Use the Up l or Down j button to scroll to the BACKUP DATA page 3 Push the Enter button k to select the page Result If no USB drive is connected the Please connect an USB drive pop up screen appears Result If a USB drive is connected the Export data page appears m l k j t s INFORMATION Only USB 2 0 flash drives single partition formatted as FAT32 are compatible...

Page 16: ...he next number in line 6 Push the Enter button k to confirm the password Result If the password is correct you can continue on the PARAMETERS page Result If the password is not correct the Access denied screen appears 4 2 13 To manually start the defrost mode e 1 Push the Manual defrost button e Result The Manual defrost icon is now blue e Result The unit status i turns to Defrost It is possible t...

Page 17: ...ntil it is necessary to restart A number of conditions must be met in order for the unit to start and stop Battery voltage Coolant temperature Box temperature On off timers Conditions to stop the engine are The voltage must be above a certain parameter for a certain time The coolant temperature has reached a minimum of 50 C The differential temperature is less than the specified value for both fro...

Page 18: ...l pump carries the fuel from the tank to the unit In exceptional circumstances e g if the fuel tank suction pipe is empty after running out of fuel the hand pump a on the fuel pre filter can be used to get the fuel faster to the fuel pump and the unit a 6 Operation 6 1 Operation range Use the system in the following temperature and humidity ranges for safe and effective operation Temperature range...

Page 19: ... as meat and frozen foods close to each other toward the center of the cold room b a b a Pallet b Spacer WARNING Make sure that no people are left in the cold room before you close the doors Risk of suffocation 12 m3 must be left empty inside the cold room Risk of frostbite Risk of freezing to death 6 4 Pre trip inspection PTI INFORMATION This inspection is a function test of all the unit s compon...

Page 20: ...tor the engine the engine exhaust the engine cooling system the evaporator defrost heaters and the water discharge heater to cool down before touching any of these parts DANGER RISK OF BURNING SCALDING Allow the engine the engine exhaust and the engine cooling system to cool down before performing any fluid change WARNING If diesel leaks from the fuel system it evaporates These vapors are irritati...

Page 21: ... mode the melt water flowing out of the evaporator also removes any dirt on its way If due to the operating conditions the automatic defrosting mode is not sufficient to keep the evaporator clean the defrosting mode can be activated manually to clean the evaporator See 4 User interface 49 for how to activate the defrosting mode manually To clean the condenser CAUTION Be careful not to bend the fin...

Page 22: ...unit WARNING Acid fumes and explosive hydrogen may be released during battery charging No open flame or smoking near the battery When the battery is dead or does not provide sufficient voltage it is possible to jumpstart the diesel engine Have the battery changed as soon as possible by a qualified service person b a a Positive battery terminal of the unit b Negative terminal of the unit 1 Remove t...

Page 23: ...ump filter Drain and flush cooling system Replace air filter c Replace fuel filter inside unit Replace fuel pre filter d Tighten engine compressor and unit mounting bolts a Factory used engine coolant Shell coolant Long Life Concentrate RED The coolant should be replaced after a maximum of 4 years or 6000h off operation b Factory used engine oil Shell Helix Ultra ECT C2 C3 0W 30 Change engine oil ...

Page 24: ... cold air leaking out of the cold room Stop the air from leaking outside Check if you did not set the temperature too high Set the setpoint appropriately see 4 2 5 To set the Set Point 413 Check if there are no high temperature articles stored in the cold room Always store articles after they have cooled down Check if the door is not opened too long Reduce the opening time of the door The user int...

Page 25: ...master has not detected any slaves on the CAN bus D42 Yellow A parallel charging slave has stopped communicating with the master Display code Color Description D43 Yellow A parallel charging master has been disconnected from the load_The slaves are still connected D44 Yellow A parallel charging slave has been disconnected from the load_The master is still connected D45 Yellow A parallel charging s...

Page 26: ...ated F065 Red Motor startup fail F066 Red Motor position loss F067 Red Emergency stop F068 Red Heatsink overheated Software related F069 Red Discharge temperature overheated Software related F070 Red Overcurrent at steady state Hardware related F071 Red Compression ratio alarm F072 Red Heaters alarm F073 Red HPS activation F074 Red High Power consumption F075 Red Engine OFF or in stall Display cod...

Page 27: ...rates the product Applicable legislation All international European national and local directives laws regulations and or codes that are relevant and applicable for a certain product or domain Service company Qualified company which can perform or coordinate the required service to the product Installation manual Instruction manual specified for a certain product or application explaining how to i...

Page 28: ...4P726855 1 2023 03 Copyright 2023 Daikin 4P726855 1 0000000V Verantwortung für Energie und Umwelt ...

Reviews: