


D-EIMWC01206-15EN - 13/20
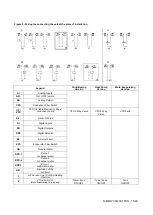
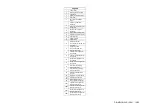
Table 1 - Periodic maintenance programme
List of Activities
Weekly
Monthly
(Note 1)
Annually /
Seasonally
(Note 2)
General:
Reading of operating data (Note 3)
X
Visual inspection of machine for any damage and/or loosening
X
Verification of thermal insulation integrity
X
Clean and paint where necessary (Note 4)
X
Analysis of water
X
Check of flow switch operation
X
Electrical:
Verification of start-up sequence
X
Verify the wear of the contactors
– If necessary replace them
X
Verify the that all the electrical terminals are tight
– Tighten if necessary
X
Clean inside the electrical board (Note 4)
X
Clean the aeration filters of the electrical board (Note 4)
X
Visual inspection of components for any signs of overheating
X
Verify operation of compressor and electrical resistance
X
Measure with the Megger the insulation of the compressor motor
X
Refrigerant Circuit:
Check for any refrigerant leakage
X
Verify using the liquid see-through window, the flow of refrigerant - See-
through window full
X
Check on filter dryer pressure drop (if present)
X
Perform the analysis of the vibrations of the compressor
X
Verify safety valve (Note 5)
X
Heat exchangers:
Verify the cleanliness of the heat exchangers (Note 6)
X
Notes:
1)
The monthly activities include all the weekly ones
2)
The annual activities (or start of season) include all the weekly and monthly activities
3)
The operating values of the machine should be noted daily for a high level of control.
4) If the unit is installed in an aggressive environment, perform this activity monthly.
The following are considered aggressive environments:
- place with high concentration of industrial exhaust gas in the air;
- Place close to the sea (salt air);
- Place close to a desert where there is a risk of sand storms;
- Other aggressive environments.
5) Safety valve
Check that the cap and seal have not been tampered with.
Check that the safety valve discharge connection has not been accidentally clogged
by extraneous objects, rust or ice.
Check the manufacture date located on the safety valve and replace it in conformity with current national laws.
6) Clean the heat exchangers. Particles and fibres could clog the heat exchanger. An increase in the flow of water or a
drop in heat efficiency indicates that the heat exchangers are clogged.
Discharge of the refrigerant from the safety valves
Avoid discharging refrigerant from the safety valves at
the installation site. If necessary, it is possible to
connect them to discharge pipes, the transversal
section and length of which must comply with the
national laws and the European directives.
Important information regarding the refrigerant
used
This product contains fluorinated greenhouse gases.
Do not disperse the refrigerant gas into the atmosphere.
Refrigerant type: R410A
GWP value: 2087.5
(1)GWP = Global Warming
Potential
The refrigerant quantity necessary for standard
operation is indicated on the unit name plate.
The actual quantity of refrigerant charged in the unit is
listed on a silver plate inside the electrical panel.
Based on the provisions of the national or European
legislations, periodic inspections may be
necessary to identify potential leaks of


