background image

5

LIFT OVER APPROXIMATE
CENTER OF UNIT

SPREADER BARS
MUST BE USED WITH
LIFTING STRAPS THAT
ARE LESS THAN 16
FEET LONG

REMOVE 2 BRACKETS
ON EACH END TO
REMOVE
WOODEN STRUTS

REMOVE 2 BRACKETS

ON EACH END TO

REMOVE

SHIPPING BRACE

3. Lift unit per the “Rigging Details” section of this manual,

observing all warnings and cautions.  When unit is lifted,
boards and shipping brace will drop if screws have been
removed.  To avoid injury, STAND CLEAR.

4.  Dispose of the boards and brace appropriately.

Curb installations must comply with local codes and should be done
in accordance with the established guidelines of the National Roof-
ing Contractors Association.

Proper unit installation requires that the roof curb be firmly and
permanently attached to the roof structure.  Check for adequate
fastening method prior to setting the unit on the curb.

Full perimeter roof curbs are available from the factory and are
shipped unassembled. Field assembly, squaring, leveling and
mounting on the roof structure are the responsibility of the in-
stalling contractor.   All required hardware necessary for the as-
sembly of the sheet metal curb is included in the curb accessory.

T

O


PREVENT


POSSIBLE


EQUIPMENT


DAMAGE

PROPERTY


DAMAGE

PERSONAL


INJURY


OR


DEATH

THE


FOLLOWING


BULLET


POINTS


MUST


BE


OBSERVED


WHEN


INSTALLING


THE


UNIT

.

WARNING

Sufficient structural support must be determined prior to
locating and mounting the curb and package unit.

Ductwork must be constructed using industry guidelines.
The duct work must be placed into the roof curb before
mounting the package unit. Our full perimeter curbs
include duct connection frames to be assembled with the
curb.  Cantilevered type curbs are not available from the
factory.

Curb insulation, cant strips, flashing and general roofing
material are furnished by the contractor.

The curbs must be supported on parallel sides by roof members.
The roof members must not penetrate supply and return duct
opening areas as damage to the unit might occur.

NOTE:

 The unit and curb accessories are designed to allow vertical

duct installation before unit placement.  Duct installation after unit
placement is not recommended.

A

LL


CURBS


LOOK


SIMILAR

. T

O


AVOID


INCORRECT


CURB


POSITIONING

CHECK


JOB


PLANS


CAREFULLY


AND


VERIFY


MARKINGS


ON


CURB


ASSEMBLY

. I

NSTRUCTIONS


MAY


VARY


IN


CURB


STYLES


AND


SUPERSEDES


INFORMATION


SHOWN

.

CAUTION

See the manual shipped with the roof curb for assembly and in-
stallation instructions.

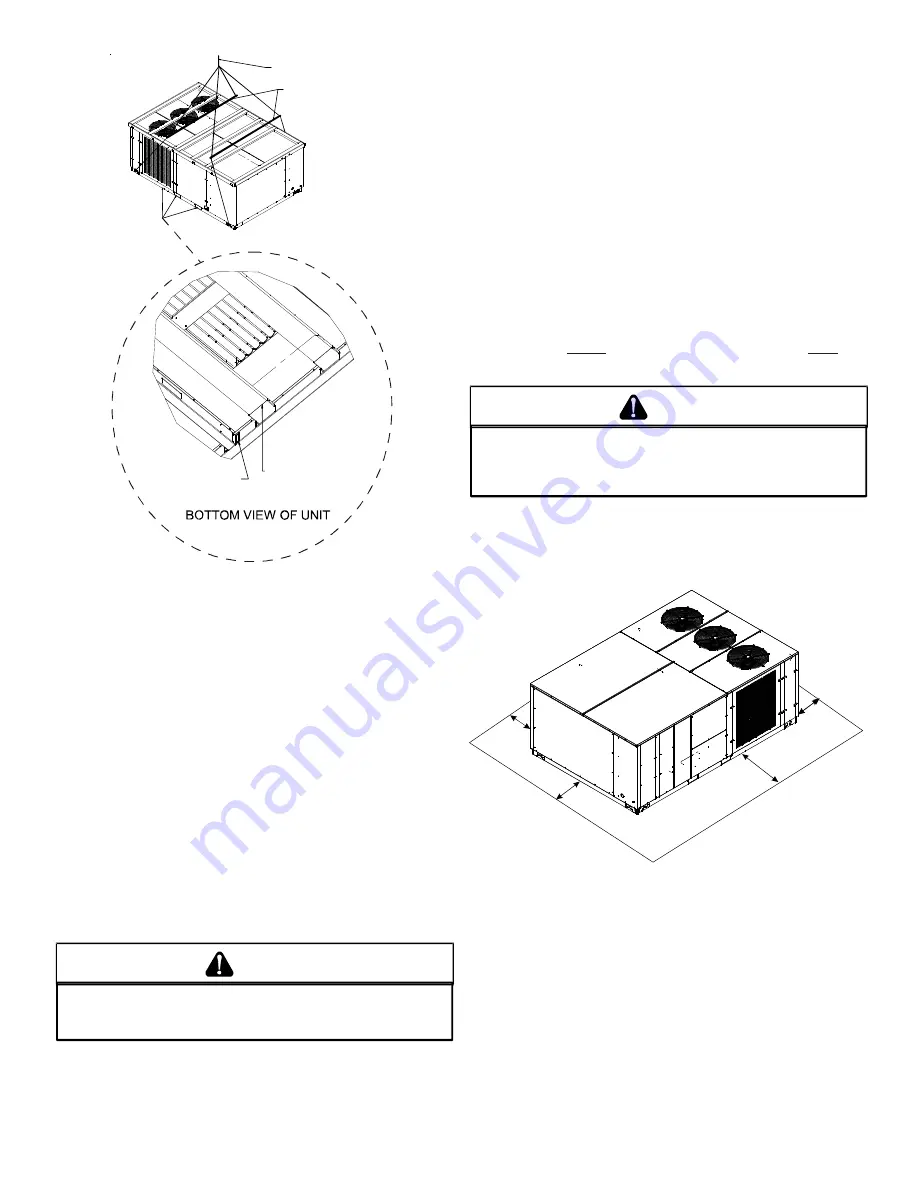
CLEARANCES

36”; minimum
roof overhang

48” Min

.

65”

Min.*

48”

Min.

48”

Min.*

*In situations that have multiple units, a 48” minimum clearance is
required between the condenser coils.

UNIT CLEARANCES

Adequate clearance around the unit should be kept for safety, ser-
vice, maintenance, and proper unit operation.  A total clearance
of 75” around this unit is recommended to facilitate possible blower
assembly, shaft, wheel replacement, coil, heat exchanger, electric
heat and gas furnace removal. This unit must not be installed be-
neath any obstruction. This unit should be installed remote from
all building exhausts to inhibit ingestion of exhaust air into the
unit’s fresh air intake.

Summary of Contents for DCC180 Series

Page 1: ...s manual Our continuing commitment to quality products may mean a change in specifications without notice DCC SERIES LIGHT COMMERCIAL PACKAGED HEATING AND COOLING UNIT 15 to 25 TON Index Replacement Parts 2 Safety Instructions 2 General Information 2 Unit Location 3 Clearances 5 Roof Curb Post Installation Checks 6 Roof Top Duct Connections 6 Rigging Details 6 Electrical Wiring 7 Circulating Air a...

Page 2: ...R OTHER FLAMMABLE LIQUIDS OR VAPORS IN THE VICINITY OF THIS APPLIANCE WARNING ONLY PERSONNEL THAT HAVE BEEN TRAINED TO INSTALL ADJUST SERVICE OR REPAIR HEREINAFTER SERVICE THE EQUIPMENT SPECIFIED IN THIS MANUAL SHOULD SERVICE THE EQUIPMENT THE MANUFACTURER WILL NOT BE RESPONSIBLE FOR ANY INJURY OR PROPERTY DAMAGE ARISING FROM IMPROPER SERVICE OR SERVICE PROCEDURES IF YOU SERVICE THIS UNIT YOU ASSU...

Page 3: ...er should 1 Make notation on delivery receipt of any visible damage to shipment or container 2 Notify carrier promptly and request an inspection 3 In case of concealed damage carrier should be notified as soon as possible preferably within 5 days 4 File the claim with the following supporting documents a Original Bill of Lading certified copy or indemnity bond b Original paid freight bill or indem...

Page 4: ... safe flat surface for service personnel should be provided As indicated on the unit s data plate a minimum clearance of36 toanycombustiblematerialisrequiredontheaccess side of the unit All combustible materials must be kept out of this area This 36 clearance must also be maintained to insure proper combustion air flow The combustion air intake must not be blocked for any reason including blockage...

Page 5: ...cted using industry guidelines The duct work must be placed into the roof curb before mounting the package unit Our full perimeter curbs include duct connection frames to be assembled with the curb Cantilevered type curbs are not available from the factory Curb insulation cant strips flashing and general roofing material are furnished by the contractor The curbs must be supported on parallel sides...

Page 6: ...SSIBLE EQUIPMENT DAMAGE PROPERTY DAMAGE PERSONAL INJURY OR DEATH THE FOLLOWING BULLET POINTS MUST BE OBSERVED WHEN INSTALLING THE UNIT Unit must be lifted by the four lifting holes located at the base frame corners Lifting cables should be attached to the unit with shackles The distance between the crane hook and the top of the unit must not be less than 60 Two spreader bars must span over the uni...

Page 7: ...cables and other rigging equipment ELECTRICAL WIRING HIGH VOLTAGE DISCONNECT ALL POWER BEFORE SERVICING OR INSTALLING THIS UNIT MULTIPLE POWER SOURCES MAY BE PRESENT FAILURE TO DO SO MAY CAUSE PROPERTY DAMAGE PERSONAL INJURY OR DEATH WARNING HIGH VOLTAGE TO AVOID PERSONAL INJURY OR DEATH DUE TO ELECTRICAL SHOCK DO NOT TAMPER WITH FACTORY WIRING THE INTERNAL POWER AND CONTROL WIRING OF THESE UNITS ...

Page 8: ...at the point of distribution in accordance with the unit s data plate The unit must be electrically grounded in accordance with local codes or in the absence of local codes with the latest edition of the National Electrical Code ANSI NFPA 70 A ground lug is provided for this purpose Size grounding conductor in accordance with Table 250 95 of the National Electrical Code Do not use the ground lug f...

Page 9: ...ions packaged with the thermostat 3 Use 18 AWG wire for 24V control wiring runs not exceeding 75 feet Use 16 AWG wire for 24V control wiring runs not exceeding 125 feet Use 14 AWG wire for 24V control wiring runs not exceeding 200 feet Low voltage wiring may be National Electrical Code NEC Class 2 where permitted by local codes 4 Route thermostat wires from sub base terminals to the unit Control w...

Page 10: ...recheck for wiring errors or obstructions in or near the blower motors Duct covers must be removed before operating unit The Startup Adjustments and Checks procedure provides a step by step sequence which if followed will assure the proper startup of the equipment in the minimum amount of time Air balancing of duct system is not considered part of this procedure However it is an important phase of...

Page 11: ... must not exceed the service factor stamped on the motor nameplate The total airflow must not be less than that required for operation of the electric heaters or the furnace If an economizer is installed check the unit operating balance with the economizer at full outside air and at minimum outside air Upon completion of the air flow balancing we recommend replacing the variable pitched motor shea...

Page 12: ...g drive Recheck set screws and belt tension after 24 hours service NOTE Future adjustments should be made by loosening the belt tension and increasing or decreasing the pitch diameter of the sheave by half or full turns as required Readjust belt tension before starting drive C B VL VM NOTE Do not operate sheave with flange projecting beyond the hub end REFRIGERATION SYSTEM The unit is equipped wit...

Page 13: ...mperature drops too low For 25 ton models The 25 ton units are equipped with a control that shuts off one condenser fan when the outdoor temperature is 44 F or below This is to assist low ambient cooling down to 24 An optional Low Ambient kit LAKT05 is required below 24 which will enable reliable cooling to occur to a minimum ambient temperature of zero F It is recommended that all single speed mo...

Page 14: ...AIR FILTER INSTALLED IN THE RETURN AIR SYSTEM Every application may require a different frequency of replace ment of dirty filters Filters must be replaced at least every three 3 months during operating seasons Dirty filters are the most common cause of inadequate heating or cooling performance Filter inspection should be made at least every two months more often if necessary because of local cond...

Page 15: ... 9570 4 08 9197 3 82 8702 3 51 0 6 9038 3 82 8460 3 46 7949 3 14 0 8 8171 2 93 7630 3 70 7068 2 79 1 0 7901 2 85 7203 3 42 1 2 7344 4 35 DCC240 STANDARD BELT DRIVE includes 2 speed models at high speed ESP In H2O TURNS OPEN 0 1 2 3 4 5 6 DCC180 STANDARD BELT DRIVE includes 2 speed models at high speed ESP In H2O TURNS OPEN 0 1 2 3 4 5 6 CFM BHP CFM BHP CFM BHP CFM BHP CFM BHP CFM BHP CFM BHP 0 2 1...

Page 16: ...BHP CFM BHP CFM BHP CFM BHP CFM BHP 1 0 9090 5 79 8297 5 06 7479 3 62 1 2 8774 5 60 7914 4 83 6989 4 07 1 4 8471 5 43 7549 4 63 1 6 8209 6 14 7194 4 45 1 8 7967 6 02 6883 5 01 2 0 6594 4 87 DCC240 HIGH STATIC BELT DRIVE ESP In H2O TURNS OPEN 0 1 2 3 4 5 6 DCC180 HIGH STATIC BELT DRIVE ESP In H2O TURNS OPEN 0 1 2 3 4 5 6 CFM BHP CFM BHP CFM BHP CFM BHP CFM BHP CFM BHP CFM BHP 0 6 11409 7 12 0 8 103...

Page 17: ...URE DROP SCFM 4500 5000 5500 6000 6500 7000 7500 8000 8500 9000 9500 10000 In WG 0 15 0 18 0 22 0 27 0 32 0 37 0 42 0 48 0 55 0 61 0 69 0 76 Airflow Pressure Drop of Downflow Economizer for 15 to 25 Ton Rooftop Units 100 Return Air ...

Page 18: ... 3 3 37 6 45 EHK4 31 34 6 3 3 52 8 60 EHK4 46 52 0 3 3 74 5 80 EHK4 60 69 3 3 3 78 8 90 26 4 35 EHK7 31 28 9 41 4 45 EHK7 46 43 4 59 5 60 EHK7 60 57 8 63 1 70 2 6 29 0 35 EHK7 31 28 9 2 6 44 6 45 EHK7 46 43 4 2 6 62 8 70 EHK7 60 57 8 2 6 66 3 70 57 6 Standard Belt Drive 3 00 4 20 28 8 43 2 57 6 28 8 43 2 57 6 DCC180XXX7B 575 3 60 9 0 78 0 9 0 78 0 3 0 33 0 67 Standard Belt Drive High Speed 3 00 4 ...

Page 19: ...3 5 50 EHK4 31 34 6 51 5 60 EHK4 46 52 0 73 3 80 EHK4 60 69 3 77 6 90 EHK4 75 86 6 94 9 110 3 3 46 8 60 EHK4 31 34 6 3 3 55 6 60 EHK4 46 52 0 3 3 77 4 80 EHK4 60 69 3 3 3 81 7 90 EHK4 75 86 6 3 3 99 0 110 28 8 43 2 57 6 72 0 28 8 43 2 57 6 72 0 1 0 33 0 85 Standard Belt Drive 5 00 6 60 28 8 43 2 57 6 72 0 DCC240XXX4V 460 3 60 16 0 140 0 16 0 140 0 28 8 43 2 57 6 72 0 1 0 33 0 85 High Static Belt D...

Page 20: ... 5 185 173 200 175 EHK3 75 54 1 72 0 150 173 7 2 6 5 185 207 200 225 53 1 70 EHK4 31 34 6 55 0 70 EHK4 46 52 0 76 8 80 EHK4 60 69 3 81 1 90 EHK4 75 86 6 98 4 110 3 3 56 4 70 EHK4 31 34 6 3 3 59 1 70 EHK4 46 52 0 3 3 80 9 90 EHK4 60 69 3 3 3 85 2 90 EHK4 75 86 6 3 3 103 110 53 8 70 EHK4 31 34 6 55 9 70 EHK4 46 52 0 77 6 80 EHK4 60 69 3 81 9 90 EHK4 75 86 6 99 2 110 3 3 57 1 70 EHK4 31 34 6 3 3 60 0...

Page 21: ...MENSIONS B C D A B C D A VERTICAL DISCHARGE TOP VIEW 21 60 7 48 22 NOTE 15 20 ton models have 3 fans 25 ton models have 2 fans Model A B C D 15 Ton 20 Ton 133 1 2 88 7 32 50 9 32 5 5 32 25 Ton 133 1 2 88 7 32 53 9 32 5 5 32 ...

Page 22: ...POWER SOURCES MAY BE PRESENT FAILURE TO DO SO MAY CAUSE PROPERTY DAMAGE PERSONAL INJURY OR DEATH Wiring is subject to change Always refer to the wiring diagram on the unit for the most up to date wiring WIRING DIAGRAMS DCC180 DCC240 208 230 460 575 3 60 1 SPEED APPENDIX D WIRING DIAGRAMS ...

Page 23: ...UNIT MULTIPLE POWER SOURCES MAY BE PRESENT FAILURE TO DO SO MAY CAUSE PROPERTY DAMAGE PERSONAL INJURY OR DEATH Wiring is subject to change Always refer to the wiring diagram on the unit for the most up to date wiring DCC180 DCC240 208 230 460 575 3 60 1 SPEED WIRING DIAGRAMS ...

Page 24: ...unit for the most up to date wiring HIGH VOLTAGE DISCONNECT ALL POWER BEFORE SERVICING OR INSTALLING THIS UNIT MULTIPLE POWER SOURCES MAY BE PRESENT FAILURE TO DO SO MAY CAUSE PROPERTY DAMAGE PERSONAL INJURY OR DEATH WIRING DIAGRAMS DCC180 DCC240 208 230 460 575 3 60 2 SPEED ...

Page 25: ...UNIT MULTIPLE POWER SOURCES MAY BE PRESENT FAILURE TO DO SO MAY CAUSE PROPERTY DAMAGE PERSONAL INJURY OR DEATH Wiring is subject to change Always refer to the wiring diagram on the unit for the most up to date wiring WIRING DIAGRAMS DCC180 DCC240 208 230 460 575 3 60 2 SPEED ...

Page 26: ...ELAY BC EBTDR PLM OPTIONAL HIGH VOLTAGE BLOWERRELAY COMPRESSORCONTACTOR RELAY CCR COMPRESSORCONTACTOR CONDENSERMOTOR COMPRESSO R ECONO MIZER EVAPORATOR MOTOR HIGHPRESSURESWITCH LOW PRESSURESWITCH POWER DISTR IBUTIONBLOCK FEMALEPLUG CONNECTO R LOW VOLTAGE TERMINALBLOCK1 CONT ROL TRANSFOR MER LINEVOLTAGE 24VAC CC CM COMP ECON EM HPS LPS PB PLF TB1 TR1 COMPONENT LEGEND LOW VOLTAGE LIN E VOLTAGE FIELD...

Page 27: ...IS UNIT MULTIPLE POWER SOURCES MAY BE PRESENT FAILURE TO DO SO MAY CAUSE PROPERTY DAMAGE PERSONAL INJURY OR DEATH Wiring is subject to change Always refer to the wiring diagram on the unit for the most up to date wiring WIRING DIAGRAMS DCC300 208 230 460 575 3 60 1 SPEED ...

Page 28: ...ECON PLM TO ECON PLF 3 TB3 LOW VOLTAGE TERMINAL BLOCK 4 TERMINALS FOR 24VAC PWR RD BK BR WIRE AND 6 TERMINALS FOR 24VAC COM BL WIRE 4 CONNECTIONS SHOWN ARE FOR 1 STAGE HEAT OPERATION WHEN 2 STAGE OPERATION IS REQUIRED REMOVE WH JUMPER WIRE CONNECTING W2 TO W1 ON TB1 5 IF OPTIONAL SMOKE DETECTOR IS INSTALLED REMOVE RD JUMPER WIRE CONNECTING S1 TO S2 ON TB1 AND MAKE THE FOLLOWING WIRE CONNECTIONS RD...

Page 29: ...29 WIRING DIAGRAMS FOR MODELS WITH DDC CONTROLS For complete information and installation instructions for models with DDC controls see manual DK DDC TGD XXX ...

Page 30: ...LAME SENSE PLM MALE PLUG CONNECTO R L1 L2 L3 T1 T2 T3 COMP 1 BM L1 L2 L3 T1 T2 T3 RD GY BL YL RD BL BK OR RD YL BK OR GY OR RD OR RD YL BK CCAS1 BC1 BC 2 CC1 PB CCH1 GR L1 L2 L3 GR 5 GND L2 L3 L1 L1 L2 L3 LINE VOLTAGE RD 7 L1 L2 L3 T2 T3 CB2 LOW SPEED L1 L2 L3 T1 T2 T3 CB1 HIGH SPEED L1 L2 L3 T1 T2 T3 RD BK RD BK OR LINE VOLTAGE TR1 4 2 3 BK OR RD OR BK BK RD OR OR OR K B Y G BK BK CF1 CF3 BR PU P...

Page 31: ...ING DIAGRAM DCC 180 240 B DDC SPC TMP SUPPLY AIR TMP SPC HUM COMP PRESS 1 BLOWER STAGE 1 COMP PRESS 2 SPC SLIDE ADJ RMT STRT STP t 0140L05762 A NOTES 1 REPLACEMENT WIRE MUST BE SAME SIZE AND TYPE OF INSULATION AS ORIGINAL AT LEAST 105 C USE COPPER CONDUCTORS ONLY USE N E C CLASS 2 WIRE FOR ALL LOW VOLTAGE FIELD CONNECTIONS IF OPTIONAL SMOKE DETECTOR IS INSTALLED REMOVE RED JUMPER WIRE CONNECTIONS ...

Page 32: ...TMP SUPPLY AIR TMP SPC HUM COMP PRESS 1 BLOWER STAGE 1 COMP PRESS 2 SPC SLIDE ADJ RMT STRT STP t 0140L05824 A NOTES 1 REPLACEMENT WIRE MUST BE SAME SIZE AND TYPE OF INSULATION AS ORIGINAL AT LEAST 105 C USE COPPER CONDUCTORS ONLY USE N E C CLASS 2 WIRE FOR ALL LOW VOLTAGE FIELD CONNECTIONS IF OPTIONAL SMOKE DETECTOR IS INSTALLED REMOVE RED JUMPER WIRE CONNECTIONS TB1 XS TO TB1 ES DISCHARGE AIR TEM...

Page 33: ...7 B V DDC GR GREEN WIRE CODE BL BLUE PU PURPLE PK PINK WH WHITE BK BLACK RD RED BR BROWN OR ORANGE YL YELLOW GY GRAY BLOWER CONTACTOR BC COMPRESSOR CONTACTOR COMPRESSOR ECONOMIZER HIGH PRESSURE SWITCH POWER DISTRIBUTION BLOCK FEMALE PLUG CONNECTOR TERMINAL BLOCK 24V SIGNAL CC COMP ECON HPS PB PLF TB COMPONENT LEGEND CIRCUIT BREAKER CB GND BCS BLOWER CURRENT SWITCH CFS CLOGGED FILTER SWITCH DAT DIS...

Page 34: ... tension and alignment per installation instructions Check refrigerant piping for rubbing and leaks Repair if necessary Check unit wiring to ensure it is not in contact with refrigerant piping or sharp metal edges Check all electrical connections and terminals Tighten as needed Verify that the crankcase heaters have been energized for 24 hours Verify the scroll compressor s are rotating in the rig...

Page 35: ...r Amps Blower Amps Condenser Fan Amps ELECTRICAL Total External Static Pressure Blower Wheel RPM TEMPERATURES Outdoor Air Temperature Return Air Temperature Cooling Supply Air Temperature Discharge Circuit 1 Heating Supply Air Temperature PRESSURES Gas Inlet Pressure Gas Manifold Pressure Suction Circuit 1 Suction Circuit 2 Discharge Circuit 2 Superheat Orifice System Superheat Orifice System Subc...

Page 36: ...36 2013 2015 2017 5151 San Felipe St Suite 500 Houston TX 77056 www daikincomfort com Our continuing commitment to quality products may mean a change in specifications without notice ...

Reviews: