


5 Installation
Installation manual
4
BRP069C51
Wireless LAN connecting adapter
4P567679-2C – 2020.05
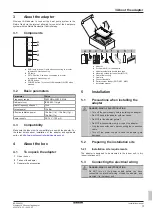
5.3.1
Overview of electrical connections
X801A
e
d
c
b
a
a
Wireless LAN adapter
b
Connection cable
c
PCB port X801A
d
Indoor unit PCB
e
Indoor unit
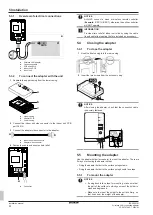
5.3.2
To connect the adapter with the unit
1
Separate the upper casing from the lower casing.
a
c
b
a
Upper casing
b
Adapter PCB
c
Lower casing
2
Connect the indoor unit side connector to the indoor unit PCB
port X801A.
3
Connect the adapter side connector to the adapter.
a
b
a
Indoor unit side connector
b
Adapter side connector
4
Fasten the cable and ensure strain relief.
a
a
Connector
NOTICE
ALWAYS connect a wired or wireless remote controller
(
Example:
BRC1H, BRC7), otherwise the online controller
will NOT operate.
INFORMATION
Provide strain relief at indoor unit side by using the cable
tie and cable tie mounting that are included as accessory.
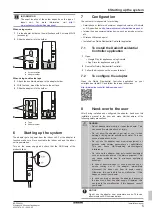
5.4
Closing the adapter
5.4.1
To close the adapter
1
Hook the front casing into the rear casing.
2
Insert the two screws from the accessory bag.
2×
NOTICE
After closing the adapter, check that the connection cable
is securely fastened.
5.5
Mounting the adapter
Use the adapter holder (accessory) to mount the adapter. There are
2 ways of mounting the adapter holder:
▪ Fixing the adapter holder to the surface using screws.
▪ Fixing the adapter holder to the surface using double face tape.
5.5.1
To mount the adapter
NOTICE
▪ If using double face tape for mounting, make sure that
the part of the surface to which you mount the holder is
clean and degreased.
▪ Make sure to mount the holder to the surface firmly, so
that it can bear the weight of the adapter.
Summary of Contents for BRP069C51
Page 6: ......
Page 7: ......
Page 8: ...4P567679 2C 2020 05 Copyright 2020 Daikin Verantwortung für Energie und Umwelt ...


