


Installation
EDUS30-900-N
46
Installation of Outdoor Units
10. CHECKS AFTER INSTALLATION
WARNING
• Never connect power supply wiring to the terminal block for
remote controller wiring as this could damage the entire system.
•
Attach the power wire securely.
•
To avoid injury, always make sure that the circuit breaker on the
power supply panel of the installation is switched off before doing
any work.
After the installation, check the following before switching on the cir-
cuit breaker:
1.
The position of the switches that requires an initial setting
Make sure that switches are set according to your application
needs before turning the power supply on.
2.
Power supply wiring and transmission wiring
Use a designated power supply and transmission wiring and make
sure that it has been carried out according to the instructions
described in this manual, the wiring diagrams and local and
national regulations.
3.
Pipe sizes and pipe insulation
Make sure that correct pipe sizes are installed and that the insula-
tion work is properly executed.
4.
Additional refrigerant charge
The amount of refrigerant to be added to the unit should be written
on the included “Additional Refrigerant” label, and attach it to the
rear side of the front cover.
5.
Measurement of insulation in main power circuit
Using a megatester for 500V, check that the insulation resistance
of 2M
or more is attained by applying a voltage of 500V DC
between power terminals and earth. Never use the megatester for
the transmission wiring.
6.
Installation date
Be sure to keep record of the installation date on the “Additional
Refrigerant” label.
11. TEST RUN
CAUTION
After completing installation, be sure to open the valves.
(Operating the unit with the valves shut will break the compres-
sor.)
11-1 Air discharge
• Running the heat source water pump, carry out air discharge
process until the water comes out from the air discharge hole of
local piping.
(For the operation to be done for the first time after installation, you
need to perform a checking operation.)
11-2 Before turn on the power supply
• Close the electrical components lid securely before turning on power.
• Make settings for outside unit PC board (A1P) after power-on and
check the LED display from inspection door that is on the electrical
components box lid.
11-3 Check operation
When running the unit for the first time after installation, be sure to
perform a test operation following these steps. (Not performing a test
operation when the unit is first installed may prevent the unit from
operating properly.)
• During the operation, monitor the outdoor unit operation status and
check for any incorrect wiring.
(Refer to figure 27)
1.
Electrical components box
2.
Electrical components box lid
3.
Service lid
4.
Inspection cover
5.
[Service precaution] Label
(1) Check the connection of interlock
circuit
The outside unit cannot be operated if the
interlock circuit has not been connected.
(2)• As necessary, configure the sys-
tem settings onsite by using the
dipswitch (DS1) on the outside unit
PC-Board (A1P) and push button
switches (BS1 to 5).
• When the system is in the multiple-
outside unit configuration (Out
Multi), perform the configuration on
the main unit. (Any settings made
on a sub unit will be ignored.)
After this, close the electrical com-
ponents box lid.
Always perform configuration after turning
ON the power. To learn the setting
method, refer to the [Service Precautions]
label attached at the position shown in the
figure on the right
(Electric box lid in outside unit).
(Remember, the actual settings you have
made must be recorded on the [Service
Precautions] label.)
(3) Turn ON the power to the outside
units and indoor units.
Make sure to turn ON the power 6 hours
before starting the operation. This is nec-
essary to warm the crankcase preliminar-
ily by the electric heater.
(4) Start the heat source water pump
and fill the heat source water in the
outside unit.
The outside unit cannot be operated if the
heat source water pump is not running.
(5) Make sure that the temperature of
heat source water is kept within the
operation range (60 - 100 °F).
The outside unit cannot be operated at a
temperature outside the operation range.
(6) Check the LED on the PC board (A1P) in the outside unit to see if the data
transmission is performed normally.
(7)• Using the push button switches
(BS1 - 5) on the PC board (A1P) of
outside unit, carry out a local set-
ting, if necessary.
• When the system is in the multiple-
outside unit configuration (Out
Multi), perform the configuration on
the main unit. (Any settings made
on a sub unit will be ignored.)
Always perform configuration after turning
ON the power. To learn the setting
method, refer to the [Service Precautions]
label attached at the position shown in the
figure on the right
(Electric box lid in outside unit).
(Remember, the actual settings you have
made must be recorded on the [Service
Precautions] label.)
(8) Check all stop valves are opened.
If some stop valve is closed, open
them.
(Refer to “
9-10 Stop valve operation
procedure
”.)
[CAUTION]
Do not leave any stop valve closed.
Otherwise the compressor will fail.
For Heat recovery system of cooling and
heating:
Open all stop valves on the suction side,
discharge gas side and liquid side.
For cooling and heating switching opera-
tion system:
Open the stop valves on discharge gas
side and liquid side.
(Keep the stop valve
on suction side fully closed.)
(9)Perform the check operation follow-
ing the instructions printed on the
[Service Precautions] label.
If you push the test run button (BS4) on
the PC board (A1P) of the outside unit for
5 seconds, the test run starts.
If you want to interrupt the test run, push the
RETURN button (BS3) on PC board (A1P) of
the outside unit. The system continues resid-
ual operation for about 1 minute (maximum
10 minutes) and then stops.
(During test run, you cannot stop it by a
command from a remote controller.)
You need to perform the above settings
on the PCB by accessing the PCB
through the inspection cover on the
switch box cover.
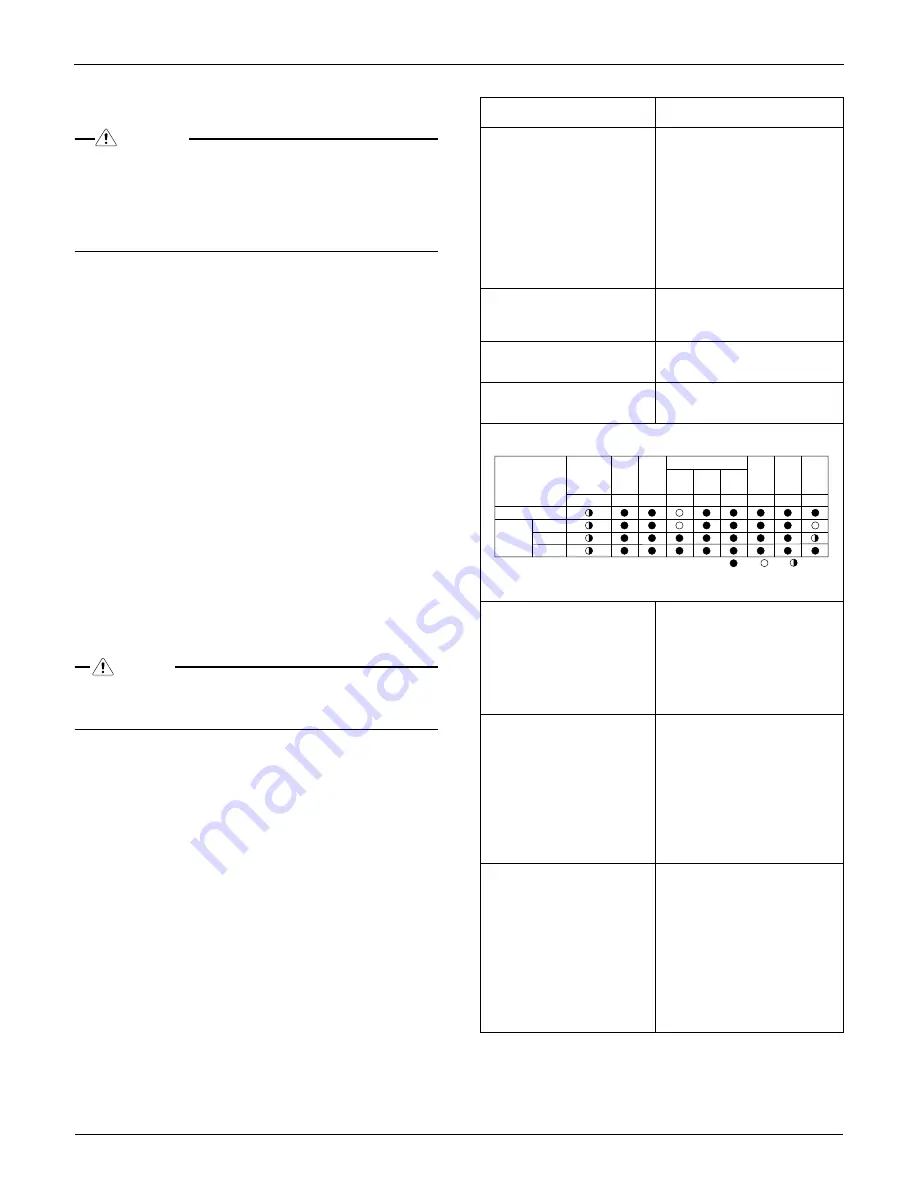
Bulk
(main)
Bulk
(sub)
Multi
Demand
(
∗
) The base (main) unit is the outside unit to which the interconnecting wiring for the
indoor units is connected. The other outside units are sub units.
LED display
(Default status
before delivery)
One outside unit installed
When multiple
outside unit
installed (
∗
)
Master station
Sub station 1
Sub station 2
Microcomputer
operation
monitor
Page
HAP
H1P
H2P
H3P
H4P
H5P
H6P
H7P
H8P
Ready/
Error
Cooler/heater changeover
Individual
Low
noise
LED display:
OFF
ON
Blinking
Summary of Contents for 80PTJU
Page 1: ...EDUS 30 900 N AMERICAS AMERICAS Installation ...
Page 17: ...REFNET Pipe System EDUS30 900 N 16 Installation of Outdoor Units 3P161697D ...
Page 21: ...REFNET Pipe System EDUS30 900 N 20 Installation of Outdoor Units C 3P113151C 7 8 1 1 1 8 ...
Page 23: ...REFNET Pipe System EDUS30 900 N 22 Installation of Outdoor Units C 3P113623C 7 8 1 1 1 8 ...
Page 25: ...REFNET Pipe System EDUS30 900 N 24 Installation of Outdoor Units 3P185500 ...
Page 27: ...REFNET Pipe System EDUS30 900 N 26 Installation of Outdoor Units 1P185542 ...


