Appearance 3
Components
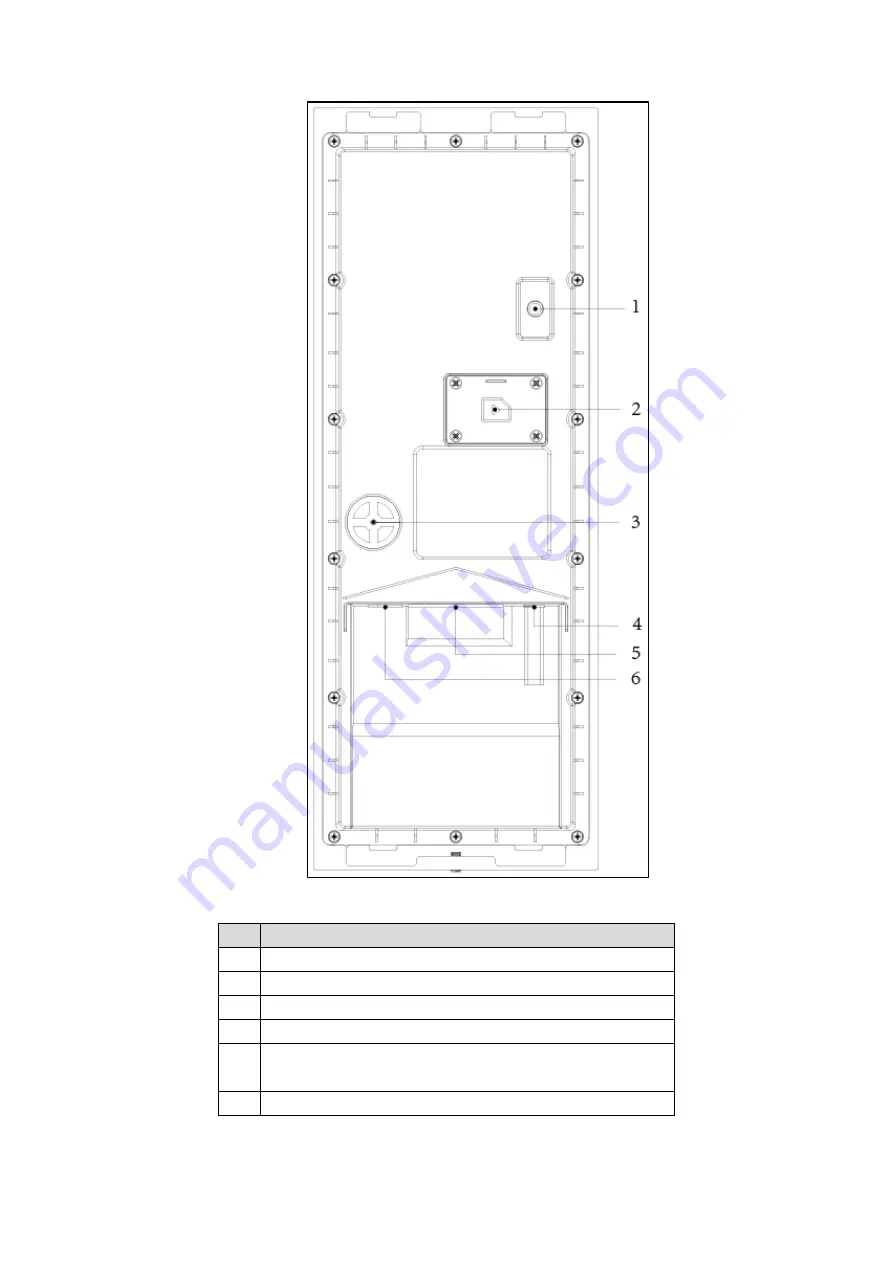
Figure 2-2
Table 2-1 Component description
No. Name
1
Tamper Switch
2
SIM Card Cover
3
4G External Antenna Port
4
Power Port
5
Function Ports (such as alarm in/out port, lock port, and
Wiegand interface)
6
Ethernet Port
Page 1: ...Digital Face Recognition Outdoor Station Quick Start Guide V1 0 1...
Page 2: ...to the text Revision History Version Revision Content Release Date V1 0 0 First release July 2019 V1 0 1 Added waterproof operation in installation November 2019 About the Manual The manual is for ref...
Page 3: ...final explanation Upgrade the reader software or try other mainstream reader software if the manual in PDF format cannot be opened All trademarks registered trademarks and the company names in the ma...
Page 4: ...on t put on the device anything filled with liquids in order to prevent liquids from flowing into the device Install the device at well ventilated places don t block its ventilation opening Use the de...
Page 5: ...on 9 Configuration Process 9 5 1 VDPConfig 9 5 2 Configuring VTO 9 5 3 5 3 1 Initialization 9 5 3 2 Configuring VTO Number 11 5 3 3 Configuring Network Parameters 11 5 3 4 Selecting SIP Servers 12 5 3...
Page 6: ...s on the VTO with VTS or VTH users Group call Call multiple VTH users at one VTO simultaneously Video Surveillance Monitor areas around the VTO from VTH or management center Emergency call Press the k...
Page 7: ...Appearance 2 2 Appearance Dimensions mm inch Figure 2 1...
Page 8: ...ents Figure 2 2 Table 2 1 Component description No Name 1 Tamper Switch 2 SIM Card Cover 3 4G External Antenna Port 4 Power Port 5 Function Ports such as alarm in out port lock port and Wiegand interf...
Page 9: ...g Cable This port can be used to connect to door locks and the connection method varies with different locks For the detailed information see Figure 3 1 and Figure 3 2 Connecting cables 1 Figure 3 1 C...
Page 10: ...cal corrosion direct sunlight or zero shelter The installation and adjustment must be finished by professional crew Do not disassemble the VTO yourself 4 1 2 Guidance The VTO horizontal angle of view...
Page 11: ...s on the mounting box Step 1 and then put expansion screws in the screw holes Fix the mounting box on the wall with the ST4 2 25 screws Step 2 Apply sealant to gaps between the mounting box and wall S...
Page 12: ...in the wall Figure 4 4 Table 4 2 Item list No Item No Item No Item 1 VTO 2 Locking screw 3 Cable entry 4 Mounting box 5 Wall Cut an opening with the size of the mounting box on the wall and then put...
Page 13: ...bottom of the VTO Step 4 Fix the VTO in the mounting box with the M4 40 screws Step 5 Tighten locking screw at the bottom of the VTO to complete the installation Step 6 Apply silica gel to gaps betwee...
Page 14: ...s 5 Add VTO devices to the SIP server See 5 3 5 Adding VTO Devices 6 Add room number to the SIP server See 5 3 6 Adding Room Number Configure VTH See the VTH users manual Step 3 Verify Configuration S...
Page 15: ...3 The email setting interface is displayed Select the email check box and then enter your email address This email address can Step 4 be used to reset the password Click Next Step 5 The initializatio...
Page 16: ...as any room number Log in to the web interface of the VTO and then the main interface is displayed See Step 1 Figure 5 3 Main interface Figure 5 3 Select Local Setting Basic Step 2 The Device Properti...
Page 17: ...n this VTO or another VTO works as SIP server select VTO from the Server Type drop down list It applies to a scenario where there is only one building When the platform Express DSS works as SIP server...
Page 18: ...ace is displayed See Figure 5 7 SIP server 1 Figure 5 7 Select a SIP server Step 5 VTO as SIP server Select Enable behind SIP Server Step 1 Select VTO from the Server Type drop down list Step 2 Config...
Page 19: ...Configuration 14 SIP server 2 Figure 5 8 Select Express DSS from the Server Type drop down list Step 2 Set parameters according to Table 5 1 Step 3...
Page 20: ...rver Alternate Password Alternate VTS IP Addr IP address of the alternate VTS Alternate Server After entering alternate IP address username password and VTS IP address you need to select the Enable ch...
Page 21: ...able 5 2 Step 3 Table 5 2 Add VTO configuration Parameter Description Rec No The VTO number you configured for the target VTO See the details in 5 3 2 Configuring VTO Number Register Password Keep def...
Page 22: ...g manual for the details The room number contains 6 digits of numbers or letters or their combination at most and it cannot be the same as any other VTO numbers Log in the web interface of the SIP ser...
Page 23: ...er of the extension VTH should be room number 1 room number 2 and so on You can have 10 extension VTH devices at most for one master VTH Register Type Select public and local is reserved for future us...
Page 24: ...Configuration 19 Add in batch Figure 5 13 All the added room numbers are displayed Click Refresh to view the latest status and click Clear to delete all the room numbers...
Page 25: ...strators and administrators can make advanced configurations to the VTO including issuing access card modifying device IP address and adding room numbers 6 2 1 Entering Project Mode On the standby int...
Page 26: ...isplayed Enter Personnel No Room No and User Name Step 3 Tap OK to save the information you entered Step 4 Tap to take a photo of the user Step 5 Tap OK to save the photo and the interface goes to the...
Page 27: ...ct might be influenced Appendix figure 1 1 Appropriate face position Requirements of Faces Make sure that the face is clean and forehead is not covered by hair Do not wear glasses hats heavy beards or...
Page 28: ...ition Appendix figure 1 3 Face distance When importing face images through the management platform make sure that image resolution is within the range 150 300 600 1200 image pixel is more than 500 500...
Page 29: ...ed to enable the auto check for updates function to obtain timely information of firmware updates released by the manufacturer We suggest that you download and use the latest version of client softwar...
Page 30: ...llowing services SNMP Choose SNMP v3 and set up strong encryption passwords and authentication passwords SMTP Choose TLS to access mailbox server FTP Choose SFTP and set up strong passwords AP hotspot...
Page 31: ...s If there are no communication requirements between two sub networks it is suggested to use VLAN network GAP and other technologies to partition the network so as to achieve the network isolation eff...