background image


20 

Table 3-6 Firewall parameters description 

Parameter 

Description 

Type 

Select 

IP Address

IP Segment

MAC Address

 or 

All IP Addresses


IP Address

: Select the IP version, and then enter the IP address 

to be added. 


IP Segment

: Select the IP version, and then enter the Initial IPv4 

Address, and End IPv4 Address.


MAC Address

: Enter the MAC address to be added. 


All  IP  Addresses

:  Set  all  IP  addresses  to  the  white  list  or  black 

list. 

All Device Ports 

Set access ports. You can select all device ports, or set the port range. 


All Device Ports

: Set all ports of the Terminal to the black list or 

white list. When all IP addresses are set to the black list, you are 

not  allowed  to  select  all  ports.  Because  in  this  case,  all  devices 

cannot access all ports of the Terminal.


Device  Start  Sever  Port/Device  End  Sever  Port

:  Set  the  start 

port and end port. The value ranges from 1 to 65535. 

Device Start Sever 

Port 

Device End Sever 

Port 

4.  Click 

Save

The system goes back to the 

Firewall

 interface. 

  Click 

Confirm

3.5.3 Register 

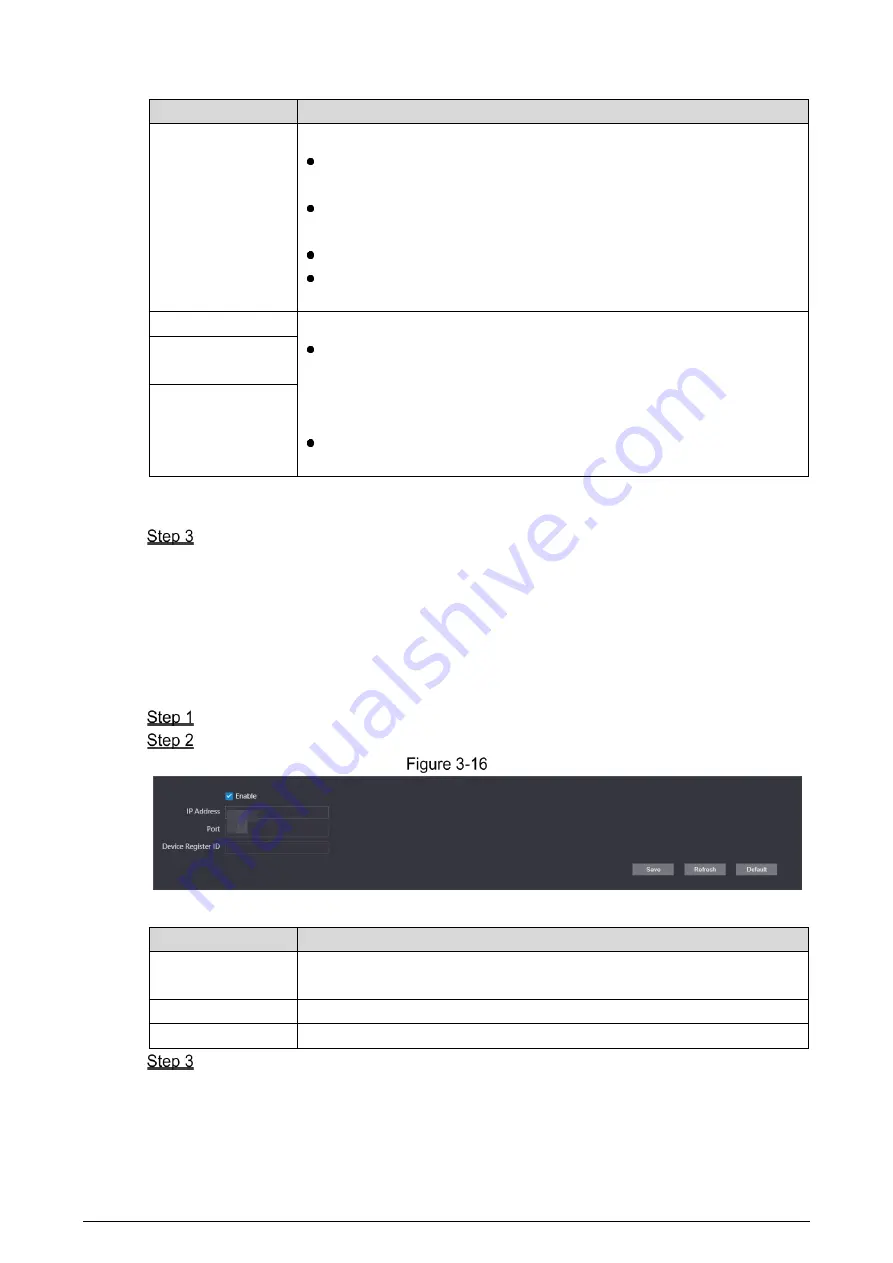
The Terminal registers to the proxy server designated by the user, and  then the proxy server 

provides the transfer function to facilitate the client software to access the Terminal, so as to 

watch live view and monitor the scene. 

  Select 

Network > Register

 on the web interface. 

  Select the

 Enable

 check box, and then set parameters. 

 Register 


Table 3-7 Register parameter description 

Parameter 

Description 

IP Address 

The IP address or domain name of the server that the Terminal is 

registered to. 

Port 

The sever port for registering. 

Device Register ID  Customize the register ID for the Terminal. 

  Click 

Save

Summary of Contents for VTA2302A

Page 1: ...Emergency Call Terminal VTA2302A Quick Start Guide V1 0 0...

Page 2: ...About the Manual The manual is for reference only If there is inconsistency between the manual and the actual product the actual product shall prevail We are not liable for any loss caused by the oper...

Page 3: ...any names in the manual are the properties of their respective owners Please visit our website contact the supplier or customer service if there is any problem occurring when using the device If there...

Page 4: ...inal within the rated range of power input and output Do not dismantle the Terminal arbitrarily Transport use and store the Terminal under the allowed humidity and temperature conditions Power Require...

Page 5: ...ization 9 Login 10 Password Reset 10 Local Settings 11 3 4 1 Basic Settings 11 3 4 2 Video Audio 12 3 4 3 System Settings 14 3 4 4 Alarm Output Settings 15 3 4 5 Security Management 15 3 4 6 Onvif Use...

Page 6: ...atform and master station VTS to provide emergency calling voice broadcasting video monitoring and more It is applicable to schools banks industrial parks apartments office buildings and other places...

Page 7: ...on Calls the management center 4 Microphone Inputs audio 5 SOS button Sends alarms to the management center 6 Camera Capture videos 1 2 2 Rear Panel Rear panel Table 1 2 Rear panel description No Name...

Page 8: ...Device Ports Device ports Table 1 3 Device ports description No Name No Name 1 MIC 6 Power input 2 Alarm input 1 7 RS 485 3 Alarm input 2 8 Reserved ports 4 Alarm output 1 9 Active speaker 5 Alarm ou...

Page 9: ...5 Typical Networking Networking The master station in the networking is optional...

Page 10: ...ofessional teams Do not dismantle or repair arbitrarily in case of device failure Contact after sales department Surface mount is supported and rear cable outlet and bottom cable outlet are reserved o...

Page 11: ...es on the mounting plate and put the expansion bolts into the holes Fix the mounting plate on the wall with the ST3 18 self tapping screws Apply sealant between the mounting plate and the wall and to...

Page 12: ...stallation Table 2 2 Installation component No Name No Name 1 M3X8 hexalobular socket screw 4 Bottom cable outlet 2 Emergency Call Terminal 5 Rear cable outlet 3 ST3 18 self tapping screw 6 Mounting p...

Page 13: ...ess is 192 168 1 108 by default Make sure that the PC and the Terminal are in the same network segment Enter the IP address of the Terminal in the address bar Enter and confirm the password according...

Page 14: ...username and password Login interface Click Login Password Reset If you forget the password when logging in to the web interface you can reset the password Click Forgot password on the login interface...

Page 15: ...ld consist of 8 to 32 non blank characters and contain at least two types of characters among uppercase lowercase number and special character excluding The confirming password should be the same as t...

Page 16: ...tness contrast hue saturation and scene mode of the monitoring screen and adjust the volume of the Terminal Select Local Setting Video Audio on the web interface If the plug in has not been installed...

Page 17: ...vivid the image This value does not affect the overall brightness of image Gamma Change the image brightness and contrast in a non linear way The larger the value the brighter the image Mirror Flip t...

Page 18: ...Volume Adjusts the volume of the microphone or speaker 3 4 3 System Settings You can set the time zone system time DST type and NTP timing Select Local Setting System on the web interface Configure pa...

Page 19: ...sabled by default Click Save 3 4 4 Alarm Output Settings After the alarm output is enabled when the Terminal initiates a call the alarm output relay can output the alarm signal Select Local Setting Al...

Page 20: ...isabled you can only reset the password after restoring the Terminal to factory settings by pressing the reset button on the device Authentication Mode Select the anthentication mode from Security Mod...

Page 21: ...ick Save Network Settings 3 5 1 TCP IP You can configure the IP address and DNS server to connect the Terminal to other devices in the network Select Network Basic on the web interface Configure param...

Page 22: ...e user can only access the specified port Black List If the IP or MAC address of the user is in the black list the Terminal cannot be accessed If a port is also set the user cannot access the specifie...

Page 23: ...ection you do not need to set parameters Click Confirm to complete the settings When enabling Network Access you need to configure white list or black list Here are the steps 1 Select White List or Bl...

Page 24: ...all devices cannot access all ports of the Terminal Device Start Sever Port Device End Sever Port Set the start port and end port The value ranges from 1 to 65535 Device Start Sever Port Device End S...

Page 25: ...g out Restart Click and then select Reboot to restart the Terminal Restoring to Factory Settings Click and then select Factory Defaults to restore the Terminal to factory settings The operation will c...

Page 26: ...nt center can initialize monitoring or listening on the Terminal to remotely see the monitoring screen of the Terminal and listen to the audio Light Compensation When the ambient light is dim or at ni...

Page 27: ...n Check whether the power supply is normal and the socket is in good contact There is a prompt that the call is not successful Network failure Check whether the network cable is properly connected The...

Page 28: ...tion to obtain timely information of firmware updates released by the manufacturer We suggest that you download and use the latest version of client software Nice to have recommendations to improve yo...

Page 29: ...TLS to access mailbox server FTP Choose SFTP and set up strong passwords AP hotspot Choose WPA2 PSK encryption mode and set up strong passwords 11 Audio and Video Encrypted Transmission If your audio...

Page 30: ...achieve the network isolation effect Establish the 802 1x access authentication system to reduce the risk of unauthorized access to private networks It is recommended that you enable your device s fir...

Reviews: