background image


Dahua Bullet-WLAN-Kamera Kurzanleitung 


Tippen Sie nun auf „Weiter“ (Next).


Schritte 7 

Geben Sie Ihr WLAN-Passwort ein und tippen Sie erneut auf „Weiter“ (Next). 

Schritte 8 

Geben Sie Ihr Gerätepasswort ein. Das Standardpasswort ist „admin“. 

Schritte 9 

Ihre Kamera wurde erfolgreich hinzugefügt. Sie können nun Ihre Zeitzone einstellen 

und die Vorschau starten. 

Hinweis 


Haben Sie mehrere Kameras, führen Sie die Schritte 4 bis 9 aus, um sie nacheinander 
hinzuzufügen. 


Zur Änderung des WLAN-Signals setzen Sie die Kamera auf die Werkseinstellungen zurück 
und wiederholen die Schritte 4 bis 9, um das Gerät hinzuzufügen. 

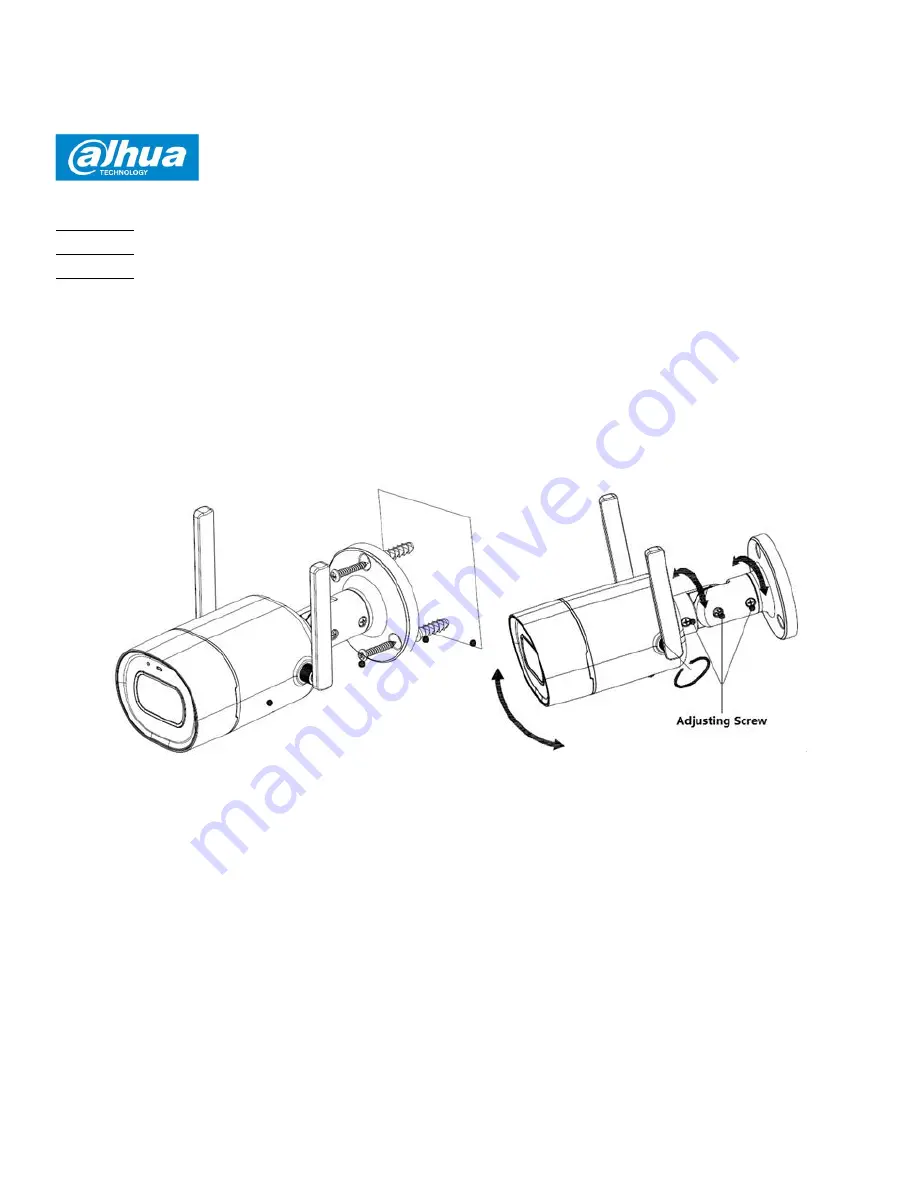
3 Installation des Geräts 


Abbildung 3-1  


Abbildung 3-2


Haftungsausschluss 


Diese Kurzanleitung dient nur als Referenz. Die Benutzeroberfläche kann geringfügig 
abweichen. 


Änderung des Designs und der Software vorbehalten. 


Alle hier erwähnten Marken oder eingetragenen Marken sind Eigentum ihres jeweiligen 
Besitzers. 


Für weitere Informationen besuchen Sie bitte unsere Website oder wenden Sie sich an Ihren 
örtlichen Kundendiensttechniker. 

Bei Unklarheiten oder Widersprüchen konsultieren Sie unsere endgültige Erläuterung. 

Summary of Contents for G26

Page 1: ...Dahua Bullet Wi Fi Camera Quick Start Guide Version 1 0 0 ZHEJIANG DAHUA VISION TECHNOLOGY CO LTD ...

Page 2: ...Content EN 1 FR 4 DE 7 IT 10 ES 13 NL 16 PT 19 ...

Page 3: ...ed light stably on Booting Slowly flashing green Bootingcompleted Waiting for Wi Ficonfiguration Entering smart configurationstatus Quickly flashing green Wi Fi smart configuration in progress including WPS Wi Fi Protected Setup management frame Green light stably on Wi Fi connectionsucceeded Operatenormally Alternately flashing red and green Device upgrade Slowly flashing red Network connection f...

Page 4: ...Wi Fi network scan Easy4ip QR on the packing box download and install Easy4ip APP Step 3 Open Easy4ip APP take iOS version as an example Please register an account for first use Figure2 1 Figure2 2 Figure2 3 Step 4 Please tap to add new devices after you login your account Figure2 4 Figure2 5 Figure2 6 Step 5 Scan the QR code on the back of the camera to get the SN you can also tap Manually enter ...

Page 5: ...hem one by one If you want to change the Wi Fi signal please reset the camera to factory default and repeat step 4 9 to add the device 3 Device Installation Figure 3 1 Figure 3 2 Disclaimer This quick start guide is for reference only Minor difference might be found in user interface All the designs and software here are subject to change without prior written notice All trademarks and registered ...

Page 6: ...ment vert rapide Configuration intelligente du Wi Fi en cours y compris WPS configuration Wi Fi protégée trame de gestion Voyant vert fixe Connexion Wi Fiétablie Fonctionnementnormal Clignotement rouge et vert alterné Mise à niveau de l appareil Clignotement rouge lent Échec de la connexion réseau Clignotement rouge rapide Échec de la mise en route del appareil Carte micro SD ne fonctionnepas Numé...

Page 7: ...lication Easy4ip prenez la version iOS comme exemple Créez un compte lors de la première utilisation Étape 4 Appuyez sur le symbole afin d ajouter de nouveaux appareils une fois que vous vous êtes connecté à votre compte Figure2 1 Figure2 2 Figure2 3 Étape 5 Scannez le code QR situé au dos de la caméra afin d obtenir le numéro de série vous pouvez également appuyer sur Entrer le numéro de série ma...

Page 8: ...restaurez la caméra aux paramètres d usine et répétez les étages de 4 à 9 afin d ajouter l appareil 3 Installation de l appareil Figure 3 1 Figure 3 2 Avertissement Ce guide de démarrage rapide est fourni uniquement à titre indicatif De légères différences peuvent exister au niveau de l interface utilisateur Tous les logiciels et interfaces présentés ici sont susceptibles d être modifiés sans préa...

Page 9: ...tus Rote LED leuchtet Gerät fährt hoch Langsam grün blinkend Hochfahrenabgeschlossen Warten aufWLAN Konfiguration Starte intelligentenKonfigurationsmodus Schnell grün blinkend Intelligente WLAN Konfiguration läuft einschließlich WPS Wi Fi Protected Setup Verwaltungsfenster Grüne LED leuchtet WLAN erfolgreichverbunden NormalerBetrieb Abwechselnd rot und grün blinkend Geräteaktualisierung Langsam ro...

Page 10: ...ie zum Beispiel die iOS Version dargestellt Erstellen Sie für die erstmalige Nutzung ein Benutzerkonto Schritte 4 Tippen Sie auf um neue Geräte nach der Anmeldung an Ihrem Benutzerkonto hinzuzufügen Abbildung 2 1 Abbildung 2 2 Abbildung 2 3 Schritte 5 Scannen Sie den QR Code auf der Rückseite des Kameras um die Seriennummer einzufügen Sie können auch auf SN manuell eingeben Manually enter the SN t...

Page 11: ...derung des WLAN Signals setzen Sie die Kamera auf die Werkseinstellungen zurück und wiederholen die Schritte 4 bis 9 um das Gerät hinzuzufügen 3 Installation des Geräts Abbildung 3 1 Abbildung 3 2 Haftungsausschluss Diese Kurzanleitung dient nur als Referenz Die Benutzeroberfläche kann geringfügig abweichen Änderung des Designs und der Software vorbehalten Alle hier erwähnten Marken oder eingetrag...

Page 12: ... lampeggiante rapido Configurazione intelligente Wi Fi tra cui configurazione WPS Wi Fi Protected Setup frame di gestione Indicatore verde fisso Connessione Wi Firiuscita Funzionamentonormale Lampeggio alternato rosso e verde Dispositivo in fase di aggiornamento Rosso lampeggiante lento Connessione di rete non riuscita Rosso lampeggiante rapido Mancato avvio deldispositivo Scheda Micro SD nonfunzi...

Page 13: ...pp Easy4ip prendere la versione iOS come esempio Registrare un account per il primo utilizzo Fase 4 Toccare per aggiungere nuovi dispositivi dopo aver effettuato l accesso all account Figura 2 1 Figura 2 2 Figura 2 3 Fase 5 Scansionare il codice QR sul retro della telecamera per ottenere il numero di serie è anche possibile toccare Accedi manualmente al numero di serie Manually enter the SN e inse...

Page 14: ...l segnale della rete Wi Fi ripristinare i valori predefiniti della telecamera e ripetere i passaggi 4 9 per aggiungere il dispositivo 3 Installazione dispositivo Figura 3 1 Figura 3 2 Dichiarazione di non responsabilità La guida introduttiva serve solo come riferimento L interfaccia utente potrebbe risultare leggermente diversa Grafiche e software sono soggetti a modifica senza preavviso Tutti i m...

Page 15: ...te Parpadea rápidamente en verde Configuración inteligente de Wi Fi en progreso incluido el marco de gestión WPS Wi Fi Protected Setup Luz verde estable encendida Conexión Wi Ficorrecta Funcionamientonormal Parpadea alternativamente en rojo y verde Actualización del dispositivo Parpadea lentamente en rojo Fallo de conexión a red Parpadea rápidamente en rojo Error al iniciarse eldispositivo Tarjeta...

Page 16: ...bra la aplicación Easy4ip tome la versión iOS como ejemplo Registre una cuenta en el primer uso Paso 4 Toque para añadir dispositivos nuevos después de iniciar sesión en su cuenta Figura 2 1 Figura 2 2 Figura 2 3 Paso 5 Escanee el código QR de la parte trasera de la cámara para obtener el N S también puede tocar Introducir manualmente el N S Manually enter the SN e introducir manualmente el número...

Page 17: ...onfiguración de fábrica y repita los pasos 4 9 para añadir el dispositivo 3 Instalación del dispositivo Figura 3 1 Figura 3 2 Descargo de responsabilidad Esta guía de inicio rápido es solo una referencia Es posible que existan pequeñas diferencias en la interfaz de usuario Todos los diseños y el software aquí incluidos están sujetos a cambios sin aviso previo por escrito Todas las marcas comercial...

Page 18: ...llen 4 Microfoon 5 Indicatielampje 6 Wi Fi antenne Status indicatielampje Status apparaat Rood constant Bezig met opstarten Groen traag knipperend Opstarten voltooid Wachten op Wi Fi configuratie Slimme configuratiemodus openen Groen snel knipperend Bezig met slimme Wi Fi configuratie inclusief WPS beveiligde Wi Fi installatie Groen constant Wi Fi verbinding gelukt Werkt normaal Rood en groen afwi...

Page 19: ...ie Afbeelding 2 1 iOS versie ook beschikbaar voor Android Registreer voor het eerste gebruik een account Afbeelding 2 1 Afbeelding 2 2 Afbeelding 2 3 Stap 4 Log na registratie in met uw inloggegevens en voeg nieuwe apparaten toe met de plusknop Stap 5 Scan de QR code op de achterkant van de camera met uw smartphone om het serienummer SN op te vragen U kunt het serienummer ook handmatig invoeren do...

Page 20: ...t volg dan stap 4 9 om ze één voor één toe te voegen Als u het Wi Fi netwerk wilt wijzigen zet de camera dan terug naar de fabrieksinstellingen en herhaal stap 4 9 om uw camera opnieuw toe te voegen 3 Monteren van de camera Afbeelding 3 1 Afbeelding 3 2 Disclaimer Deze snelstarthandleiding is uitsluitend bedoeld ter referentie Er kunnen kleine verschillen worden aangetroffen in de gebruikersinterf...

Page 21: ...vo Luz vermelha fixa acesa Arranque Verde lentamente intermitente Arranqueconcluído A aguardar a configuração deWi Fi Início do estado de configuraçãointeligente Verde rapidamente intermitente Configuração Wi Fi inteligente em curso incluindo WPS configuração protegida de Wi Fi gestão da trama Luz verde fixa acesa Ligação Wi Fibem sucedida Funcionamentonormal Vermelho e verde intermitentes alterna...

Page 22: ...e a aplicação Easy4ip Passo 3 Abra a aplicação Easy4ip utilize a versão iOS como exemplo Na primeira utilização registe se numa conta Passo 4 Toque em para adicionar dispositivos novos após iniciar sessão na sua conta Figura 2 1 Figura 2 2 Figura 2 3 Passo 5 Leia o código QR na parte posterior da câmara para obter o número de série SN também pode tocar em Introduzir manualmente o SN Manually enter...

Page 23: ...valores predefinidos de fábrica e repita os passos 4 9 para adicionar o dispositivo 3 Instalação do dispositivo Figura 3 1 Figura 3 2 Isenção de responsabilidade Este guia de início rápido destina se apenas a consulta Podem ser encontradas diferenças mínimas na interface do utilizador Todos os designs e software aqui incluídos estão sujeitos a alterações sem aviso prévio Todas as marcas comerciais...

Page 24: ...UA VISION TECHNOLOGY CO LTD Address No 1199 Bin an Road Binjiang District Hangzhou P R China Postcode 310053 Tel 86 571 87688883 Fax 86 571 87688815 Email consumer global dahuatech com Website www dahuaconsumer com ...

Reviews: