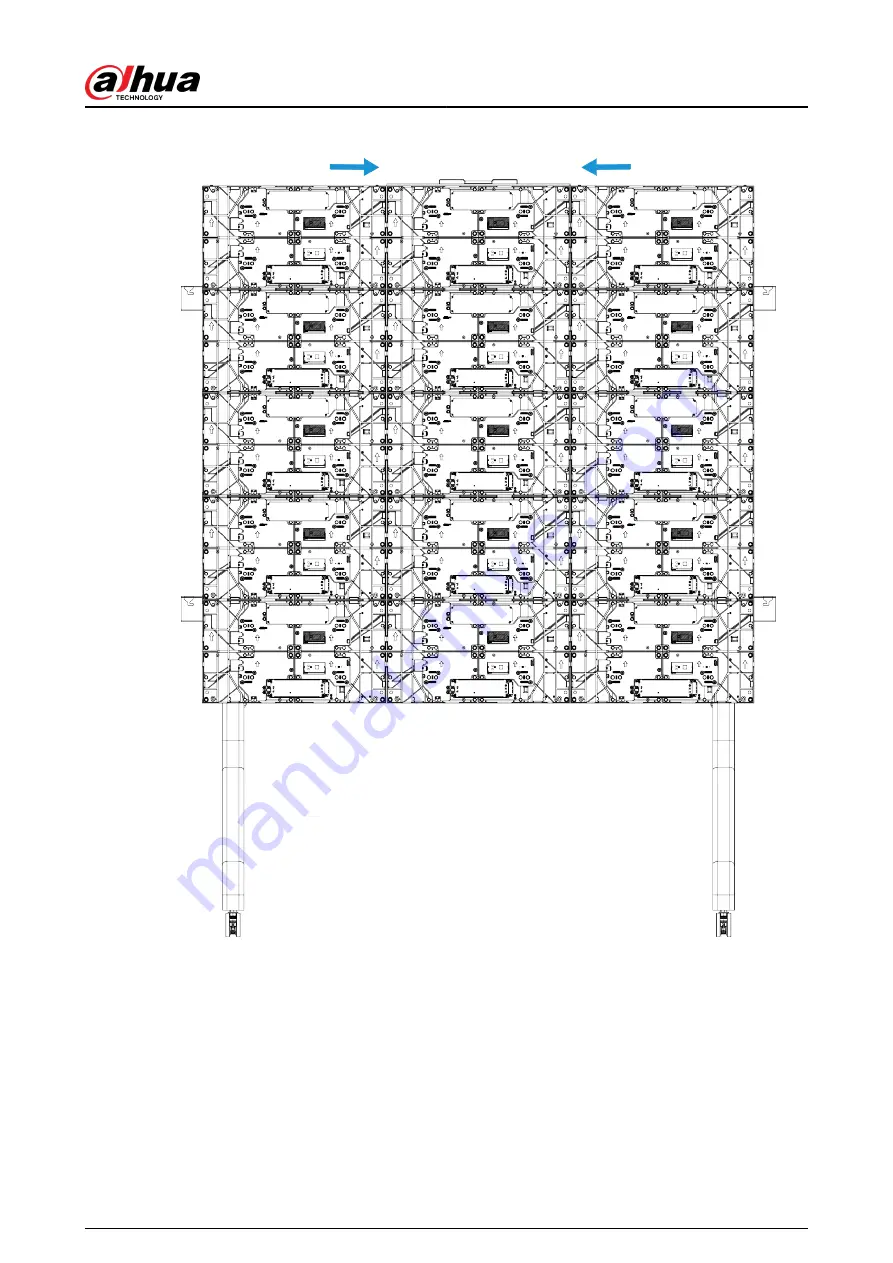
Figure 3-13 Install other columns
Quick Start Guide
19
Page 1: ...ZHEJIANG DAHUA VISION TECHNOLOGY CO LTD V1 0 1 Smart All In One LED Display Quick Start Guide...
Page 2: ...collect the personal data of others such as their face fingerprints and license plate number You need to be in compliance with your local privacy protection laws and regulations to protect the legiti...
Page 3: ...s operations and technical data If there is any doubt or dispute we reserve the right of final explanation Upgrade the reader software or try other mainstream reader software if the manual in PDF form...
Page 4: ...rom dampness dust and soot Install the device on a stable surface to prevent it from falling Install the device in a well ventilated place and do not block its ventilation The power supply must confor...
Page 5: ...d power adapter We will assume no responsibility for any problems caused by the use of a nonstandard power adapter Use the power cord that is recommended for the region and conforms to the rated power...
Page 6: ...ean and soft cloth or use the special lens wiping cloth when cleaning the surface of display screen Do not use the wet cloth to clean the display screen Otherwise it may do harm to the screen Quick St...
Page 7: ...Bracket Installation 10 3 3 1 Installing Mobile Bracket 10 3 3 2 Installing Wall Mount Bracket 13 3 4 Column Installation 14 3 4 1 Installing the Middle Column 15 3 4 2 Installing Other Columns 18 3 5...
Page 8: ...cy protection the device adopts a built in flip camera which automatically pans up during use and pans down when it stops working 8 MP wide angle camera Diagonal 99 horizontal 87 vertical 49 With buil...
Page 9: ...e Quantity Name Quantity LED column 5 Transverse beam 1 Front cover 1 Beam connector 1 Camera 1 Power cable 1 Light modules box 13 Remote control 1 Projector 1 Type C cable on the camera 1 HDMI cable...
Page 10: ...that the wall can bear a load of 160 kg or more Space Make sure that there is enough space for the Device The ideal reserved space is 10 mm greater than the length and height of the Device If you want...
Page 11: ...w 16 3 3 Bracket Installation 3 3 1 Installing Mobile Bracket The mobile bracket comes with 2 Y shaped vertical poles 2 horizontal poles 1 strengthen pole 4 foot wheels 8 M8 16 screws 8 M8 45 screws 4...
Page 12: ...nstall the casters Step 2 Screw 2 M8 16 screws into the side of the 2 Y shaped vertical poles to stand the moving bracket upright Do not tighten the screws for later adjustment of the columns Quick St...
Page 13: ...ach the 2 horizontal poles to the Y shaped vertical poles with M8 45 screws Make sure that the mounting holes in the upper and lower part of the 2 horizontal poles align The holes will be used to adju...
Page 14: ...and 12 expansion screws ST6 3 Procedure Step 1 Confirm and mark the installation position on the wall through tape measure or laser level Step 2 Drill holes on the marked positions with diameter of 10...
Page 15: ...ith a camera or OPS it is necessary to reserve an area on the wall in advance Figure 3 6 Reserve an area mm inch 3 4 Column Installation You can install the device on the mobile bracket or wall Here w...
Page 16: ...ws were pre installed in the specific mounting holes on the back of the columns and the pre installed wall mounting screws were tightened Before attaching the column to the bracket unscrew the wall mo...
Page 17: ...the cables to the adapter board and then fix the sheet metal bracket to the top of the edging strip Connect the Type C cable as below Do not install the cable facing the wrong direction Figure 3 10 Fi...
Page 18: ...gure 3 11 Fix the camera module Step 4 Install the middle column where the camera module is already installed to the middle hole of the bracket by loosening the wall mounting screws Quick Start Guide...
Page 19: ...Columns Procedure Step 1 With the middle column in the center install the other columns on both sides After installation slide them to the middle to ensure that there is no gap between columns and the...
Page 20: ...Figure 3 13 Install other columns Quick Start Guide 19...
Page 21: ...ep 2 After all the columns are installed use a slotted screwdriver to turn the wall mounting screws counterclockwise from the front of the column to tighten them Figure 3 15 Tighten the wall mounting...
Page 22: ...ransverse Beam Installation Procedure Step 1 Unfold the beam until it is flat and attach the beam connector Figure 3 17 Lock the transverse beam Step 2 Align the beam to the bottom of the column and a...
Page 23: ...Figure 3 18 Align the beam Figure 3 19 Tighten the screws Step 3 Connect the power cables Quick Start Guide 22...
Page 24: ...the other end of the HDMI and Type C cables of the camera to the motherboard Connect the Type C cable as below Do not install the cable facing the wrong direction Figure 3 21 Connect the cable Step 6...
Page 25: ...t hole Step 2 Remove the OPS bracket and the top cover pass the FFC connector and power cable through the OPS bracket and then secure the OPS bracket to the bottom of the column in the lower right cor...
Page 26: ...on standby and blue when the Device is in normal use You can set the display mode of the indicator light as needed 6 Power input port Inputs 100 240 VAC power 7 Speaker Plays multi media sound 8 OPS...
Page 27: ...m and the optional OPS computer module 3 Type C Connect a laptop or other devices to the Device through the Type C port for screen sharing and other operations 4 IR sensor Receives signals from the re...
Page 28: ...e 3 HDMI OUT HD audio and video signal output port Transmits uncompressed HD video and multi channel audio data 4 Micro USB Used for debugging Android system 5 RS 232 port Transmits data between devic...
Page 29: ...nt software Nice to have recommendations to improve your device network security 1 Physical Protection We suggest that you perform physical protection to device especially storage devices For example...
Page 30: ...users regularly to see if the device is logged in without authorization Check device log By viewing the logs you can know the IP addresses that were used to log in to your devices and their key opera...
Page 31: ......