background image


12 

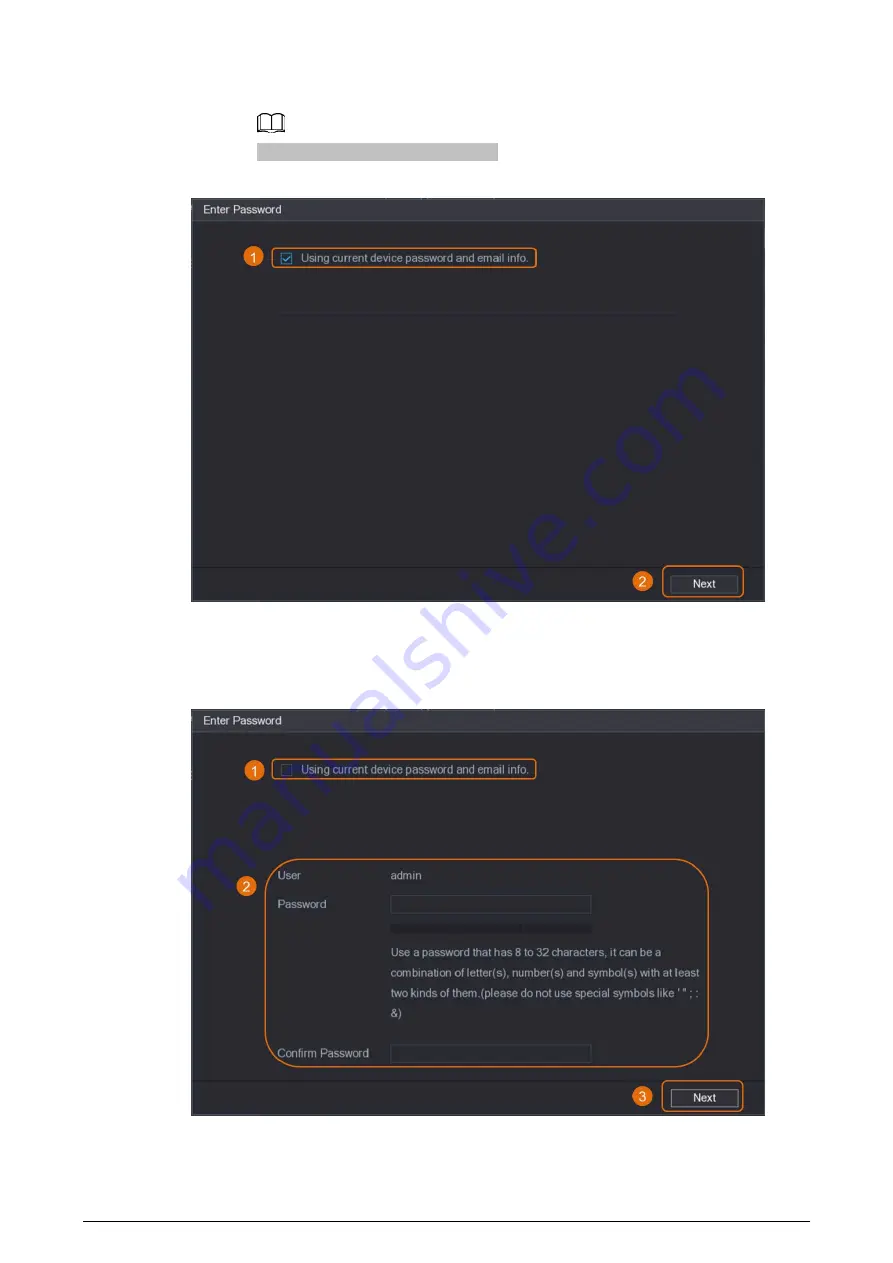
1.  Select Using current device password and email info.. 


This check box is selected by default. 

Figure 1-11 Apply device settings 


2.  Click Next. 

  Manually set password and email information. 

1.  Cancel Using current device password and email info.. 

Figure 1-12 Set password 


2.  Set password. 

Summary of Contents for D-XVR5104H-4KL-I3

Page 1: ...Digital Video Recorder Quick Start Guide V1 0 0 ...

Page 2: ...sonal data of others such as face fingerprints car plate number Email address phone number GPS You need to be in compliance with the local privacy protection laws and regulations to protect the legitimate rights and interests of other people by implementing measures including but not limited to providing clear and visible identification to inform data subject the existence of surveillance area and...

Page 3: ...al explanation Upgrade the reader software or try other mainstream reader software if the Manual in PDF format cannot be opened All trademarks registered trademarks and the company names in the Manual are the properties of their respective owners Visit our website contact the supplier or customer service if there is any problem occurred when using the DVR If there is any uncertainty or controversy...

Page 4: ...not dismantle the DVR arbitrarily Transport use and store the DVR within allowed humidity and temperature range Power Requirements Use batteries according to requirements Otherwise it may result in fire explosion or burning risks of batteries To replace batteries only the same type of batteries can be used Dispose the exhausted batteries according to the instructions Use electric wires within rate...

Page 5: ...anging Channel Type 9 1 5 2 Initializing IP Camera 10 1 5 3 Adding IP Camera by Search Result 14 1 5 4 Manually Adding IP Camera 16 1 6 Configuring Recorded Video Storage Schedule 19 1 7 Configuring P2P Settings 21 1 7 1 Enabling P2P Function 21 1 7 2 Adding the DVR to Smart Phone Client 22 1 8 Smart Motion Detection 23 1 9 Live View 26 1 10 Recording Playback 27 2 Logging in to Web 29 Appendix 1 ...

Page 6: ...en connect it to the power socket Always use stable current It is recommended to use UPS as the power source 1 2 Initializing the DVR This topic shows how to initialize the DVR before use Background Information When booting up for the first time you need to configure the password information for admin by default To guarantee device security we strongly recommend you properly keep the login passwor...

Page 7: ...d Step 3 Click Next Step 4 Read the Software License Agreement and select I have read and agree to all terms and then click Next Step 5 Select time zone and configure system time and then click Next Figure 1 2 Configure time zone and system time Step 6 Configure the password information for device administrator and then click Next ...

Page 8: ...the next field The new password can be set from 8 characters to 32 characters and contains at least two types from numbers letters and special characters excluding and Confirm Password Password Hint Enter a prompt question that will help you recall the password for your device On the login interface click and the prompt will be displayed to help you reset the password Step 7 Optional Use mouse to ...

Page 9: ...nal Apply reserved email and security questions to the DVR Enable Reserved Email and enter the email address Enable Security Question and select questions from the drop down lists for Question 1 Question 2 and Question 3 and then enter the answers to those questions Figure 1 5 Apply reserved email and security questions Step 9 Click OK 1 3 Configuring Network You can configure the basic network se...

Page 10: ...onfiguration once DHCP is enabled If DHCP is effective the obtained information will be displayed in the IP Address Subnet Mask and Default Gateway If not all values show 0 0 0 0 If PPPoE connection is successful the IP address subnet mask default gateway and DHCP are not available for configuration IP Address Enter the IP address and configure the corresponding subnet mask and default gateway IP ...

Page 11: ...onnection and it is also the default value of some routers network adapters and switches 1492 Optimized value for PPPoE 1468 Optimized value for DHCP 1450 Optimized value for VPN Test Click Test to test if the entered IP address and gateway are interworking Step 3 Click OK 1 4 Configuring Encode Setting This topic shows how to set encode settings for each channel Procedure Step 1 Select Main Menu ...

Page 12: ...e drop down list select General Motion or Alarm Sub Stream This setting is not configurable Compression In the Compression list select the encode mode H 265 Main profile encoding This setting is recommended H 264H High profile encoding Low bit stream with high definition H 264 General profile encoding H 264B Baseline profile encoding This setting requires higher bit stream compared with other sett...

Page 13: ...er the value the better the image will become I Frame Interval The interval between two reference frames Bit Rate Kb S From the Bit Rate drop down list select a value or enter a customized value to change the image quality The bigger the value is the better the image will become Video Enable the function for sub stream Audio Click More the More interface is displayed Audio This function is enabled...

Page 14: ...og channel to IP channel Cameras you want to add must be in the same network with the DVR 1 5 1 Changing Channel Type You can convert channel type to IP channel when you need to add IP camera to the DVR Background Information All channels of the DVR are set as analog channels by default and you can convert them to IP channels Procedure Step 1 Select Main Menu CAMERA Channel Type Step 2 Select the ...

Page 15: ... you purchased The actual product shall prevail Figure 1 8 Select IP channel Step 3 Click Apply and follow onscreen instructions to complete the settings 1 5 2 Initializing IP Camera The topic shows how to initialize new cameras or the cameras after restoring factory defaults Background Information The IP camera shall be initialized before connecting to an DVR otherwise the connection will fail Th...

Page 16: ... Search uninitialized device Step 3 Select the camera to be initialized and then click Initialize Figure 1 10 Initialize the camera Step 4 Apply password and email information to the IP camera Use the DVR s settings ...

Page 17: ...rd and email info This check box is selected by default Figure 1 11 Apply device settings 2 Click Next Manually set password and email information 1 Cancel Using current device password and email info Figure 1 12 Set password 2 Set password ...

Page 18: ...gth bar indication Confirm Password 3 Click Next 4 Enter an email address and click Next Figure 1 13 Set email information Step 5 Configure camera IP address Select DHCP if there is a DHCP server deployed Select Static and then input IP address subnet mask default gateway and incremental value Set the incremental value when you need to change IP addresses of multiple cameras at one time The DVR wi...

Page 19: ...tion to complete Step 7 Click Finished 1 5 3 Adding IP Camera by Search Result Prerequisites Make sure that the cameras you want to add have already been initialized and connected to the right network Procedure Step 1 Select Main Menu CAMERA Camera List Add Camera Step 2 Click Search Device ...

Page 20: ...as Add by double click Double click the target camera to add it to Added Device list You can add only one camera by search result at one time Add by check box Select the check box of the target camera and then click Add to add it to Added Device list ...

Page 21: ...dicates connection failure between the camera and the DVR Check the parameters of the camera such as password protocol and channel number and then try adding it again 1 5 4 Manually Adding IP Camera You can add an IP camera by IP information at one time Prerequisites Make sure that the cameras you want to add have already been initialized and connected to the right network Procedure Step 1 Select ...

Page 22: ...17 Figure 1 17 Manual add Step 3 In the Manual Add dialog box configure parameters ...

Page 23: ...nnot connect to RTSP Port The default value is 554 You can change the value as needed HTTP Port The default value is 80 You can change the value as needed If you enter another value for example 70 and then you should enter 70 after the IP address when logging in to the DVR by browser TCP Port The default value is 37777 You can change the value as needed Username Enter the username of the remote de...

Page 24: ...nabling the Encryption check box will provide encryption protection to the data being transmitted To use this function the HTTPS function must be enabled for the remote IP camera Step 4 Click OK 1 6 Configuring Recorded Video Storage Schedule By default all cameras continuously record videos 24 hours a day You can modify the settings as needed You can also configure storage schedule in the Startup...

Page 25: ...he redundant HDD only backs up the recorded videos but not snapshots Event type Select the check box of the event types General General recording means that the DVR records all videos for the specified time frame General recording is represented by the color green Motion Motion recording means that the DVR records video only when the motion detection is triggered Motion recording is represented by...

Page 26: ...to record function is enabled For details to enable auto record see User s Manual 1 7 Configuring P2P Settings You can use the QR code to connect a smart phone to the DVR for management Make sure that the DVR has been connected to the Internet and if yes in the Status box of the P2P interface it shows Online 1 7 1 Enabling P2P Function You need to enter P2P interface to enable P2P function and sca...

Page 27: ...s topic takes adding the DVR to smart phone client as an example for smart phone management Step 1 Open the application and tap Step 2 Select SN Scan Figure 1 21 Add device Step 3 Select DVR XVR enter a name and password for the DVR and then tap Save ...

Page 28: ...ion SMD Background Information The Smart Motion Detection SMD is an ideal monitoring feature for low populated areas where you want an alert for human or vehicles anywhere in the scene without having to set rules and draw lines Step 1 Select Main Menu SMART DETECTION Parameters SMD The SMD interface is displayed ...

Page 29: ...riod during which the motion detection is active Anti Dither Configure the time period from end of event detection to the stop of alarm Alarm out Port Click Setting to display setting interface General Alarm Enable alarm activation through the alarm devices connected to the selected output port External Alarm Enable alarm activation through the connected alarm box Wireless Siren Enable alarm activ...

Page 30: ...ng off recording after the alarm is cancelled The value ranges from 10 seconds to 300 seconds and the default value is 10 seconds Tour Select the Tour check box to enable a tour of the selected channels Picture Storage Select the Snapshot check box to take a snapshot of the selected channel To use this function select Main Menu CAMERA Encode Snapshot in the Type list select Event Sub Screen Select...

Page 31: ...el on the screen By default the system time channel name and channel number are displayed on each channel window This setting can be configured by selecting Main Menu CAMERA Overlay Overlay The figure at the lower right corner represents channel number If the channel position is changed or the channel name is modified you can recognize the channel number by this figure and then perform the operati...

Page 32: ... minutes to 60 minutes of the recorded video By clicking the instant playback interface is displayed The instant playback has the following features Move the slider to choose the time you want to start playing Play pause and close playback The information such as channel name and recording status icon are shielded during instant playback and will not display until exited During playback screen spl...

Page 33: ...f there was any motion detection event occurred The system will display the images with motion events of the recorded video This function is for some series product only To use the Smart Search function you need to enable the motion detection for the channel by selecting Main Menu ALARM Video Detection Motion Detection ...

Page 34: ...The actual product shall govern Procedure Step 1 Open the browser and enter the IP address of the DVR and then press Enter key Step 2 Enter the username and password Figure 2 1 Login The default administrator account is admin The password is the one that was configured during initial settings To security your account it is recommended to keep the password properly and change it regularly Click to ...

Page 35: ...e suggest that you download and use the latest version of client software Nice to have recommendations to improve your equipment network security 1 Physical Protection We suggest that you perform physical protection to equipment especially storage devices For example place the equipment in a special computer room and cabinet and implement well done access control permission and key management to p...

Page 36: ...SK encryption mode and set up strong passwords 11 Audio and Video Encrypted Transmission If your audio and video data contents are very important or sensitive we recommend that you use encrypted transmission function to reduce the risk of audio and video data being stolen during transmission Reminder encrypted transmission will cause some loss in transmission efficiency 12 Secure Auditing Check on...

Page 37: ...he network isolation effect Establish the 802 1x access authentication system to reduce the risk of unauthorized access to private networks 15 It is recommended that you enable your device s firewall or blocklist and allowlist feature to reduce the risk that your device might be attacked ...

Reviews: