Dahua D-IPC-HFW7442H-ZVH Quick Start Manual Download Page 11

Quick Start Guide 

The 

Device initialization

 interface is displayed. 


Select the devices that need initialization, and then click 

Initialize

Step 6

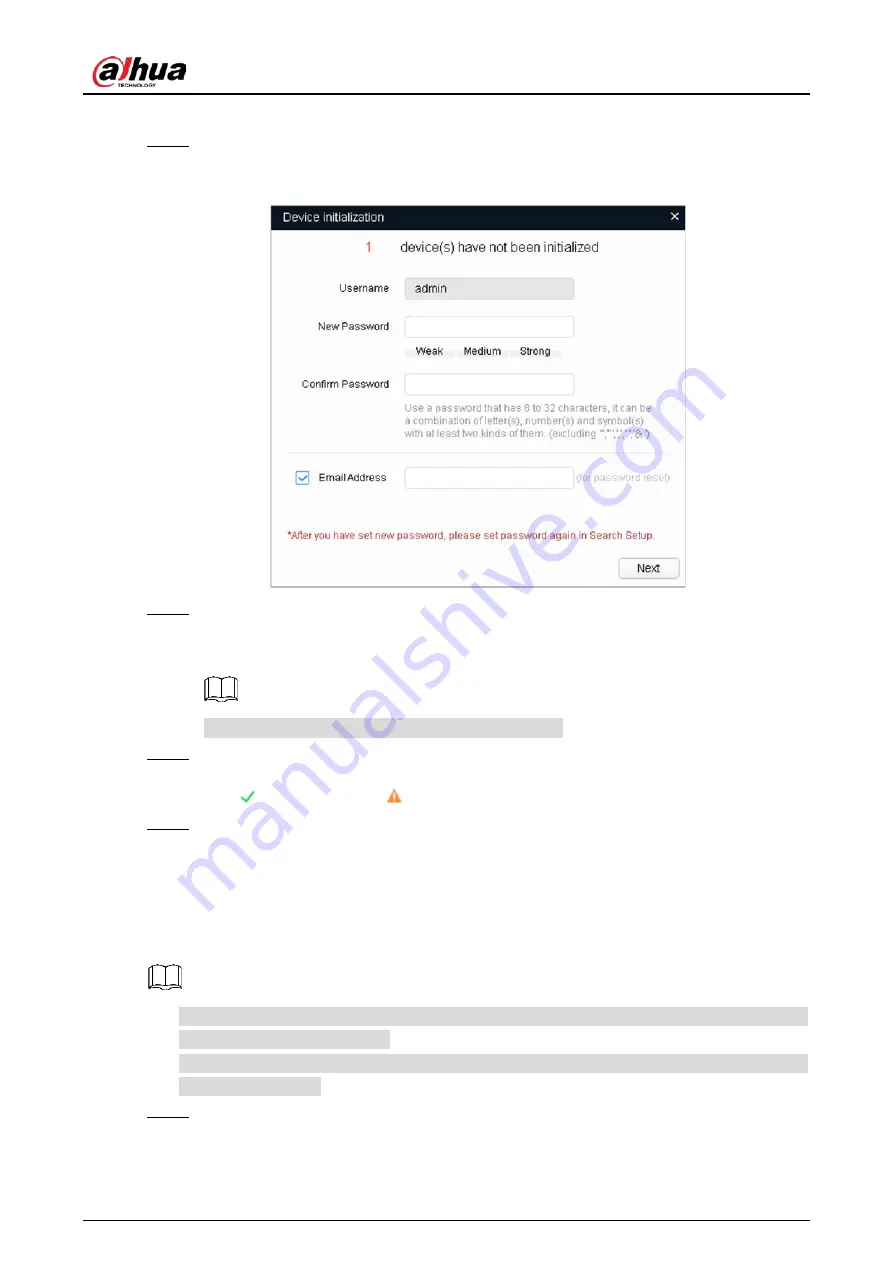
The password setting interface is displayed. See Figure 2-2. 


Password setting 

Figure 2-2


Set and confirm the password of the devices, then enter a valid email address, and then click 

Step 7

Next

The final setting interface is displayed. 


Password can be modified or reset in 

System Settings


Select the options according to your needs, and then click 

OK

Step 8

The 

Initialization

  interface is displayed after initialization  is completed. Click the success 

icon ( ) or the failure icon ( ) for the details. 


Click 

Finish

Step 9

The device status in the 

Modify IP

 interface (Figure 2-1) turns to 

Initialized


Modifying Device IP Address 

2.2


You can modify IP address of one or multiple devices in one time. This section is based on 
modifying IP addresses in batch. 


Modifying IP addresses in batch is available only when the corresponding devices have the 
same login password. 


Do Step 1 to Step 4 in "2.1 Initializing Device" to search devices in your network segment. 

Step 1

Summary of Contents for D-IPC-HFW7442H-ZVH

Page 1: ...Model H IR Bullet Network Camera Quick Start Guide V1 0 3 ZHEJIANG DAHUA VISION TECHNOLOGY CO LTD...

Page 2: ...1 1 Delete the mode the Angle mounted installation type in 3 3 1 Installation Type Add 3 3 3 Threading Cable and 3 3 5 Wrapping Waterproof Tape Optional April 2019 V1 0 0 First release November 2018 A...

Page 3: ...software or try other mainstream reader software if the manual in PDF format cannot be opened All trademarks registered trademarks and the company names in the manual are the properties of their resp...

Page 4: ...p the indoor device away from rain or damp to avoid fire or lightning Keep sound ventilation to avoid heat accumulation Transport use and store the device within the range of allowed humidity and temp...

Page 5: ...h diethyl or moisten soft cloth You can also remove dust with an air blower WARNING Strengthen the protection of network device data and personal information by adopting measures which include but not...

Page 6: ...nitializing Device 4 2 1 Modifying Device IP Address 5 2 2 Logging in to Web Interface 6 2 3 3 Installation 8 Packing List 8 3 1 Dimensions 8 3 2 Installing Device 9 3 3 3 3 1 Installation Type 9 3 3...

Page 7: ...ion 1 A RS 485_A controls external devices such as PTZ B RS 485_B controls external devices such as PTZ G Ground connection of port I1 port I2 and port I3 I1 Receives the switch signal of external ala...

Page 8: ...rm input device to the alarm input end of the I O port Step 1 Device collects different states of alarm input port when the input signal is idling and being connected to the ground Device collects log...

Page 9: ...end of the I O port There will be high level and low level alarm signal generated by the alarm input device when alarm occurs set the input mode to NO default if the alarm input signal is logic 0 and...

Page 10: ...le network segment properly to connect the device to the network The following figures and interfaces are for reference only and the actual product shall prevail Initializing Device 2 1 Double click C...

Page 11: ...ions according to your needs and then click OK Step 8 The Initialization interface is displayed after initialization is completed Click the success icon or the failure icon for the details Click Finis...

Page 12: ...e devices will be set to the same if you select the Same IP check box If DHCP server is available in the network devices will automatically obtain IP addresses from DHCP server when you select DHCP Cl...

Page 13: ...Quick Start Guide 7 Main interface Figure 2 4...

Page 14: ...ation such as electric drill is not provided in the packing The operation manual and related tool are contained in the disk or the QR code and the actual packing shall prevail Dimensions 3 2 The follo...

Page 15: ...stallation Type 3 3 2 Installing SD Card Optional Disconnect the power before installing or removing the SD card Press and hold the reset button for 10 s to reset the camera 3 3 3 Threading Cable This...

Page 16: ...Quick Start Guide 10 3 3 4 Attaching Device Make sure that the mounting surface is strong enough to hold at least three times of the weight of the device and bracket...

Page 17: ...Quick Start Guide 11 Cable going through the mounting surface...

Page 18: ...Quick Start Guide 12 Cable going through the side cable tray 3 3 5 Wrapping Waterproof Tape Optional This part is needed when the cable connector is out of the junction box...

Page 19: ...Quick Start Guide 13 3 3 6 Adjusting Sunshield 3 3 7 Adjusting Lens Angle...

Page 20: ...Quick Start Guide...

Reviews: