Dahua ARC2000E-SW Quick Start Manual Download Page 35


Error!  Use  the  Home  tab  to  apply 

标题

  1  to  the  text  that  you  want  to  app

ear  here.


  35 


The accessory is armed by default in away mode. Tap 

  to disarm the accessory. 


(Optional)  Tap 

  to  disarm  all  accessories,  except  24H  alarm  devices,  such as 

flood detector and so on. 


Configuration Details 

3.5.1 

Device Details 


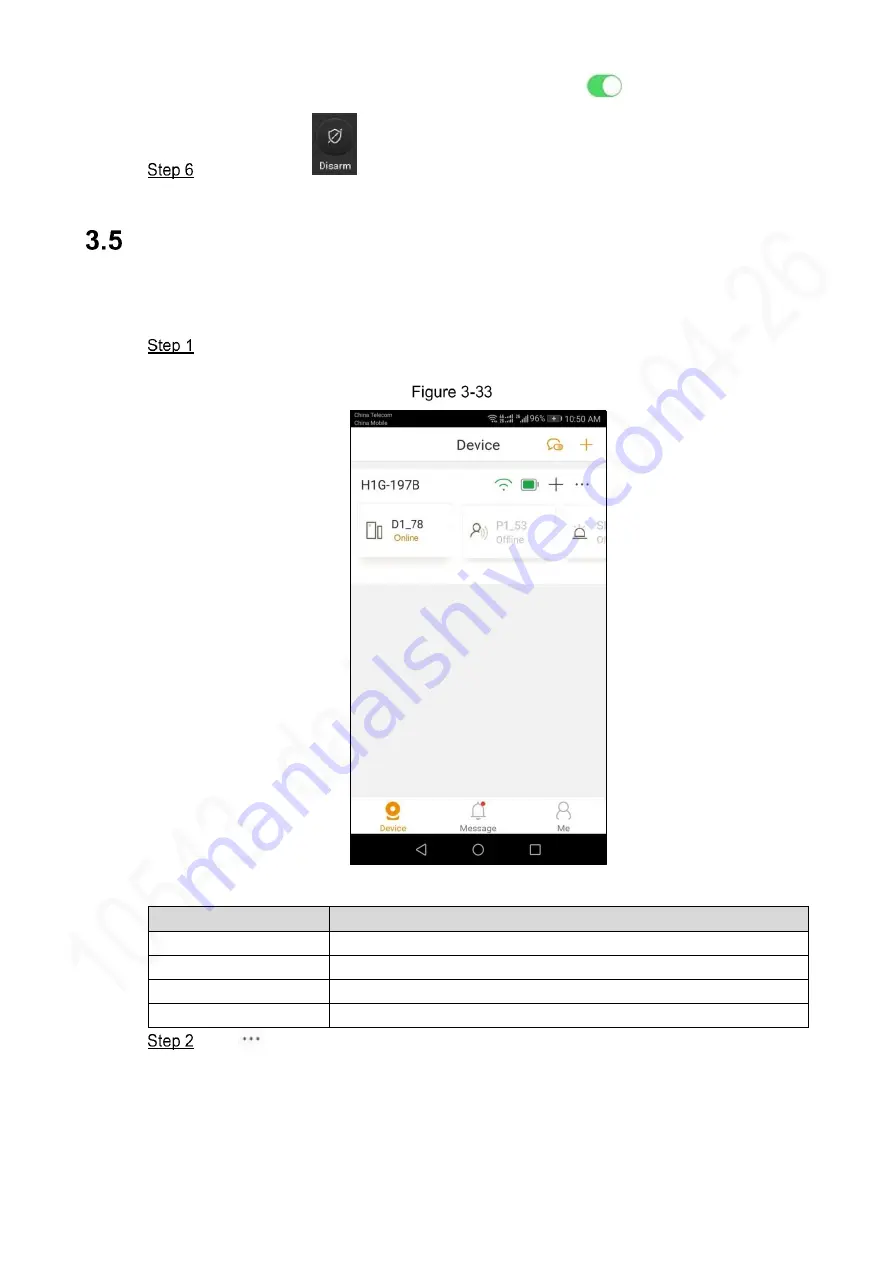
Tap App icon on your mobile phone, and start the App. 
The 

Device

 interface is displayed. See Figure 3-33. 


Device 


Table 3-3 

Accessory status description 

Status 

Description 

Online   

The accessory is online and working. 

Offline 

The accessory is offline and not working. 

Armed   

The accessory is armed. It will give an alarm when necessary. 

Disarmed 

The accessory is disarmed. It will not give an alarm. 


Tap 

Accessory list is displayed. See Figure 3-34. 

Summary of Contents for ARC2000E-SW

Page 1: ...Wireless Alarm Hub Quick Start Guide V1 0 0 ZHEJIANG DAHUA VISION TECHNOLOGY CO LTD...

Page 2: ...be changed to any set of numbers between 1025 65535 Avoiding the default ports reduces the risk of outsiders being able to guess which ports you are using 3 Enable HTTPS SSL Set up an SSL Certificate...

Page 3: ...g SNMP you should do so only temporarily for tracing and testing purposes only 12 Multicast Multicast is used to share video streams between two recorders Currently there are no known issues involving...

Page 4: ...rty damage data loss lower performance or unpredictable result TIPS Provides methods to help you solve a problem or save you time NOTE Provides additional information as the emphasis and supplement to...

Page 5: ...a Increase the separation between the equipment and receiver Connect the equipment into an outlet on a circuit different from that to which the receiver is connected Consult the dealer or an experienc...

Page 6: ...ations description or errors in print If there is any doubt or dispute please refer to our final explanation Upgrade the reader software or try other mainstream reader software if the Guide in PDF for...

Page 7: ...n rated input and output range Do not dismantle the device arbitrarily Transport use and store the device within allowed humidity and temperature range Power Requirement Use batteries according to req...

Page 8: ...llation Dimension 12 Installation Procedure 12 3 Operation 14 Downloading APP 14 Adding Alarm Hub 14 3 2 1 Adding Alarm Hub through Wired Network 14 3 2 2 Adding Alarm Hub through Wi Fi 19 Pairing wit...

Page 9: ...arm devices conveniently and obtain reliable security service 2G and 4G functions are not standard configurations H1G matches with 2G module whereas H1F matches with 4G module Feature Support maximum...

Page 10: ...shing red light represents alarm or network error Reset Reset the device to initialized status During normal operation press RESET hole for 6s with a needle The indicator will flash red the device wil...

Page 11: ...Error Use the Home tab to apply 1 to the text that you want to app ear here 11 Device dimension 2 unit mm...

Page 12: ...tall this device with expansion screw Drill holes in the wall according to hole positions of the bracket Put expansion tubes into the holes Fix the bracket with self tapping screws After installation...

Page 13: ...Error Use the Home tab to apply 1 to the text that you want to app ear here 13 Installation with screws To ensure normal network connection insert SIM card before power on...

Page 14: ...See Figure 3 1 QR code Android users please go to Android APP market to search and download Imou Apple users please go to Apple Store to search and download Imou Adding Alarm Hub 3 2 1 Adding Alarm Hu...

Page 15: ...e tab to apply 1 to the text that you want to app ear here 15 Login Enter your mailbox and password and then tap Login The Device interface is displayed See Figure 3 3 Tap Sign up if you have not sign...

Page 16: ...tap in the upper right corner The Device adding interface is displayed See Figure 3 4 Remove the bracket and then scan QR code at the bottom of the hub Device adding QR code Optional Or tap Serial num...

Page 17: ...p ear here 17 Device adding serial number Enter serial number of the device select the device in the category of alarm station and then tap Next On the APP interface tap Next Enter the device password...

Page 18: ...On the APP interface tap Next The hub is connecting with cloud See Figure 3 7 Connect cloud Then the hub prompts that it is connected with router successfully The device is added successfully On this...

Page 19: ...me tab to apply 1 to the text that you want to app ear here 19 Add successfully 3 2 2 Adding Alarm Hub through Wi Fi Tap App icon on your mobile phone and start the App The Login interface is displaye...

Page 20: ...e tab to apply 1 to the text that you want to app ear here 20 Login Enter your mailbox and password and then tap Login The Device interface is displayed See Figure 3 10 Tap Sign up if you have not sig...

Page 21: ...ap in the upper right corner The Device adding interface is displayed See Figure 3 11 Remove the bracket and then scan QR code at the bottom of the hub Device adding QR code Optional Or tap Serial num...

Page 22: ...r serial number of the device select the device in the category of alarm station and then tap Next Press and hold the function key on the top of the hub for more than 5 seconds until the indicator lig...

Page 23: ...to app ear here 23 Enable WLAN on your mobile phone tap hub hotspot Hotspot Wi Fi name is AlarmHub hub serial number and then tap Connect on the pop up interface See Figure 3 14 Connect The hotspot is...

Page 24: ...n 3 2 1 Adding Alarm Hub through Wired Network On the APP interface tap Next Enter the device password on the pop up interface See Figure 3 16 Enter the device password On the APP interface tap Next S...

Page 25: ...Error Use the Home tab to apply 1 to the text that you want to app ear here 25 Select Wi Fi Enter Wi Fi password On the APP interface tap Next The hub is connecting with cloud See Figure 3 19...

Page 26: ...26 Connect cloud Then the hub prompts that it is connected with router successfully The device is added successfully On this interface you can name your device configure time zone and DST See Figure...

Page 27: ...ot of electricity The battery has moderate electricity The battery has insufficient electricity Battery query error The battery is offline The Battery is charging The hub is charging with power adapte...

Page 28: ...ant to app ear here 28 Select hub Tap Next According to the interface prompts insert one battery into battery compartment of door contact and ensure its electrodes are correct See Figure 3 22 Insert b...

Page 29: ...Operation Tick the confirmation that Related operations have been completed and then tap Next The pairing process is going on See Figure 3 24 Pairing process After several seconds the door contact is...

Page 30: ...p ear here 30 Add successfully Tap Complete Arming the Door Contact After the door contact is added to arming mode an alarm will be triggered only in armed status Tap App icon on your mobile phone and...

Page 31: ...ror Use the Home tab to apply 1 to the text that you want to app ear here 31 Added Device Tap Accessory list is displayed See Figure 3 27 Accessory Table 3 2 Opening status description Icon Descriptio...

Page 32: ...t you want to app ear here 32 Icon Description The door is open The door is closed Offline and unknown status Query error Tap Mode Switch on the interface Switch the mode according to your needs See F...

Page 33: ...ror Use the Home tab to apply 1 to the text that you want to app ear here 33 Away mode Disarm mode Optional Tap Settings in Figure 3 28 home mode Home mode setting interface is displayed See Figure 3...

Page 34: ...hat you want to app ear here 34 Home mode setting The accessory is disarmed by default in home mode Tap to arm the accessory Optional Tap Settings in Figure 3 29 away mode Away mode setting interface...

Page 35: ...Details 3 5 1 Device Details Tap App icon on your mobile phone and start the App The Device interface is displayed See Figure 3 33 Device Table 3 3 Accessory status description Status Description Onl...

Page 36: ...pply 1 to the text that you want to app ear here 36 Accessory In case of alarm you can tap Ignore Sound to stop the alarm sound Tap in the upper right corner Device Details interface is displayed See...

Page 37: ...intensity operator setting and contact person number Maximum 8 contact person numbers can be configured In case of alarm a message will be sent to all the configured contact person numbers For operat...

Page 38: ...tector is opened Battery Level Show remaining electricity of the battery Protection Status Show protection status including Armed and Disarmed Linkage Siren Tap Linkage Siren and then tap on the inter...

Page 39: ...s no wired network and Wi Fi and 2G 4G card is inserted into the hub the hub uses 2G 4G network This following configuration is valid only when the hub is offline When the hub is online you can search...

Page 40: ...e text that you want to app ear here 40 Device details Tap Network Config The Wi Fi config interface is displayed See Figure 3 39 Wi Fi config On the APP interface tap Next Enter the device password o...

Page 41: ...Wi Fi network and enter Wi Fi password according to interface prompts Deleting the Door Contact Method 1 In APP check accessory details and delete according to prompts Method 2 Press RESET key for 6s...

Page 42: ...iring again 3 Accessory is triggered without any response Solution Check if electric quantity of accessory battery is sufficient Check if the accessory has been added to arm mode Check if the hub is a...

Page 43: ...nection Wired Network 1 channel 10 100M Ethernet RJ 45 port Standby Power Supply CR18650 battery 2150 mAh Supply Voltage DC5V 2A Power Consumption 10W Working Temperature 10 C to 55 C Dimension 125 12...

Reviews: