Dahua 6AE240VNI Quick Start Manual Download Page 19


17 

5.5  Configuring Alarms 

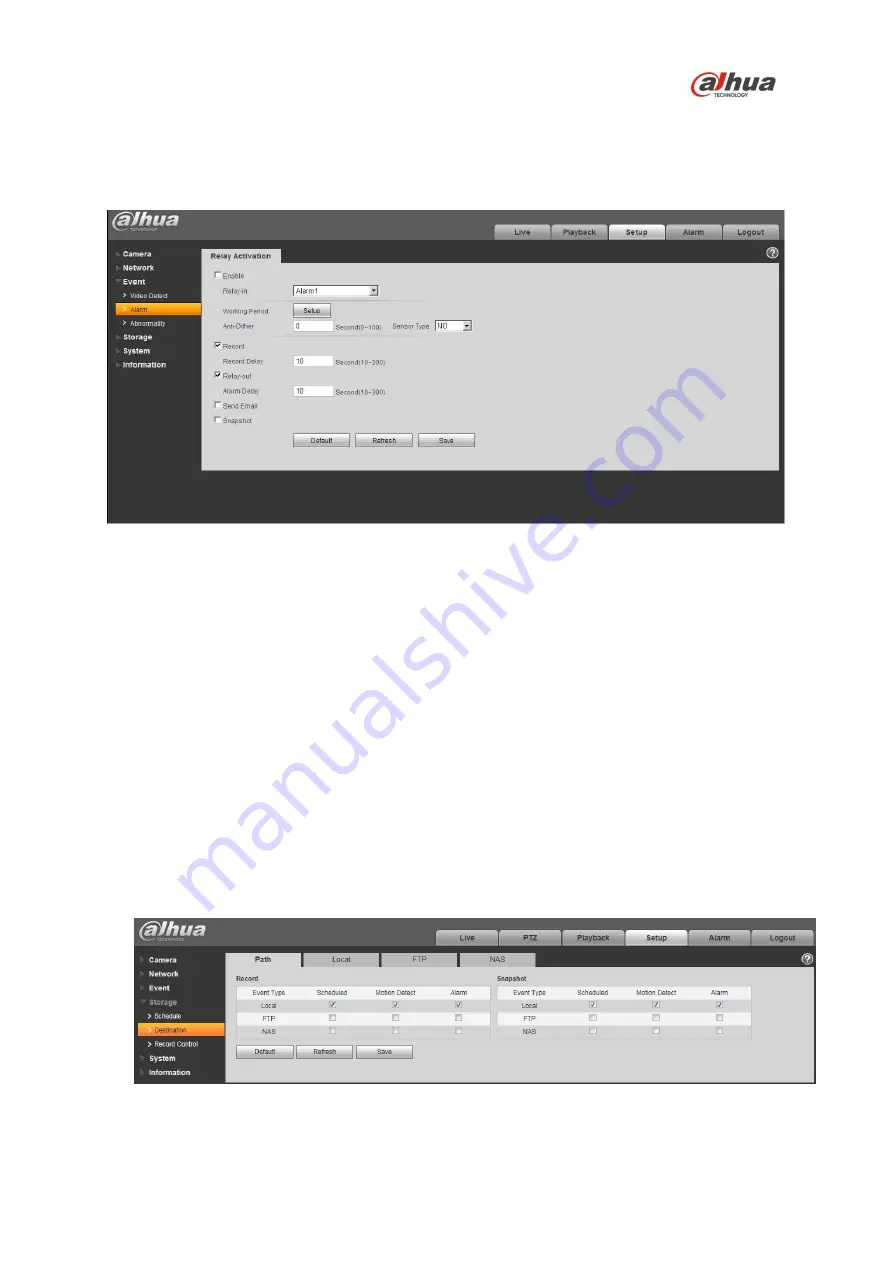
The device’s Web Interface offers a Relay Activation page to configure alarms and to set alarm 

responses. 


Figure 5-4 

1.  Access the Web Interface for the device and click the Setup tab. Expand the Event menu, then 

choose the Alarm page. Set the alarm input and output parameters in the Relay Activation page.  

2.  Set the parameters for the alarm inputs. Check the Enable box to activate the chosen alarm input 

(Alarm 1 or Alarm 2). Set the sensor type for the alarm, either Normally Open (NO) or Normally 

Closed (NC). 

3.  Check the Relay Out box to enable the alarm activation function.  

4.  Select an alarm output port to activate a corresponding alarm device when an alarm occurs. 

Check Send Email to have the device send an email to alert when alarm occurs and ends. Check 

Snapshot to have the device automatically take a snapshot of the scene if alarm occurs. 

5.6  Configuring Local SD Card Recording 

The devices Web interface contains settings to control the recording medium and to configure an 

alarm that triggers once the Micro SD card passes a pre-determined storage.  

1.  Access the Web Interface for the device and click the Setup tab. Expand the Storage menu, then 

choose the Destination page.  


Figure 5-5 

Summary of Contents for 6AE240VNI

Page 1: ...2 MP Network PTZ Camera 6AE240VNI Quick Start Guide Version 001 002 Dahua Technology USA Inc...

Page 2: ...6 3 Installation and Configuration 7 3 1 Framework and Dimensions 7 3 2 Wiring 7 3 3 Alarm Setup 8 Alarm Input 8 Alarm Output Level Application 8 Alarm Output Switch Application 9 4 Device Installatio...

Page 3: ...ect the unit from damage especially in damp environments Protect the plug and power cord from foot traffic being pinched and its exit from the unit Units with or without an ON OFF switch have power su...

Page 4: ...ng or installation Environmental Precautions Do not aim the unit at a strong light source or into direct sunlight to focus A strong light source may cause overexposure and may affect the longevity of...

Page 5: ...wipe a dome cover during installation this cover is an optical device Refer to the following methods clean the dome cover Stained with dirt Use an oil free soft brush or blower to gently remove the d...

Page 6: ...ee that interference will not occur in a particular installation If this equipment does cause harmful interference to radio or television reception which can be determined by turning the equipment off...

Page 7: ...y information Dahua accepts no liability for damage resulting directly or indirectly from faults incompleteness or discrepancies between this guide and the product described Dahua is not liable for an...

Page 8: ...o transport the unit in the event the unit must be returned for service Retain the carton and all shipping material for future use Please refer to the enclosed CD for more details to view the detailed...

Page 9: ...e only Figure 3 1 Dimensions for 6AE240VNI 3 2 Wiring The dome camera includes the following wiring bundles Wire Color Connection Power Red 24 VAC Yellow Green Earth Ground Black 24 VAC Video Control...

Page 10: ...ves the alarm input signal If input signal is grounded then no alarm input signal is detected Figure 3 2 Alarm Output Level Application Use this alarm output configuration if the output triggers an ex...

Page 11: ...nt substitute as these cards have been fully tested without issue and the SanDisk Extreme line is better suited for constant recording Lower grade SD cards meant for multimedia applications will at ti...

Page 12: ...de a different permanently earthed metal conduits not supplied Warning Install external interconnecting cables in accordance to NEC ANSI NFPA70 for US application and Canadian Electrical Code Part I C...

Page 13: ...d mount Appropriate tools to mount the camera to the wall Unpacking the Camera 1 Remove the camera the mount accessories and any hardware packages from the boxes 2 Remove the camera from the plastic w...

Page 14: ...each pre drilled perimeter hole 5 Remove the M4 Stainless Screw from the front of the PFB303W Wall Mount Bracket 6 Wrap several turns of Teflon tape around the threads on the PFA111 Mount Adapter with...

Page 15: ...mount bracket with care 2 Align the straight edge of the flange on the dome with the straight edge of the mount adapter quick installation port Slowly push the dome into the mount adapter quick insta...

Page 16: ...and automate the assignment of IP addresses DHCP should only be enabled if using dynamic IP address notification or if the DHCP can update a DNS server TFTP The Trivial File Transfer Protocol is a sim...

Page 17: ...figTool to access and to modify the network settings of a device Refer to the Operation Manual available on the CD included with the camera or on Dahuasecurity com for complete information Notes Ensur...

Page 18: ...have different Web interfaces the figures below are for reference only and may not represent the Web Interface for your camera Refer to the Web Operation Manual included on the CD shipped with the ca...

Page 19: ...or Normally Closed NC 3 Check the Relay Out box to enable the alarm activation function 4 Select an alarm output port to activate a corresponding alarm device when an alarm occurs Check Send Email to...

Page 20: ...following Micro SD card alarm options No SD Card Device triggers an alarm if the device does not contain a Micro SD card Capacity Warning Device triggers an alarm when the data on the Micro SD card pa...

Page 21: ...to a specified user after the device triggers an alarm 9 Set the capacity limit for the Micro SD Card available with the Capacity Warning event type The device triggers an alarm once the amount of da...

Page 22: ...logy USA Inc 23 Hubble Irvine CA 92618 Tel 949 679 7777 Fax 949 679 5760 Email sales usa global dahuatech com Rev 001 002 2017 Dahua All rights reserved Design and specifications are subject to change...

Reviews: