background image

26

Timer Recording

Normal timer recording

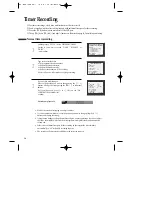
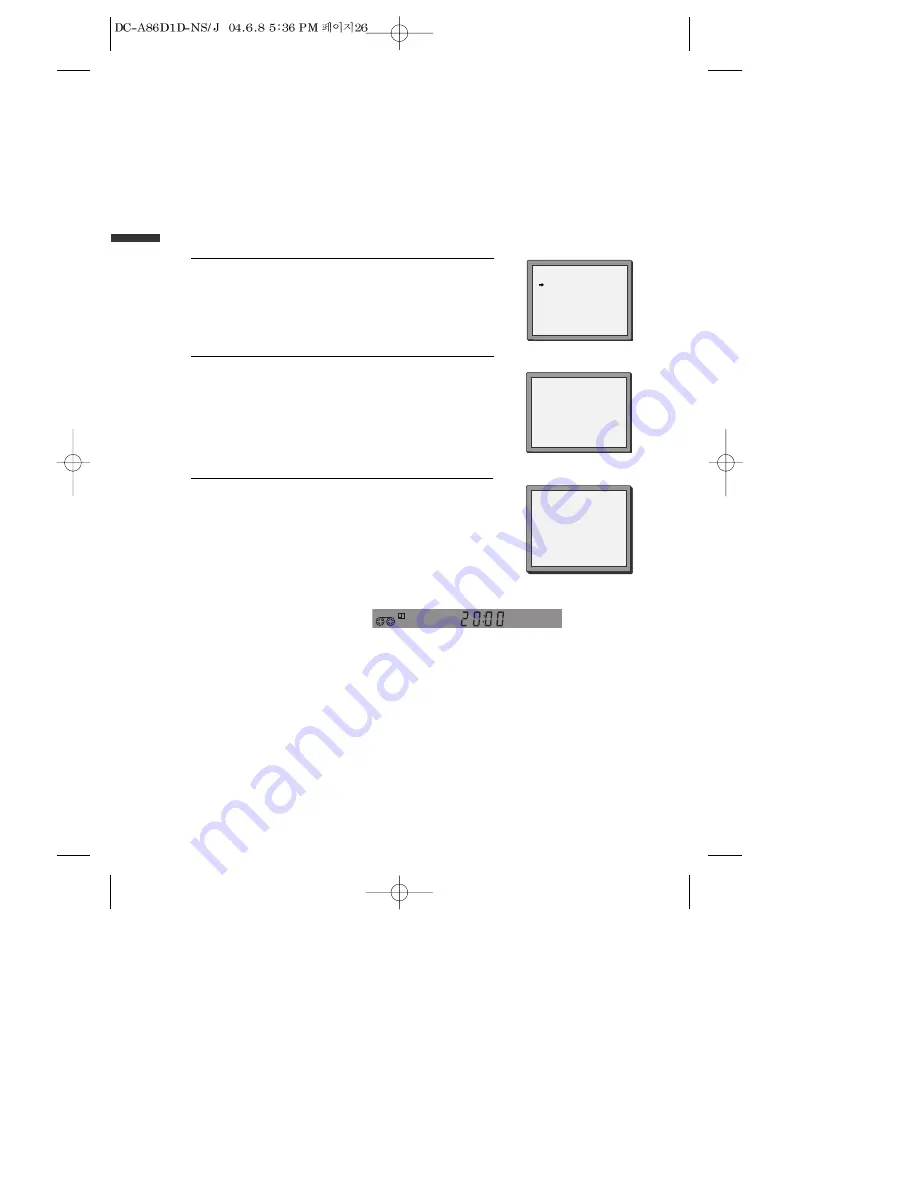
Call the player’s "SETUP", choose "TIMER PROGRAM".
Decide if you want to record  "ONCE", "WEEKLY" or
"DAILY"...
... and confirm.

1

Type in one after the other: 
•  The programme location number;
•  the time the broadcast starts,
•  the time the broadcast ends, 
•  the day of the broadcast, if it is not today. 
•  Select LP if you wish to make a very long recording .

2

If you wish to make changes:
Move to the position you want to change using the  [< / >]
buttons. Change the setting using the [PR+/- ] or [number]
buttons.
If all setting are ok, press [< or  >], till you see “OK :
CONFIRM” in the bottom line.
Confirm.

3

Switch your player off.

• Wait a few seconds after typing a one-digit-number.
• If you have made a mistake, move to the position you want to change using the [< / >]

buttons and change the setting.

• If programme timings overlap, the machine will give a warning message. If you don’t adjust

the times, the machine will record the first programme completely then continue with the
second one.

• If there is no sufficient free space for the recording on the cassette the video switches

automatically to “LP” for double recording capacity. 

• The recorder will eject cassettes which have the safety tab removed.

PR+/-:SELECT(AV)

0-9  :SETUP(PR)

</>:CORRECT   SETUP:END

PR

--

START TIME

--:--

END TIME

--:--

START DATE

--/--

TAPE SPEED

SP

TIMER  PROGRAM (ONCE)

PR

01

START TIME

18:10

END TIME

20:30

START DATE

20/06(FRI)

TAPE SPEED

LP

PR+/-:SELECT(AV)

0-9 : SETUP (PR)

</>

:CORRECT

OK:CONFIRM           SETUP:END

TIMER  PROGRAM  (ONCE)

HOW OFTEN DO YOU WANT

TO RECORD THIS PROGRAM?

PR+/-:SELECT
OK:CONFIRM       SETUP:END

ONCE

WEEKLY(ONCE A WEEK)

DAILY(MON-FRI)
DAILY(MON-SAT)
DAILY(MON-SUN)

For timer recordings, clock, date, and stations must be set correctly. 

Load a cassette with its safety tab in place and with sufficient free space for the recording.

Press the [VCR] button to assume control of the VCR part.

The up [PR+], down [PR-], left [<] and right [>] buttons are illustrated on page 16, 'Initial Set-up and tuning'.

Summary of Contents for SD-9800D

Page 1: ... displayed in operating the product please wait for a while then use it If DO NOT mark continues to be displayed in pressing a button after that it means the button does not function in the currently played disc Press a product button on the REMOTE then use the product DVD operation DVD button Video operation VCR button Please read this manual carefully before connecting your DVD VCR and operating...

Page 2: ...ON OFF 18 Output Select 19 DVD Playback 20 VCR Playback 21 Recording 22 VCR Operation Tuning in New Stations 24 Timer Recording 26 More Functions 28 Connections and Assembling 31 DVD Operation Playing a desired scene 33 Confirming the current PLAY mode on screen 37 Selecting an AUDIO language SUBTITLE language and 3D AUDIO 39 Selecting ZOOM and Multi Angle 40 About MP3 JPEG discs 41 Displaying men...

Page 3: ...re reference Should the unit require maintenance contact an authorized service location see service procedure Use of control adjustments or the performance of procedures other than those specified may result in hazardous radiation exposure To prevent direct exposure to the laser beam do not try to open the enclosure Visible laser radiation when open and interlocks defeated DO NOT STARE INTO THE BE...

Page 4: ... openings in the case are provided for ventilation to ensure reliable operation of the unit and to protect it from overheating These openings must not be blocked or covered These openings must not be blocked by placing the unit on a bed sofa rug or other similar surface This unit should never be placed near or over a radiator or heat radiator This unit should not be placed in a built in installati...

Page 5: ...rom the wall outlet and refer servicing to qualified service personnel under the following conditions A When the power supply cord or plug is damaged B If liquid has been spilled or objects have fallen into the unit C If the unit has been exposed to rain or water D If the unit does not operate normally by following the operating instructions Adjust only those controls that are covered by the opera...

Page 6: ... Forward Reverse playback Search of title chapter and time in DVD disc and search of time and track time in VCD and CD Various TV aspect DVD 4 3 for Pan and Scan 4 3 for Letter Box and 16 9 for Wide Repeat playback title chapter and part for DVD track disc and part for VCD CD Selective Play DVD VCD CD You can select and play the desired title chapter of DVD and track of Video CD CD in STOP mode 10...

Page 7: ...ain a clear screen we recommend regular inspection and maintenance every 1 000 hours of use by technical engineers For checking contact your dealer or your nearest service center Checking and Replacement of Antenna Antenna is subject to change in its direction or damage by wind and rain For clean screen contact and consult your nearest service center about checking and replacement In recording imp...

Page 8: ...e or disc or to playback back rapidly 3 Playback PAUSE button Playback videotape or disc Press this button to pause a screen 4 FAST FORWARD button Use to wind currently being played videotape or disc or to playback rapidly 5 OPEN CLOSE Tray button Operation Display Window Time Counter and Current Operation Tray is opened Tray is closed Disc is loaded There is no disc in tray Disc has some error Me...

Page 9: ... digital audio decoder A V OUTPUT Jack A V INPUT Jack AUDIO OUTPUT JACK COMPONENT OUTPUT Jack Connection to ANTENNA Cable Connection to TV Accessories REP EAT OPEN CLO SE DISP LAY TITL E PB C MEN U PR PR INPU T PRE V REC PRO GRA M CLK CNT TV V CR TRA CKIN G ANG LE S PEE D SEA RCH SYS TEM PLA Y PA USE NEX T A B ZOO M AUD IO SUB TITL E SETU P CLEAR 3D ENT ER OK VCR DVD remote control 2 Batteries RF ...

Page 10: ...VD VCR PROGRAM button 2 DVD VCR CLOCK COUNTER button 3 VCR TV VCR button 4 VCR Record button 5 DVD VCR NUMBER button VCR TRACKING button 6 VCR SELECT button 7 DVD SELECT button 8 DVD VCR OSD DISPLAY button 9 VCR INPUT Selection button 0 ENTER OK button CLEAR 3D button DVD AUDIO LANGUAGE Select VCR AUDIO Select button DVD SUBTITLE Select button DVD NEXT button Move into a next chapter or track VCR ...

Page 11: ...ayer When it is on the player generates a signal on UHF transmission channel 52 but this might change after tuning in the stations with AUTO SEARCH See the Check it out box on page 16 See your television manual for how to tune in a new channel INPUT 1 ANT IN INPUT 2 ANT IN ANT OUT OPTICAL DIGITAL AUDIO OUT REAR PANEL OF DVD VIDEO OUTSIDEANTENNAOR WALLANTENNAOUTLET REAR PANEL OF TV RF CABLE Remove ...

Page 12: ...ack in DVD Video to AUDIO IN jack in TV with connecting cable of Audio Video jack Select VCR mode by pressing TV INPUT button in TV you can view more clear screen and sound than connection with RF cable only VHF 2 12 channels of TV UHF 21 69 channels of TV CATV Broadcasting is transmitted with cable from broadcasting station by contract with the station and consumers It does not need any antenna I...

Page 13: ...UDIOOUT OPTICAL AUDIO OUT DIGITAL AUDIO OUT REAR PANEL OF DVD VIDEO FRONT PANEL OF DVD VIDEO REARPANELOFPLAYBACKVCR CAMCORDER REAR PANEL OF TV RF CABLE AUDIO VIDEO CABLE ANT IN ANT OUT R L OUT IN AUDIO VIDEO R COAXIAL L Y Pr Pb DIGITAL COMPONENTOUT AUDIOOUT OPTICAL AUDIO OUT DIGITAL AUDIO OUT INPUT 1 OUT VIDEO L AUDIO R ANT IN INPUT 2 REAR PANEL OF DVD VIDEO REARPANELOFPLAYBACKVCR CAMCORDER REAR P...

Page 14: ... remote control and adjust DVD Video to display AV or AV F in TV screen Press PLAY button in Camcorder or playback video Press REC button in DVD Video if you want to record contents of camcorder or playback video Press Pause button in DVD Video when unnecessary or undesired scene is displayed in recording Caution Recording is released automatically after 5 minutes since pressing PAUSE button Press...

Page 15: ...ITAL AUDIO OUT L AUDIO R REAR PANEL OF DVD VIDEO REAR PANEL OF STEREO UNIT AUDIO CABLE DIGITAL AUDIO OUT Connect Audio jack Connect AUDIO OUT in rear panel of DVD Video to IN jack of stereo sound unit For Input Select in stereo unit Select External Input connected with DVD Video Playback DVD disc or Hi Fi videotape you can hear sound in speaker of stereo unit ...

Page 16: ... Pb COMPONENTOUT AUDIOOUT OPTICAL DIGITAL AUDIO OUT DIGITAL AUDIO OUT L AUDIOIN R REAR PANEL OF DVD VIDEO DOLBY DIGITAL DECODER AMPLIFIER TV CONNECTIONS COMPONENT IN CONNECTING CABLE UseinCOMPONENTInjackattachedinTVorampsupportingDolbyDigital Manufactured under license from Dolby Laboratories Dolby and the double D symbol are trademarks of Dolby Laboratories ...

Page 17: ...u don t use a RCA cable and you need to tune the television to the player see Connecting your player through RF lead on page 10 Normally a new player outputs a signal via the RF lead on transmission channel 52 Search for the menu picture with the channel tuning function of your TV set see its user manual Some televisions allow you to key in the transmission channel number in their tuning set up me...

Page 18: ...on near the current RF OUTPUT CH the guide message appears automatically The player recommends the optimal RF OUTPUT CH number automatically 5 If the signal from the player is coming into the TV through the RF lead the picture will disappear when you press OK at step 7 You will need to re tune your television to the new UHF transmission channel MANUAL SET PR01 P 01 PR08 P 08 PR02 P 02 PR09 P 09 PR...

Page 19: ...TE 08 06 2003 SUN Setting time and date Setting time and date OSD ON OFF Call the player s SETUP 1 Choose VCR SETUP And press the OK button 2 Select OSD ON OFF If you want OSD OFF mode select it and press OK button to confirm Then OSD characters are not displayed in the normal picture 3 OSD On Screen Display ON OFF This player is set to OSD On Screen Display ON mode before shipping and you can cha...

Page 20: ...ct VCR Press VCR button If VCR mode is correctly selected VCR on the operation display window is lit and DVD goes out Then REMOTE button works as VCR function Press the VCR button then it becomes to the VCR OPERATION mode To Select Watch Modes or External Input Press INPUT button When you press INPUT button BROADCASTING RECEPTION and EXTERNAL INPUT is selected But it is not operated in PLAY REC an...

Page 21: ... press PLAY PAUSE button in playback mode If you press this button once more it starts playback again 5 Press OPEN CLOSE button to remove the disc 6 REPEAT OPEN CLOSE DISPLAY TITLE PBC MENU PR PR INPUT PREV REC PROGRAM CLK CNT TV VCR TRACKING ANGLE SPEED SEARCH SYSTEM PLAY PAUSE NEXT A B ZOOM AUDIO SUBTITLE SETUP CLEAR 3D ENTER OK VCR DVD Various Playback Methods If you want fast forward or revers...

Page 22: ... Playback Methods If you want fast forward or reverse playback press or œ œœ œ button in Playback mode You can watch fast playing rewinding screen If you want Still picture press PLAY PAUSE in Playback mode You can watch the desired screen in pause status If you want slow motion playback press button in Pause mode You can watch the desired screen in the slow forward playback NOTE VCR doesn t have ...

Page 23: ...mode Insert a recordable tape Insert a tape with recording tab With CHANNEL NUMBER and INPUT buttons select the desired broadcasting channel or external input unit to record 1 2 3 To Record With VCR Select the desired speed SP or LP with SPEED button 4 Press REC button Then it starts recording 5 If you want to pause recording press PAUSE button After pressing PAUSE button if the pause status conti...

Page 24: ... a recordable tape 2 2 Press REC button during playing of DVD DVD plays and VCR starts recording 3 3 If you press STOP button in DVD mode DVD and VCR will stop at the same time If you press STOP button in VCR mode VCR stops to record and DVD continues to play One Touch timer Recording OTR When your urgent business happens suddenly in watching TV or you want to record the current TV program for the...

Page 25: ...irectly enter the real channel number with the 0 to 9 buttons or search by pressing The fine tuning you can adjust Change or create the station name 4 Once you see the station you want store it Tune in further stations from step 3 onwards or exit tuning mode 5 PR PRESET AUTO SEARCH MANUAL SET PR ERASE PR ALIGN PR SELECT OK CONFIRM SETUP END MANUAL SET PR01 P 01 PR08 P 08 PR02 P 02 PR09 P 09 PR03 P...

Page 26: ...d the way you want 1 1 Call the player s SETUP choose PR PRESET then PR ALIGN 2 2 Select the programme to swap Confirm by pressing OK button Move the station to the desired location number Confirm by pressing OK button Clearing programme locations 1 1 Call the player s SETUP choose PR PRESET then PR ERASE 2 2 Select the station location number you want to clear Review the picture by pressing butto...

Page 27: ... If you don t adjust the times the machine will record the first programme completely then continue with the second one If there is no sufficient free space for the recording on the cassette the video switches automatically to LP for double recording capacity The recorder will eject cassettes which have the safety tab removed PR SELECT AV 0 9 SETUP PR CORRECT SETUP END PR START TIME END TIME START...

Page 28: ...es Move to the position you want to change using the buttons Change the settings using the PR or number buttons If all settings are ok press or until you see OK CONFIRM in the bottom line Confirm changes with OK Exit the menus 2 TIMER PROGRAM PR START END DATE 03 21 20 22 20 14 06 01 18 10 20 30 20 06 PR SELECT OK CONFIRM SETUP END TIMER PROGRAM ONCE PR 03 START TIME 21 20 END TIME 22 20 START DAT...

Page 29: ...r tape position to find out if there is sufficient space for a recording for example To ensure the remaining time shown is accurate select the length of cassette currently loaded by selecting this function until you reach the correct length Call the player s SETUP choose TAPE CONTROL Remaining time display is only possible when the cassette is loaded TAPE CONTROL TAPE REMAIN E 240 01 27 TAPE REMAI...

Page 30: ... can be operated now and LOCK INDICATOR LOCK will be displayed on window display Keep your remote control in a safe place To release child lock press any button of the remote control Cassettes Use only good quality tape cassettes with the VHS logo Keep cassettes away from excessive moisture or dust magnetic and electrical fields loud speakers and computer monitors for example Always wind the tape ...

Page 31: ...rent station is broadcasting When you switch to another station or the current station changes the sound mode your player displays the programme and sound mode on screen if not press AUDIO STEREO stereo BIL I BIL II bilingual nothing monaural sound During Playback the player displays what is recorded on the cassette if not press AUDIO Hi Fi stereo bilingual nothing monaural sound STOP SP PR10 EURO...

Page 32: ...test picture Tune the TV to the test picture using the channel pre set functions of your TV as described in its manual When you have found the test picture store it under the button number on your TV for player input Press the OK button of the player s remote control again longer than 5 seconds to release the test picture 1 If the quality of the test picture transmitted to the TV is poor due to in...

Page 33: ...ints Move the tape to the position at which the new scene is to be added using the play functions Wind back slightly before the edit point and put the machine into pause using the PAUSE button do not press STOP Now go directly into record For the best results the source cassette from which you are recording should already be playing back when you start recording ...

Page 34: ...n A list of the titles on the disc is displayed For the case of VCD disc menu screen will appear only when the disc has PBC function and PBC ON is activated 1 Press the ENTER button or PLAY button after pressing the button to select the desired title The selected title now starts playing 2 Some movie discs may contain multiple titles If the disc has a movie title menu recorded on it the TITLE PBC ...

Page 35: ...1 06 02 07 03 08 04 09 05 10 PRG PLAY PLAY SELECT ENTER EXIT PRG 00 Playing desired scene To cancel move the cursor to the desired parts and press CLEAR button 34 Repeating a defined period CHAPTER Current chapter will be repeatedly playback TITLE Current title will be repeatedly playback TRACK Current track will be repeatedly playback DISC Current disc will be repeatedly playback RANDOM Tracks in...

Page 36: ...F Searching DVD with a title number a chapter number or a time If you want to search with a title number press SEARCH button one time It shows current and total title numbers Please enter the new title number to be searched using the NUMBER buttons 1 If you want to search with a time press SEARCH button three times Please enter the new time to be searched using the NUMBER buttons In completing ent...

Page 37: ...o be searched using the NUMBER button If it is PBC ON pressing track number converts PBC to OFF mode automatically 1 In completing entering please press ENTER PLAY starts from the selected position 3 If you want to search with a track time press SEARCH button twice In case of PBC OFF the screen like the right figure appears It shows total track time Please enter the new time to be searched using t...

Page 38: ...m with up down cursor and enter the new settings with number or button In completing entering press ENTER button To exit from Display mode press DISPLAY button again T C DISPLAY DISPLAY 001 003 001 023 00 01 03 1 3 ENG 1 3 ENG OFF 1 4 channel number at current title total title number channel number at current chapter total chapter number time elapsed channel number at current subtitle total subti...

Page 39: ...t disc mode If you want to change the mode select the item with up down cursor and enter the new settings with number or button In completing entering press ENTER button To exit from Display mode press DISPLAY button again T C DISPLAY DISPLAY 001 005 00 07 13 OFF channel number at current track total track number time elapsed repeat playback mode ...

Page 40: ...s preferred language appears in playback mode If a DVD disc includes subtitle information every time the user presses SUBTITLE button English ENG French FRE Spanish SPA and OFF appear one by one A certain disc may not support audio select or subtitle select Selecting 3D Audio If you want to adjust Sound Fields press 3D button Every time the user presses 3D button a 3D sound changes 3D ON 3D OFF 3D...

Page 41: ...ation of button Different Angle If a disc includes multi angle information the user can watch a screen in multi angles The function is limited to a DVD disc supporting multi angle information Keep pressing ANGLE button till the preferred angle appears Every time the user presses ANGLE button an angle degrees changes in a consecutive order For the case of SVCD and VCD only 2 times Zoom is available...

Page 42: ...esses ENTER button disc type changes MIXED MP3 ONLY JPG ONLY MP3 AND JPG MIXED one by one 3 DISC FILTER MIXED REPEAT OFF 00 00 00 00 œ ENTER MENU DIR 01 DIR 02 DIR 03 Name of current directory Location of current cursor Current disc type selected Current repeat mode selected DISC DIR 01 DIR 02 DIR 03 FILTER MP3 ONLY REPEAT OFF 00 00 00 00 œ ENTER MENU Select the repeat playback mode Move the curso...

Page 43: ...ng of the previous file is located and played back The ability of this unit to read MP3 discs is dependent on the followings The Bit Rate must be within 64 256 kbps The maximum number of directories should not exceed 32 The maximum depth level of directories should not exceed 4 In case of the file that is recorded with the variable bit rate VBR in one file Example 54 256kbps occurrence of the soun...

Page 44: ...o discs Return will appear on the OSD with VCD2 0 If it is a VCD2 0 select PBC ON mode by pressing TITLE PBC button CD and VCD1 1 do not support the function 1 If it is a DVD disc move a cursor to a relative item with arrow buttons of button and select one with ENTER button or PLAY button If it is a VCD 2 0 disc it shows menus in the disc by pressing ENTER button 2 Displaying menus in a disc ...

Page 45: ...y played in the set language in every playing For example English is set and recorded as subtitle language in the DISC it is played in English Every time the user presses ENTER button SUBTITLE LANGUAGE changes ENGLISH FRENCH OFF one by one 4 Selecting Disc Menu language Please set it as the preferred DISC MENU language In case the DISC MENU language is set and recorded in the DISC it is automatica...

Page 46: ...tion and screen If a user selects 4 3 PS the user can watch only a center of the original scene of 16 9 If a user selects 4 3 LB the user can watch the original scene of 16 9 but the top and bottom of the screen look black color If a disc size is originally recorded in 4 3 a user cannot watch it in a wide screen though a user sets a size as 16 9 Wide TV ASPECT 4 3 LB 4 3 LB LANGUAGE VIDEO AUDIO OT...

Page 47: ... 13 5PG R 6R 7NC 17 8ADULT one by one It consists of 8 levels of parental control violence sexual scene strong sexual scene and others to protect children from watching those scenes 5 While STOP or RESUME STOP press SETUP button 1 Parental Lock activates only if you set a password and the unit goes into Lock status When the disc has no parental function even if the disc for adult only Parental Loc...

Page 48: ... the DVD discs does not correspond to the Region number of this player the player will not play this disc This player will play DVD discs made for ALL regions Therefore this player will play DVD discs marked with labels containing the region number 2 or ALL Region 2 Region ALL 2 ALL Terms related with DVD DVD A DVD abbreviation of Digital Versatile Disc or Digital Video Disc can include 135 minute...

Page 49: ...from a number of different angles PCM Linear PCM is a signal recording format used in a CD while CD is recorded in 44 1kHz 16bit a DVD is recorded in 48KHz 16bit up to 96KHz 24bit Dolby DigitalDolby Digital enables the delivery of mono through 5 1 channel audio at data rates from 32 kbps to 640 kbps thus offering flexibility and economical performance as well as uncompromised sound quality Bitstre...

Page 50: ...of a VCR or videotape Terms related with VCR AFT Automatic fine tuning a circuit that automatically adjusts TV reception to optimum condition CABLE Cable television Index Search A feature of this VCR that automatically records an index each time recording begins It helps you locate a particular segment of the tape quickly and easily LP Long Play an intermediate tape recording speed that combines m...

Page 51: ... tape smoothly That s why a safe mode to protect a videotape is operated automatically Please pull out the tape and input it again In case the product is used for a long time a videotape may not be ejected for a film inside may be stretched In the case please pull out a power plug for about 10mins and then press EJECT button Please check your antenna s connection TV channel should be fixed on vide...

Page 52: ...play Is a tab of cassette tape broken Please cover a tab hole with cellophane adhesive tape Scotch tape Please check whether the clock is right Does the display on your video show Ready to timer recording Please make it out Please check whether the timer recording info is right Please check a tab on a tape whether it is broke or not If it was broken please scotch tape it Was a cable data output co...

Page 53: ...lease check the connection with Dolby Digital amplifier Please check the plugs are connected with one another tightly Some contaminants may be remained in connection terminal Please check the degree of remote control distance or any interruption Battery may be weak or exhausted When you operate DVD use it by pressing DVD button Dolby Digital sound can be worked in the Dolby Digital amplifier only ...

Page 54: ...EO output common use of DVD and VCR VIDEO output terminal 1 0 Vp p unbalanced RCA JACK VIDEO output DVD only Component output 75Ω In load Y 1 0Vp p Pb 0 7Vp p Pr 0 7Vp p AUDIO output common use of DVD and VCR Audio output terminal 2 kinds 5 8dBm VCR 2Vrms DVD RCA JACK AUDIO output DVD only Analogue AUDIO output 2 0Vrms Digital audio output OPTICAL COAXIAL Playable tape Very high dense tapes with V...

Reviews: