background image

VCR

Operation

25

Tuning in New Stations

Tuning

The TV and player are switched on.

To see the picture from your player, press the station button on the TV reserved for player input or
the AV (Audio / Video) button.

"AV1/2" should not be selected with the AV button on the player.

To complete the set-up of your video recorder when the
auto set has not stored all of the channels or when you wish
to store a new channel.
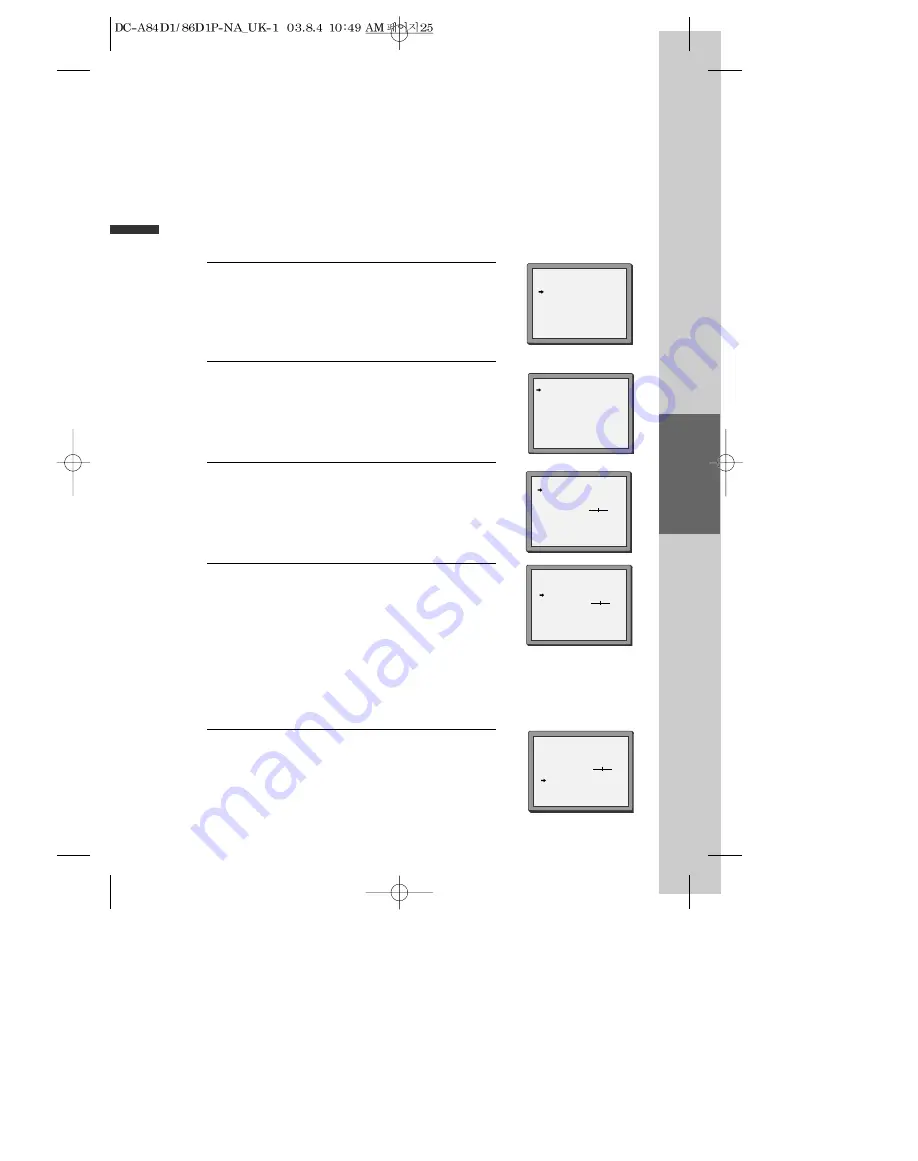
Call the video’s "SETUP",  choose "PR PRESET".

1

Select "MANUAL SET".

2

Choose any unused programme number "----" or "P-xx" ...

It's best to use the same programme number on both the TV
and video.

... and confirm by selecting “OK” button.

3

Set the station you want: 
•  the programme number;
• the broadcast system you want (Aerial (CH) or Cable

(CC)),

• You can directly enter the real channel number with the

[0 to 9] buttons, or search by pressing [<  /  >],

• The fine tuning you can adjust,
• When the program is encoded (and you have a decoder

connected to socket EURO AV2), press the [< or  >] to
select ON or OFF.

• Change or create the station name.

4

Once you see the station you want, store it by selecting OK.

Tune in further stations (from step 3 onwards) or exit
tuning mode.

5

PR PRESET

AUTO SET

MANUAL SET

PR ERASE
PR ALIGN

PR+/-:SELECT
OK:CONFIRM      SETUP:END

MANUAL SET

PR+/-: UP/DOWN

</>

: SELECT

OK:CONFIRM            SETUP:END

MANUAL SET

PR01 BBC1 PR08 SKYS
PR02 BBC2 PR09 MTVE
PR03 ITV

PR10 P-10

PR04 CHA4 PR11 P-11
PR05 SKY1 PR12 ----
PR06 SKYN PR13 ----
PR07 SKYM PR14 ----

PR+/-:SELECT
OK:CONFIRM      SETUP:END

PR

04

RECEPTION

AERIAL

AUTOSEARCH

CH_ _

FINE TUNING
DECODER

ON

NAME

_ _ _ _

MANUAL SET

PR+/-: UP/DOWN

</>

: SELECT

OK:CONFIRM            SETUP:END

PR

03

RECEPTION

AERIAL

AUTOSEARCH

CH 03

FINE TUNING
DECODER

ON

NAME

_ _ _ _

MANUAL SET

PR+/-: UP/DOWN
0/1: CHANGE/CREATE
OK:CONFIRM            SETUP:END

PR

03

RECEPTION

AERIAL

AUTOSEARCH

CH_ _

FINE TUNING
DECODER

ON

NAME

_ _ _ _

Summary of Contents for SD-9500P

Page 1: ...sc with another region code it will not operate Please only use a disc with region code 2 or ALL is a DO NOT mark If this mark is displayed in operating the product please wait for a while then use it...

Page 2: ...ration Initial Installation 18 Setting time and date Auto clock 19 OSD ON OFF Output Select 20 DVD Playback 21 VCR Playback 22 VCR Recording 23 VCR Operation Tuning in New Stations 25 Timer Recording...

Page 3: ...authorized service location see service procedure Use of control adjustments or the performance of procedures other than those specified may result in hazardous radiation exposure To prevent direct e...

Page 4: ...ination to overturn 8 VENTILATION Slots and openings in the case are provided for ventilation to ensure reliable operation of the unit and to protect it from overheating These openings must not be blo...

Page 5: ...the operating instructions Adjust only those controls that are covered by the operating instructions Improper adjustment of other controls may result in damage and will often require work by a qualif...

Page 6: ...d Reverse playback DVD Fast Forward Reverse playback Search of title chapter and time in DVD disc and search of time and track time in VCD and CD Various TV aspect DVD 4 3 for Pan and Scan 4 3 for Let...

Page 7: ...t Follow instructions in using chemical cleaners Do not use any type of solvent such as gasoline or benzene as they may cause deterioration or paint to peel off Checking The video is a high precision...

Page 8: ...ANNEL Up Down button Operation Display Window Displays operation of device For more information see Operation Display Window as below SELECT button Use to change DVD mode to VCR mode and vice versa 1...

Page 9: ...menu is displayed Power is ON Power is OFF 3D Sound Indicator DVD Disc Operation VCR Operation REC and TIMER REC display Recording TIMER Recording To be Timer recorded To be Timer recorded state ERROR...

Page 10: ...to outlet in a wall EURO AV2 DECODER Jack VIDEO OUTPUT Jack AUDIO OUTPUT Jack DIGITAL OUTPUT OPTICAL COAXIAL Jack To enjoy theatre sound quality in the home connect this jack with amp or unit embedde...

Page 11: ...l and warranty are not sold additionally Operate remote control within 7m from the unit Do not press 2 two buttons at the same time Excessive sun light falling on the remote receiver may cause the rem...

Page 12: ...R CLOCK COUNTER button 3 VCR TV VCR button 4 VCR Record button 5 DVD VCR NUMBER button VCR TRACKING button 6 VCR SELECT button 7 DVD SELECT button 8 DVD VCR OSD DISPLAY button 9 INPUT Selection button...

Page 13: ...press TV VCR on the remote control TV remote can now be used as normal You will get better pictures and sound quality if you connect your player using a scart lead Before you start unplug all the equi...

Page 14: ...rough RF lead Before you start unplug all the equipment from the mains supply Television Aerial Back view of your player 230V 50 60 Hz You can also use this scarted connection if your player has two s...

Page 15: ...e audio sockets on any audio amplifier if needed If your amplifier does not have this connection see page 16 Player 230V 50 60 Hz You can also use a scart lead to improve picture and sound quality fro...

Page 16: ...scart sockets you can use the other socket AV2 to connect other equipment To use this function see page 17 How to connect your player to a camcorder How to connect Before you start unplug all the equ...

Page 17: ...Dolby Digital Amplifier If you want to know about Dolby Digital please refer to About DVD in 49 50p Home Theater Receiver with Dolby Digital decoding capability REAR PANEL OF DVD VIDEO CONNECTING CABL...

Page 18: ...the video PR PR buttons have no effect To return to normal video use the other equipment must be turned off Recording from other Equipment Simple recording can be performed ensure the equipment is tur...

Page 19: ...nds the optimal RF OUTPUT CH number automatically 3 Press the OK button to confirm the recommended PR Should you wish the stations to have the same numbers as those used on the TV follow the instructi...

Page 20: ...ime and date Auto clock Auto Clock is only available for models with the VPS PDC function see page 27 Some broadcasting stations may send the time and date along with the VPS PDC data The video will a...

Page 21: ...rder and the operation DISPLAY of the unit will change according to the one which is selected To Select DVD Call the player s SETUP 1 Choose VCR SETUP And press the OK button 2 Select OSD ON OFF If yo...

Page 22: ...press button For pause press PLAY PAUSE button in playback mode If you press this button once more it starts playback again 5 Press OPEN CLOSE button to remove the disc 6 REPEAT OPEN CLOSE DISPLAY TIT...

Page 23: ...or reverse playback press or button in Playback mode You can watch fast playing cue review rewinding screen If you want Still picture press PLAY PAUSE in Playback mode You can watch the desired scene...

Page 24: ...pe Insert a tape with recording tab With CHANNEL NUMBER and INPUT buttons select the desired broadcasting channel or external input unit to be recorded 1 2 3 To Record With VCR Select the desired spee...

Page 25: ...TV program for the desired time follow the procedures below 1 1 Insert the desired DVD disc When the DVD disc is copyright protected you can t copy it If DVD disc is not copy protected then insert a b...

Page 26: ...he 0 to 9 buttons or search by pressing The fine tuning you can adjust When the program is encoded and you have a decoder connected to socket EURO AV2 press the or to select ON or OFF Change or create...

Page 27: ...ION AERIAL AUTOSEARCH CH__ FINE TUNING DECODER ON NAME O___ Sorting programme locations If the location numbers used for programmes stored in your TV and player are different you can change them on th...

Page 28: ...er recordings precisely even if the broadcaster delays the start time of the programme slightly The time you enter is the VPS PDC time so this must be correct Not all stations offer VPS PDC in which c...

Page 29: ...player off Wait a few seconds after typing a one digit number If you have made a mistake move to the position you want to change using the buttons and change the setting If programme timings overlap t...

Page 30: ...ges Move to the position you want to change using the buttons Change the settings using the PR or number buttons If all settings are ok press or until you see OK CONFIRM in the bottom line Confirm cha...

Page 31: ...p Remaining time and cassette length When you want the player to show the time remaining from the current player tape position to find out if there is sufficient space for a recording for example To e...

Page 32: ...inning to end parts To release this mode press the button or mode operation button PLAY FF REW or STOP Child lock Press the button for about 5 seconds No buttons of front panel can be operated now and...

Page 33: ...current station is broadcasting When you switch to another station or the current station changes the sound mode your player displays the programme and sound mode on screen if not press AUDIO STEREO s...

Page 34: ...ll the player s test picture Tune the TV to the test picture using the channel pre set functions of your TV as described in its manual When you have found the test picture store it under the button nu...

Page 35: ...CART sockets On the other video select its AV input and set the machine to record Switch your player to play back at the position you want copying to start Assembling Should you wish to shoot your own...

Page 36: ...list of the titles on the disc is displayed For the case of VCD disc the menu screen will appear only when the disc has PBC function and PBC ON is activated 1 Press the ENTER button or PLAY button aft...

Page 37: ...APT 01 06 02 07 03 08 04 09 05 10 PRG PLAY PLAY SELECT ENTER EXIT PRG 00 Playing desired scene To cancel move the cursor to the desired parts and press CLEAR button 36 Repeating a defined period CHAPT...

Page 38: ...A A B OFF Searching DVD with a title number a chapter number or a time If you want to search with a title number press SEARCH button one time It shows current and total title numbers Please enter the...

Page 39: ...o be searched using the NUMBER button If PBC is ON pressing track number converts PBC to OFF mode automatically 1 In completing entering please press ENTER PLAY starts from the selected position 3 If...

Page 40: ...e item with up down cursor and enter the new settings with number or button In completing entering press ENTER button To exit from Display mode press DISPLAY button again T C DISPLAY DISPLAY 001 003 0...

Page 41: ...ent disc mode If you want to change the mode select the item with up down cursor and enter the new settings with number or button In completing entering press ENTER button To exit from Display mode pr...

Page 42: ...erred language appears in playback mode If a DVD disc includes subtitle information every time the user presses SUBTITLE button English ENG French FRE Spanish SPA and OFF appear one by one A certain d...

Page 43: ...ation of button Different Angle If a disc includes multi angle information the user can watch a screen in multi angles The function is limited to a DVD disc supporting multi angle information Keep pre...

Page 44: ...presses ENTER button disc type changes MIXED MP3 ONLY JPG ONLY MP3 AND JPG MIXED one by one 3 DISC FILTER MIXED REPEAT OFF 00 00 00 00 ENTER MENU DIR 01 DIR 02 DIR 03 Name of current directory Locati...

Page 45: ...ous file is located and played back The ability of this unit to read MP3 discs is dependent on the followings The Bit Rate must be within 64 256 kbps The maximum number of directories should not excee...

Page 46: ...o discs Return will appear on the OSD with VCD2 0 If it is a VCD2 0 select PBC ON mode by pressing TITLE PBC button CD and VCD1 1 do not support the function 1 If it is a DVD disc move the cursor to a...

Page 47: ...cally played in the set language on every playing For example English is set and recorded as subtitle language in the DISC it is played in English Every time the user presses ENTER button SUBTITLE LAN...

Page 48: ...onnected TV condition and screen If a user selects 4 3 PS the user can watch only a centre of the original scene of 16 9 If a user selects 4 3 LB the user can watch the original scene of 16 9 but the...

Page 49: ...4PG 13 5PG R 6R 7NC 17 8ADULT one by one It consists of 8 levels of parental control violence sexual scene strong sexual scene and others to protect children from watching those scenes 5 While in STOP...

Page 50: ...y DVD discs made for ALL regions Therefore this player will play DVD discs marked with labels containing the region number 2 or ALL Region 2 Region ALL 2 ALL Terms related with DVD DVD A DVD abbreviat...

Page 51: ...Bitstream Digital audio data that is decoded into an analog signal for subsequent output to speakers Lt Rt It indicates L R of Dolby Digital 2CH Downmix output Downmix DOWNMIX is reproducing the prope...

Page 52: ...use it because it may develop troubles in the VCR or videotape Terms related with VCR AFT Automatic fine tuning a circuit that automatically adjusts TV reception to optimum condition CABLE Cable telev...

Page 53: ...a safe mode to protect a videotape is operated automatically Please pull out the tape and input it again In case the product is not used for a long time a videotape may not be ejected because the fil...

Page 54: ...or timer recording Please check whether the timer recording info is right Please check a tab on a tape whether it is broke or not If it is broken please replace with some adhesive tape Was the cable d...

Page 55: ...ne Please check the connection with Dolby Digital amplifier Please check the plugs are connected with one another tightly Some contaminants may be remained in connection terminal Please check the degr...

Page 56: ...put common use of DVD and VCR VIDEO output terminal 1 0 Vp p unbalanced RCA JACK SCART JACK VIDEO output DVD only RGB output 75 In load R 0 7Vp p G 0 7Vp p B 0 7Vp p AUDIO output common use of DVD and...

Page 57: ...quired if service is needed on this product during the guarantee period KEEP THIS SECTION FOR FUTURE REFERENCE On the expiry date of the manufacturer s guarantee you will be sent details of our annual...

Page 58: ...tained in the manual It must be used solely for domestic purposes For further information regarding your guarantee please see the section at the rear of your user manual The guarantee will be rendered...

Reviews: