background image

f o r   e x p e r i e n c e d   u s e r s

B R I E F   I N S T R U C T I O N

24

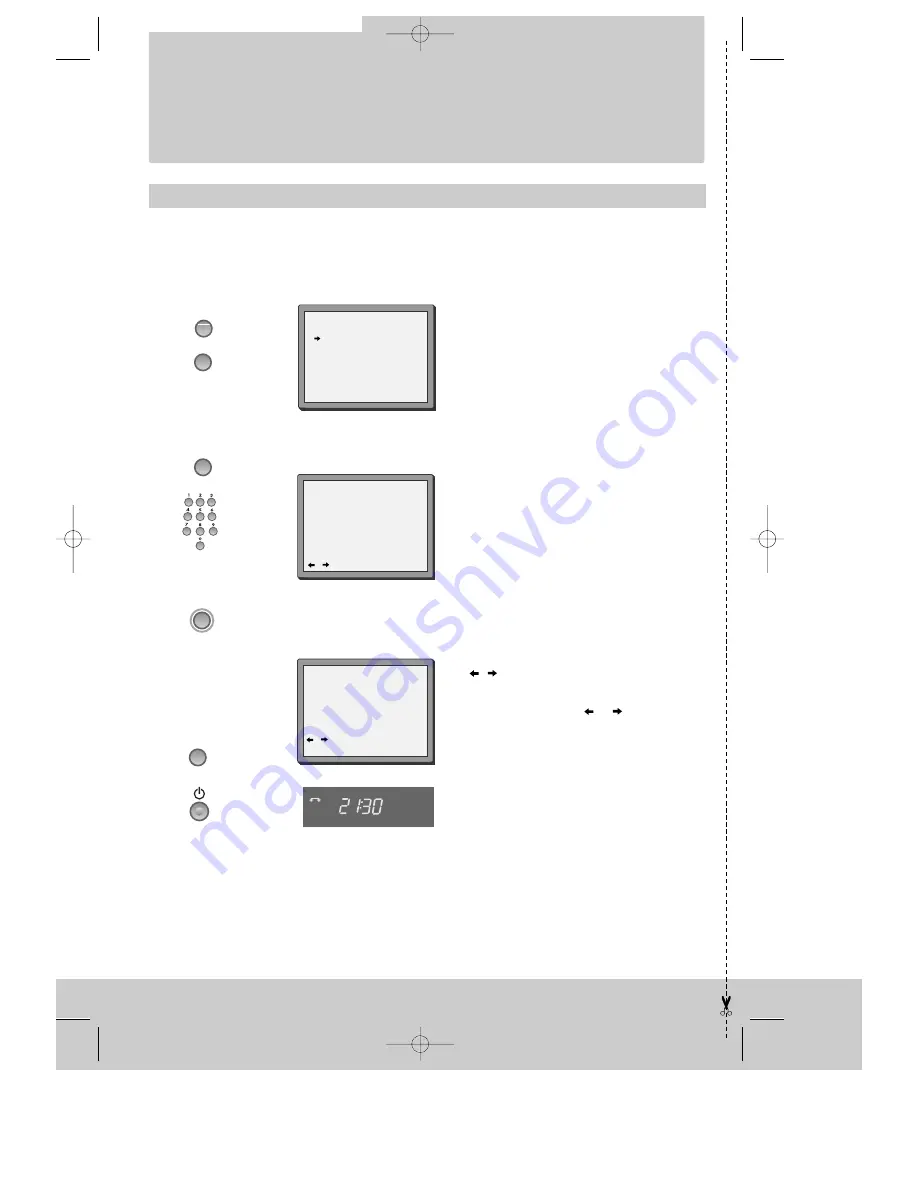
Normal timer

For timer recordings, clock, date, and stations must be set correctly. 

Load a cassette with safety tab in place (page 15) and with sufficient free space for the recording.

Call the video’s "MAIN MENU", choose
"Timer Program".

Decide if you want to record "Once",
"Weekly" or "Daily"...
... and confirm.

If you wish to make changes:
Move to the position you want to change using the

/

button.

Change the setting using the +/- or number buttons. 

If all setting are ok, press 

or 

, till you see

“OK:confirm” in the last line. 

Confirm.

Switch your video off. 

Type in one after the other: 

the programme location number,

the time the broadcast starts,

the time the broadcast ends, 

the day of the broadcast, 
if it is not today. 

switch off VPS/PDC here if you need to

(page25

)

.

MENU

OK

OK

OK

PR  

+

2x

How often do you want 
to record this program?

Once
Weekly(Once a Week)
Daily(Mon-Fri)
Daily(Mon-Sat)
Daily(Mon-Sun)

PR+/-:select
OK:confirm          MENU:end

PR+/-:select (AV)

0-9  :setup(PR)

/

:correct       MENU:end

PR

--

Start Time

--:--

End Time

--:--

Start Date

--/--

VPS/PDC

ON

TIMER  PROGRAM (Once)

PR

01

Start Time

18:10

End Time

20:30

Start Date

20/10(FRI)

VPS/PDC

ON

/

:correct

OK:confirm          MENU:end

TMR

TIMER  PROGRAM  (Once)

DV-K229DY-KQ_GB  00.10.5 11:2 AM  ˘

`

24

Summary of Contents for Q253

Page 1: ...Instruction manual Video recorder Q253 GB English DV K229DY KQ_cover 00 10 5 11 5 AM 1...

Page 2: ...Make sure the recorder is placed on a steady flat surface you place the recorder where there is good ventilation all around you clean the recorder only with a soft lint free cloth do not use aggressiv...

Page 3: ...dex scan 7 16 9 Wide Screen Format Playing back Recording CM Skip 8 Recording cassettes Setting time and date 9 Simple recording 10 One touch recording OTR 11 More functions Normal timer recording 12...

Page 4: ...set to search the beginnings of records index this button is not available for this set the record or OTR button One Touch Recording means each time you press the button recording is extended by 30 m...

Page 5: ...e VCR The menus show you which button to press for the next step In addition some other functions appear on screen temporarily REW SP PR04 EURO programme station selection recording or OTR One Touch R...

Page 6: ...ity Ask your dealer for an appropriate cable if you do not have one Without a SCART cable you need to follow the steps described under If you are not using a SCART cable right page and page 19 Make su...

Page 7: ...locations on page 18 Else exit the basic installation function and enjoy your video recorder If you don t see this picture because you don t use a SCART cable search this picture now CH 52 with the st...

Page 8: ...back starts automatically PLAY switches back to normal playback During still slow or search you don t hear the sound If the still picture is jittering you can steady it by using the PR buttons You can...

Page 9: ...motion speed in 6 steps 1 15 1 10 1 5 1 30 1 25 1 20 1 15 Press repeatedly PLAY switches back to normal playback Select INDEX or INDEX to search forwards or backwards The video will now wind to the b...

Page 10: ...confirm MENU end You can play and record the program of 16 9 Wide Screen format with this VCR 16 9 Set Auto This VCR perceives the recorded program format 16 9 Wide Screen format 4 3 normal TV format...

Page 11: ...nd type in the new values Wait a few seconds after typing a one digit number Store with OK button and exit with MENU button CLOCK SET 0 9 setup hour correct MENU end Time Date CLOCK SET 0 9 setup minu...

Page 12: ...switch off the TV altogether Load a cassette with its safety tab in place see page 15 Start your recording If you wish to interrupt recording briefly then continue REC blinks during this period Stop...

Page 13: ...rd from a source connected to your video see page 20 21 To cancel OTR press the button stop more than 5 seconds If the programme you are recording is not visible on the TV press the TV VCR button VCR...

Page 14: ...confirm Wait a few seconds after typing a one digit number If you have made a mistake move to the position you want to change using the buttons and change the setting If programme timings overlap the...

Page 15: ...t to change using the buttons Change the settings using the PR or number buttons If all setting are ok press or till you see OK confirm in the bottom line Confirm changes with OK Exit the menus TIMER...

Page 16: ...r If didn t wind tape PLAY FF REW it doesn t appear the tape remain time Reset the counter The video will wind to the position 0 00 00 and stop When you want the video to show the time remaining from...

Page 17: ...for more than 5 minutes Use only good quality tape cassettes with the VHS logo Keep cassettes away from excessive moisture or dust magnetic and electrical fields loudspeakers and computer monitors for...

Page 18: ...nd video and confirm Tune in the station you want Press button to see the picture If it isn t the station you want or the picture is disturbed carry on tuning Once you see the station you want store i...

Page 19: ...ANUAL SET menu Call this menu just see the left page if it isn t displayed Select name correct Either select the name from the stored list MANUAL SET PR name change name create OK confirm MENU end PR0...

Page 20: ...video s MAIN MENU choose PR Preset then PR Erase Select the programme to swap Confirm Move the station to the desired location number Confirm Select the station location number you want to clear Revie...

Page 21: ...nds to call the video s test picture Tune the TV to the test picture using the channel pre set functions of your TV as described in its manual When you have found the test picture store it under the b...

Page 22: ...programme AV 1 AV 2 using the AV button Set the other video machine to playback and your machine to record To copy to another video machine from your video connect the two machines by means of their E...

Page 23: ...for Pay TV Switch to Decoder connect the decoder left page and tune in the pay TV station see page 16 Store and exit Canal Setting For the Canal channel it must be set to Canal ON to recognize it as...

Page 24: ...ording on the video tape Use PR buttons to adjust tracking if horizontal stripes appear Is the cassette of poor quality or worn out Test with another cassette If you are not using a SCART cable have y...

Page 25: ...to normal playback Starting from playback you can control search speed in 2 steps either forwards or backwards Press repeatedly PLAY switches back to normal playback Starting from playback you can co...

Page 26: ...ok press or till you see OK confirm in the last line Confirm Switch your video off Type in one after the other the programme location number the time the broadcast starts the time the broadcast ends t...

Page 27: ...69 CATV S1 S41 x y z Hyperband channel locations 99 AUX RF Out UHF CH 21 69 52 Video System VHS Speeds SP General Temperature range 5 35 C Humidity range 80 Timer 8 events 1 month VPS PDC Subject to t...

Page 28: ...Manual Pages 4 5 Exit the basic installation function and enjoy your video recorder MANUAL SET PR01 ARD PR02 ZDF PR03 P 03 PR04 P 04 PR05 MTV PR select OK confirm MENU end sorts them in an order comm...

Reviews: