background image

49

48

If a disc includes menus, the user may use them.

Press [MENU] button. 

• In case of a DVD disc, it shows menus in the disc. Also they are different

according to discs.

• If it is a VCD2.0, select  PBC ON mode by pressing [TITLE/PBC] button.

* CD and VCD1.1 do not support the function.

1

If it is a DVD disc,

move a cursor to a relative item with arrow buttons of [

œ

√…†

] button and select one with [ENTER] button or [PLAY] button.

2

To display menus in a disc

Displaying menus in a disc

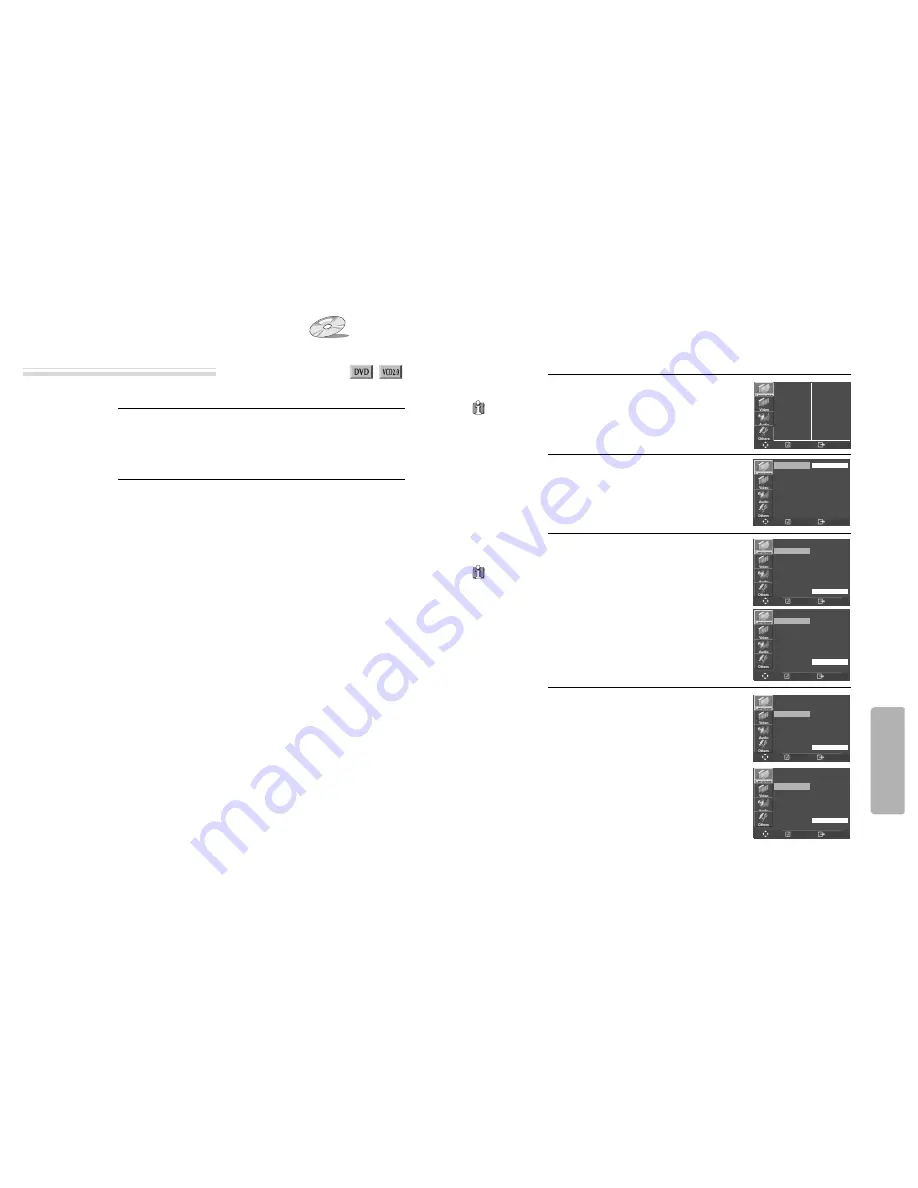
Language Setup

While STOP

, press [SETUP] button.

1

Selecting a OSD language.

Select a OSD language to be displayed on
DVD menus with [ENTER]. 

2

Selecting Audio language.

Set your preferred audio language with
[ENTER]. If the audio language is set and
recorded on the DISC, it is automatically
played in the set language every time it is
played.  

OTHERS - - - - : Another language can be
selected. You can input 4-digit language
code. 

Refer to the language codes on next page. Press
[CLEAR] if an incorrect language code is entered.

3

Selecting Subtitle language.

Set your preferred subtitle with [ENTER].
If the subtitle language is set and recorded
on the DISC, it is automatically played in
the set language every time it is played. 

OTHERS - - - - : Another language can be
selected. You can input 4-digit language
code. 

Refer to the language codes on next page. Press
[CLEAR] if an incorrect language code is entered.

4

A user can set OSD language, Audio, Subtitle and Disc Menu.

In case a disc
does not include

setting languages
information, the
selected language does
not appear.

“OSD” means

“On Screen Display”.

OSD LANGUAGE
AUDIO
SUBTITLE
DISC MENU

ENGLISH
AUTO
OFF
AUTO

OSD LANGUAGE

AUDIO
SUBTITLE
DISC MENU

ENGLISH  

FRENCH
SPANISH
GERMAN
ITALIAN
DUTCH

OSD LANGUAGE

AUDIO

SUBTITLE
DISC MENU

GERMAN
SPANISH
ITALIAN
DUTCH
RUSSIAN
CZECH
HUNGARIAN

AUTO  

OSD LANGUAGE

AUDIO

SUBTITLE
DISC MENU

SPANISH
ITALIAN
DUTCH
RUSSIAN
CZECH
HUNGARIAN
AUTO   

OTHERS

OSD LANGUAGE
AUDIO

SUBTITLE

DISC MENU

GERMAN
SPANISH
ITALIAN
DUTCH
RUSSIAN
CZECH
HUNGARIAN

OFF  

OSD LANGUAGE
AUDIO

SUBTITLE

DISC MENU

SPANISH
ITALIAN
DUTCH
RUSSIAN
CZECH
HUNGARIAN
OFF    

OTHERS

Setup

ENTER

SETUP

ENTER

SETUP

ENTER

SETUP

ENTER

SETUP

ENTER

SETUP

ENTER

SETUP

Summary of Contents for DX-9840E

Page 1: ...rk continues to be displayed in pressing a button after that it means the button does not function in the currently played disc Press a product button on the REMOTE then use the product DVD operation DVD button Video operation VCR button INSTRUCTION MANUAL Please read this manual carefully before connecting your DVD VCR and operating it for the first time Keep the manual in a safe place for future...

Page 2: ...ion Initial Installation 18 Setting time and date Auto clock 19 OSD ON OFF Output Select 20 DVD Playback 21 VCR Playback 22 Recording 23 VCR Operation Tuning in New Stations 25 Timer Recording 27 More Functions 30 Connections and Copying 34 DVD Operation Playing a desired scene 36 Confirming the current PLAY mode on screen 40 Selecting an AUDIO language SUBTITLE language and 3D AUDIO 42 Selecting ...

Page 3: ... READ INSTRUCTIONS All the safety and operating instructions should be read before the unit is operated 2 RETAIN INSTRUCTIONS The safety and operating instructions should be retained for future reference 3 HEED WARNINGS All warnings on the unit and in the operating instructions should be adhered to 4 FOLLOW INSTRUCTIONS All operating and use instructions should be followed 5 CLEANING Unplug this u...

Page 4: ...way from heat sources such as radiators heat registers stoves or other products including amplifiers that produce heat 25 To prevent battery electrolyte leakage which may result in injury and damage to the unit or other objects observe the following precautions A All batteries must be installed with the proper polarity B Do not mix new with old or used batteries C Only use batteries of the same ty...

Page 5: ...r damage by wind and rain For clean screen contact and consult your nearest service center about checking and replacement In recording important screen Be sure to record the screen and check whether recording is performed properly We beg you to understand compensation of recording if recording is not performed by badness of used tape or video Copyright Do not use your recordings without permission...

Page 6: ...ck Fast reverse playback Slow playback Pause picture DVD OPERATION VCR playback Fast forward Rewinding Fast playback CUE Fast reverse playback REVIEW Slow playback Still picture Stop Child Lock VCR OPERATION Operation Display Window Identification of Controls POWER CORD It is a jack for supplying power to the unit Connect to outlet in a wall EURO AV2 DECODER Jack VIDEO OUTPUT Jack AUDIO OUTPUT Jac...

Page 7: ...ter or track 3 VCR Record SPEED button 4 VCR Record button 5 VCR TV VCR button 6 DVD 3D button 7 VCR CM SKIP 8 VCR Replay button 9 POWER button 0 DVD SELECT button VCR INPUT Selection button CLEAR button DVD VCR OSD DISPLAY button OK ENTER button Q DVD MENU button q DVD Chapter Title Time SEARCH button W DVD ZOOM button w FORWARD SEARCH button E STOP button e DVD NEXT button Move into a next chapt...

Page 8: ...n Aerial The type of aerial you should use depends on local interference and how far you are from the transmitter You should contact a local retailer if you have any questions about your aerial Back view of your player 200 240V 50 60 Hz Television Aerial Back view of your player 200 240V 50 60 Hz Scart lead not supplied Option 1 Connecting your player through RF lead Option 2 Connecting your playe...

Page 9: ...z 1 Insert the tape you wish to record on into the first player and press INPUT until AV1 appears on the front display 2 Insert the tape you wish to copy from into the second player Press the PLAY button on the second player 3 Press the RECORD button on the first player The player will start recording If your player has two scart sockets you can use the other socket AV2 to connect other equipment ...

Page 10: ...ideo behaves as normal but if the equipment is turned on the video will automatically switch over to AV2 mode and displays the channel of the other equipment channel selection can only be performed by the other equipment the video PR PR buttons have no effect To return to normal video use the other equipment must be turned off Recording from other Equipment Simple recording can be performed ensure...

Page 11: ...s picture now CH 52 with the station tuning functions of your TV set see its user manual In case of interference problems on CH 52 type in an other transmission channel between 21 and 69 using the number buttons Setting up the player Press VCR button on the remote control to change into VCR Mode and follow the procedure below Call the player s SETUP choose VCR SETUP then CLOCK SET 1 Move to the po...

Page 12: ...ct Watch Modes or External Input DVD Playback Press button to power on Press DVD button of REMOTE to change into DVD mode Press OPEN CLOSE button to open the disc tray Place a disc firmly on the disc tray making its label look upward Insert the disc and press OPEN CLOSE button to close the tray The disc tray is closed and after checking the disc s condition Playback or Stop function starts to oper...

Page 13: ...kly rewinds 15 seconds of the tape and plays it If you press CM SKIP button in playback mode the player quickly skips 30 seconds of the tape and plays it To Adjust Display This product includes automatic Tracking function and enables users to enjoy clear picture without an additional operation Provided that the following problems can be solved by the manual adjustment which improves display qualit...

Page 14: ... the picture from your player press the input or AV Audio Video button on the TV To complete the set up of your video recorder when the auto set has not stored all of the channels or when you wish to store a new channel Call the video s SETUP choose PR PRESET 1 Select MANUAL SET 2 Choose any unused location number or P xx It s simplest to use the same location number on both the TV and video and c...

Page 15: ... the position you want to change using the œ œ buttons Change the setting using the or number buttons If all setting are ok press OK till you see OK CONFIRM in the bottom line Confirm 3 Switch your player off 0 9 SHOWVIEW NUMBER CORRECT OK CONFIRM SETUP END SHOWVIEW 83077 HOW OFTEN DO YOU WANT TO RECORD THIS PROGRAM PR SELECT OK CONFIRM SETUP END TIMER PROGRAM ONCE PR 03 START TIME 21 20 END TIME ...

Page 16: ...ly to LP for double recording capacity The recorder will eject cassettes which have the safety tab removed The player will be powered on and record the program at the set time In case the player is powered on after setting of timer recording the player cannot record in VCR mode but can record in DVD mode PR SELECT AV1 AV2 0 9 SETUP PR CORRECT SETUP END PR START TIME END TIME START DATE TAPE SPEED ...

Page 17: ... search backward The VCR will locate your index mark and begin playback TAPE CONTROL TAPE REMAIN GO TO ZERO COUNTER RESET INDEX INDEX PR SELECT OK CONFIRM SETUP END Clock counter display Remaining time and cassette length Searching a recorded program with index The player will wind to the position 0 00 00 and stop REW SP GO TO ZERO 0 02 13 Reset the counter COUNTER RESET 0 00 00 You can play and r...

Page 18: ... recorders your player machine is equipped with a high quality Hi Fi sound system This means you can enjoy films with excellent stereo sound films of full length concerts in high quality stereo films with impressive Surround Sound using additional Surround equipment films with two dialogue modes dual bilingual usually the original sound track and dubbed sound track VHS cassettes with Hi Fi stereo ...

Page 19: ... exit 2 If the quality of the test picture transmitted to the TV is poor fine tuning on the TV may help refer to the TV manual Without a scart cable you will not get stereo sound from a TV capable of stereo sound To the TV via antenna cable if you are not using a SCART cable Connections and Copying Switch off all components when connecting or disconnecting cables To copy to your player from anothe...

Page 20: ...disc Directly moving to a desired title You may repeat a defined period from A to B A MP3 disc may not be repeated from A to B At the point where you want to start the repeat playback press A B button The right figure appears and repeat playback start position A is set 1 At the point where you want to end the repeat playback press A B button again The repeat playback end position B is set and a de...

Page 21: ... current and total track numbers Please enter the new track number to be searched using the NUMBER button If it is PBC ON pressing track number converts PBC to OFF mode automatically 1 If you want to search with a track time press SEARCH button twice In case of PBC OFF the screen like the right figure appears It shows total track time Please enter the new time to be searched using the NUMBER butto...

Page 22: ...ode current angle total angle 001 002 001 001 00 02 04 01 06 ENG 01 06 ENG OFF 01 04 Confirming the current DVD disc mode Confirming the current PLAY mode on screen While in playing press DISPLAY button It shows the current disc mode If you want to change the mode select the item with up down cursor and enter the new settings with number œ or button In completing entering press ENTER button To exi...

Page 23: ...io language Selecting a subtitle language Selecting 3D Audio Selecting ZOOM and Multi Angle The user can enlarge the current screen about 0 25 or 3 times Keep pressing ZOOM button till the preferred zoom appears A magnification ratio of display is increased or decreased by one step in order upon pressing the ZOOM button A base point to be enlarged is centre and the point can be changed with the op...

Page 24: ... About MP3 JPG and DivX discs Recognizing range for a MP3 disc is stated below The maximum number of directories should not exceed 32 The maximum depth level of directories should not exceed 4 It may break of a sound while playing for a file in which it was recorded with a variable bit rate VBR from low bit rate to high bit rate Ex 64 256kbps in itself A file name must be composed with not exceedi...

Page 25: ...d file have not been undergone the interleave it will output either the image or the sound When the frame number of screens per a second is more than 30 it may not play it normally It will not support a DivX file coded with dts It will not support GMC or Q Pel Quarter Pixel It will not support Q Pel Quarter Pixel It will be available to play a file with a resolution size will be below 720 x 576 wi...

Page 26: ...red 3 Selecting Subtitle language Set your preferred subtitle with ENTER If the subtitle language is set and recorded on the DISC it is automatically played in the set language every time it is played OTHERS Another language can be selected You can input 4 digit language code Refer to the language codes on next page Press CLEAR if an incorrect language code is entered 4 A user can set OSD language...

Page 27: ...3 Czech 7285 Hungarian 7773 Maori 8373 Singhalese 8673 Vietnamese 6789 Welsh 7289 Armenian 7775 Macedonian 8375 Slovak 8679 Volapük 6865 Danish 7365 Interlingua 7776 Malayalam 8376 Slovenian 8779 Wolof 6869 German 7378 Indonesian 7778 Mongolian 8377 Samoan 8872 Xhosa 6890 Bhutani 7383 Icelandic 7779 Moldavian 8378 Shona 8979 Yoruba 6976 Greek 7384 Italian 7782 Marathi 8379 Somali 9072 Chinese 6978...

Page 28: ...d for about 5 minutes 3 Restoring DEFAULTS This feature resets every function to its original Factory Defaults except the Parental Control settings 4 Select Parental Press button when the cursor is located in PARENTAL When INPUT PASSWORD appears on the screen input the password Change Parental Rating level Once you have entered the correct password you can change the PARENTAL rating by pressing An...

Page 29: ...ible DVD Video MP3 DivX Video JPG DivX Video Possible avi DivX mpeg mpg File DVD ROM Impossible DVD RAM Impossible Photo CD Possible except KODAC CD REGION MANAGEMENT INFORMATION This unit is designed and manufactured to respond to the Region Management information that is recorded on a DVD disc The region number of this player is 2 If the region number described on the DVD discs does not correspo...

Page 30: ...ious scenes that have been simultaneously shot from a number of different angles PCM Linear PCM is a signal recording format used in a CD while CD is recorded in 44 1kHz 16bit a DVD is recorded in 48KHz 16bit up to 96KHz 24bit Dolby DigitalDolby Digital enables the delivery of mono through 5 1 channel audio at data rates from 32 kbps to 640 kbps thus offering flexibility and economical performance...

Page 31: ... ejected A channel on video and a play screen does not appear Noise screen noise appears on screen Noise appears on screen after recording While in playing noise appears Sound and screen are irregular Sound comes out but screen does not appear Screenisirregularandstripesappears Screen Error message is displayed in a screen While recording and playing the top of screen extremely waves A screen is n...

Page 32: ...corder Try to record it with the recorder You may start recording it in REC PAUSE Please start recording it from stop condition Please select CABLE not NETWORK from the CHANNEL SETTING Before doubting about troubles DVD The recorder does not play No sound comes through A disc is playing but screen does not appear or poor screen appears Sound is irregular REMOTE does not work Dolby Digital sound do...

Page 33: ...K AUDIO input 8 8dBm RCA JACK VIDEO output common use of DVD and VCR VIDEO output terminal 1 0 Vp p unbalanced RCA JACK SCART JACK VIDEO output DVD only RGB output 75Ω In load R 0 7Vp p G 0 7Vp p B 0 7Vp p AUDIO output common use of DVD and VCR Audio output terminal 2 kinds 5 8dBm VCR 2Vrms DVD RCA JACK AUDIO output DVD only Analogue AUDIO output 2 0Vrms Digital audio output OPTICAL COAXIAL Playab...

Page 34: ...the OK ENTER button 5 Select the channel that needs to be moved and press the OK ENTER button 6 Press the OK ENTER button in order to select the PR number which you want to place the current selected channel using buttons ie PR01 ARD And press the OK ENTER button to confirm Repeat above 5 6 steps to align the other channels STOP SP PR01 P 01 SETUP TIMER PROGRAM PR PRESET VCR SETUP TAPE CONTROL PR ...

Reviews: