background image

8

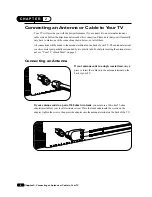
Chapter 2 : Connecting an Antenna or Cable to Your TV

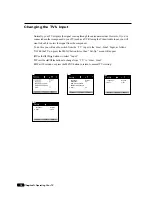
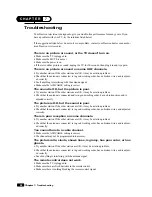
If your cable system requires you to use a converter box for all channels,

connect the incoming cable

to the IN terminal on the converter box. Connect another cable between the OUT terminal on the con-
verter box and the antenna terminal on the TV. You will need to keep your TV tuned to channel 3 or 4
and change channels using the converter box.

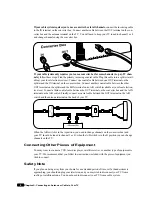
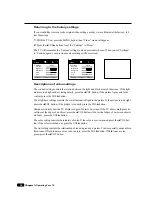
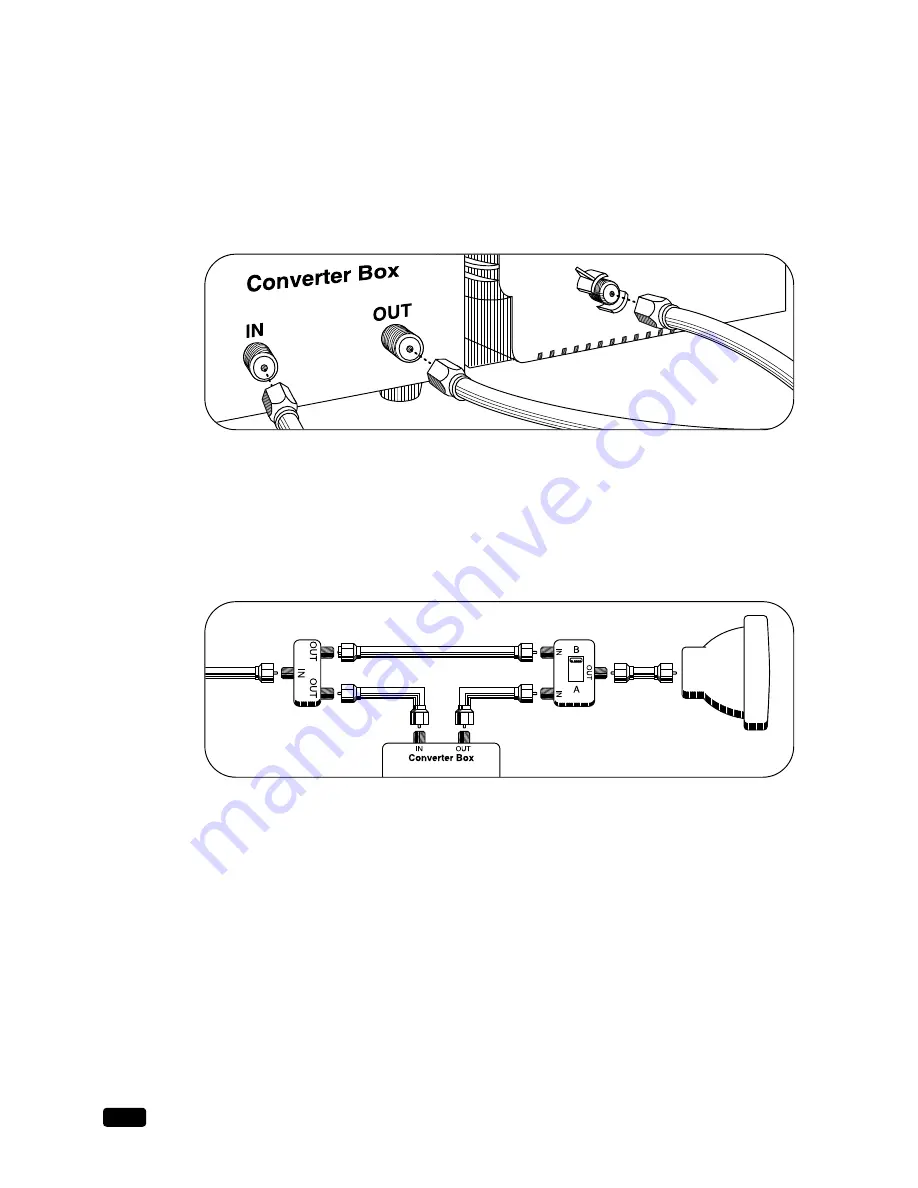
If  your cable system only requires you to use a converter box for some channels (i. e. pay-TV chan-
nels)

follow these steps: Find the primary incoming coaxial cable. Plug this cable into a splitter (avail-

able at your local electronics store). Connect one coaxial cable between one OUT terminal on the
splitter and the IN terminal on the converter box. Connect another coaxial cable between the other
OUT terminal on the splitter and the B-IN terminal on an A/B switch (available at your local electron-
ics store.) Connect a third coaxial cable between the OUT terminal on the converter box and the A-IN
terminal on the A/B switch. Finally, connect a coaxial cable between the OUT terminal on the A/B
switch and the antenna terminal on the back of your TV.

When the A/B switch is in the A position, you need to change channels on the converter box (and

your TV should be tuned to channel 3 or 4); when the A/B switch is in the B position you can change
channels on the TV.

Connecting Other Pieces of Equipment

You may want to connect a VCR, laser disc player, satellite receiver, or another type of equipment to
your TV. We recommend that you follow the instructions included with the piece of equipment you
wish to connect.

Safety Note

If you plan on being away from your home for an extended period of time, or if a thunderstorm is
approaching, you should unplug your television, and you may wish to disconnect your TV from a
rooftop or satellite antenna. You do not need to disconnect your TV from a cable system.

Summary of Contents for DTQ 20U6SC

Page 1: ...INSTRUCTION MANUAL Color Television DTQ 20U6SC ...

Page 2: ...nsure reliable operation of the television equipment and to protect it from overheating these openings must not be blocked or covered The openings should never be blocked by plac ing the television equipment on a bed sofa rug or other similar surface This equipment should never be placed near or over a radiator or heat register This television equipment should not be placed in a built in installat...

Page 3: ... friends and consider Daewoo when you make your next purchase of home entertainment equipment In addition to TV receivers Daewoo produces a full line of audiovisual products built to the same high design engineering and manufacturing standards as this unit Here are a few tips that will keep your TV receiver looking great and performing for years to come Avoid putting it in excessively hot location...

Page 4: ...k Use this jack to receive an audio signal from your TV 5 STAND BY red indicator This indicator lights up when the power is off 6 Remote control receiver This receiver receives a signal from your remote control Do not block it 7 WCHV Use these buttons to change channels on your TV or to select items in the menu system 8 CVOLB Use these buttons to change your TV s volume to activate selections in t...

Page 5: ...the menu system or to change audio and video settings 5 MENU Use this button to turn the TV s menu system on and off 6 DISPLAY Use this button to display the channel number and status 7 INPUT Use this button to select the TV s signal source 8 VIDEO Use this button to display video adjustment items 9 0 9 Use these buttons to change channels 10 SLEEP Use this button to program the TV to turn off aft...

Page 6: ...terminal on the back of your TV The antenna terminal is a silver metal post partially surrounded by two plastic tabs For help in locating the antenna termi nal see Your TV s Back Panel on page 3 Connecting an Antenna If your antenna ends in a single coaxial lead simply press or screw the cable onto the antenna terminal on the back of your TV If your antenna ends in a pair of 300 ohm twin leads you...

Page 7: ...n an A B switch available at your local electron ics store Connect a third coaxial cable between the OUT terminal on the converter box and the A IN terminal on the A B switch Finally connect a coaxial cable between the OUT terminal on the A B switch and the antenna terminal on the back of your TV When the A B switch is in the A position you need to change channels on the converter box and your TV ...

Page 8: ... to any channel even if it has not been memorized To change to a channel enter its number the TV will tune to the new channel when you enter the second digit of the channel 3 The PREVIOUS button will take you instantly to the last channel you were watching Changing the Volume 1 To change the volume of the TV set use the CVOLB buttons on the remote conteroller or on the front panel 2 To quickly tur...

Page 9: ...1 Line2 Input as follows 1 With the TV on press the MENU button twice then Set Up menu will appear 2 Use the WCHV buttons to select Input 3 Press the CVOLB buttons to change from TV to Line1 Line2 4 Wait 10 seconds or press the MENU button to return to normal TV viewing 12 Chapter 3 Operating Your TV Select Set Up Language English Input Line2 Adjust Next 3 2 Select Set Up Language English Input Li...

Page 10: ...settings controls the overall amount of light in the picture If the picture is too bright press the CVOL button if the picture is too dark press the VOLB button Sharpness controls how the TV displays edges of objects on screen If the TV shows multiple verti cal lines at the edges of an object press the CVOL button if the vertical edges of on screen objects are fuzzy press the VOLB button The color...

Page 11: ...ct use the WCHV buttons to select another Time function or press the MENU button to return to normal TV viewing Canceling the Wake up Time or Off Time If you would like to cancel the Wake up Time or the Off Time Press the CVOLB buttons until the time settings return to The Wake up Time and Off Time will not function correctly unless the clock has been set Select Time Set Clock 12 00 AM Wake Up Tim...

Page 12: ...t is not usually related to the action on screen often providing information such as news or weather A TV program might be providing more than one set of captions or one set of text To set your TV to display captions or text 1 With the TV turned on press the MENU button until Special menu will be displayed 2 The Closed Caption item be selected To turn captioning on use the CVOLB buttons to select ...

Page 13: ...ng your password you have to remember it 5 The Parental Lock feature will be selected Use the CVOLB buttons to toggle On or Off 6 Use the WCHV buttons to select the Parental Control settings you wish to adjust Descriptions of the Parental Control settings are on the next page 7 Use the WCHV buttons to adjust the Parental Control settings 8 Use the MENU button to return to the one level up menu Clo...

Page 14: ...ce Content is such that parents may not want their children to view the Suggested program G General Audience Content not offensive to most viewers NR Not Rated A motion picture that chid not receive a rating for a varicty of possible reasons TV MA Mature Audience Only Adults only may contain Strong Dialog Bad Language Sex TV 14 Parents Strongly Unsuitable for childern under 14 may contain Strong D...

Page 15: ...splayed character will change in the following order CHV A B C D Z 0 1 9 WCH 9 8 0 Z Y B A Cearing Channel Labels 1 Select the channel which has the label you want to clear 2 3 4 Follow step 1 3 on the Ch Labels to call up the Ch Labels mode display 5 Enter in first character spaces ...

Page 16: ... wait few seconds to return to normal TV viewing 6 Your setting will remain intact until you change it Your TV will then automatically reproduce either stereo or monaural sound whichever is broadcast Note If a broadcast signal is weak it may cause noise and hum in stereo sound Please select the Mono mode the noise and hum should be reduced Present Broadcast Your Selection Speaker Out MONO Stereo M...

Page 17: ...problem Check that the antenna is connected and is in good working order has no broken wires and is adjusted correctly The picture is OK but the sound is poor Try another station If the other stations are OK it may be a station problem Check that the antenna is connected is in good working order has no broken wires and adjusted correctly There is poor reception on some channels Try another station...

Page 18: ...nufactured to meet rigid U L safety standards against X radiation fire casualty and electrical hazards Daewoo Electronics Corporation of America 120 Chubb Avenue Lyndhurst NJ 07071 For more information about this or other Daewoo products please call 1 800 DAEWOO8 P N 48586220E10F R0 ...

Reviews: