background image

INTRODUCTION

15

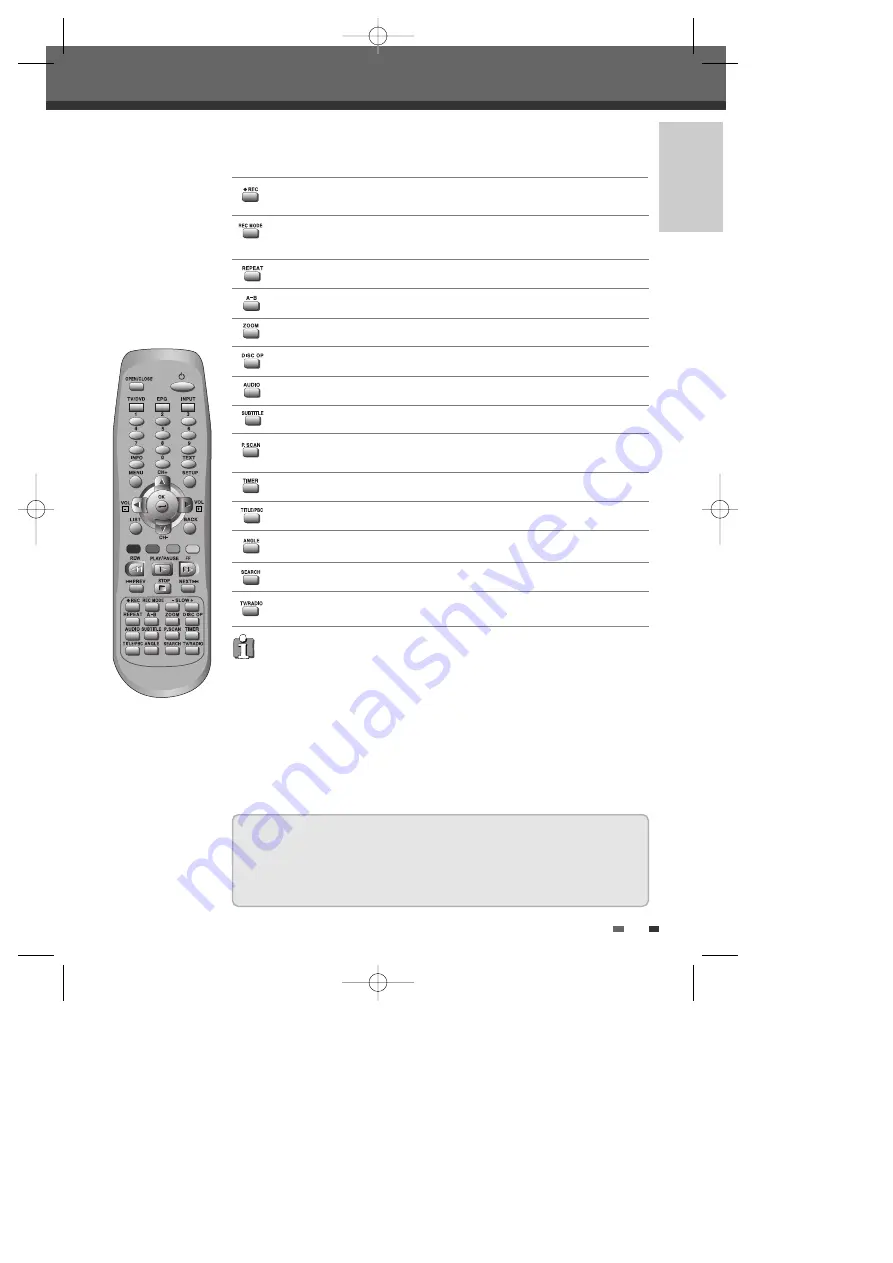
Identification of Controls

Displays a screen in multi angles (only in multi-angle supported DVD)

Switches  between TV and Radio mode.

Displays a disc’s Title menu, if available.

Selects Recording mode. (Approx.)
HQ (1hr), SP (2hrs), EP  (4hrs), SLP (6hrs)

Displays the Timer Recording menu.

Starts recording. Press repeatedly to set the recording time. For more
details, Refer to One Touch Record (OTR) on page 42.

Repeats the current chapter, track, title or the entire disc.

Repeats playback between two points (A and B).

Progressive Scan Mode

• If your TV supports Progressive Scan, you can view high quality video by setting the

DVB-T DVD Recorder to Progressive Scan mode. If your TV does not support
Progressive Scan, do NOT change to Progressive Scan mode.
If you do so accidentally, press [P.SCAN] to restore normal viewing.

• When video output mode is changed from RGB or Interlace to Progressive, Scart

output is not adequate for Component video.

• As component outputs have their own Jacks on the back side, change the TV input

into Component input, after connecting the component cables from the DVB-T DVD
Recorder to the TV.

• Changing from Interlace or  RGB to Progressive, should be the opposite of above.

Selects an audio language (DVD), audio channel (CD) or audio type (TV).

Selects a subtitle language, if available.

Enlarges the video image.

Disc Operation options

Searches for a specific title or a chapter.

Switches between Progressive Scan and Interlace Scan mode.

CONSUMERS SHOULD NOTE THAT NOT ALL HIGH DEFINITION TELEVISION SETS ARE FULLY
COMPATIBLE WITH THIS PRODUCT AND MAY CAUSE ARTIFACTS TO BE DISPLAYED IN THE
PICTURE. IN THE CASE OF 525 PROGRESSIVE SCAN PICTURE PROBLEMS, IT IS RECOMMENDED
THAT THE USER SWITCH THE CONNECTION TO THE 'STANDARD DEFINITION' OUTPUT. IF THERE
ARE QUESTIONS REGARDING OUR TV SET COMPATIBILITY 'WITH THIS MODEL 525p DVD
PLAYER, PLEASE CONTACT OUR CUSTOMER SERVICE CENTER.

0817DTBD-LN11PA-AGN(GB) 


2006.8.17 

4:8 

AM 


˘

`

15

Summary of Contents for DRT-10

Page 1: ...0817DTBD LN11PA AGN GB 2006 8 17 4 8 AM A ...

Page 2: ...m temperature Make sure the product is placed at least 10 cm apart from other home appliances or obstacles to ensure sufficient ventilation The product should not be exposed to dripping or splashing and no objects filled with liquids such as vases should be placed on top of the product Before a storm and or lightning unplug the product from the mains supply and aerial Put the product on a steady f...

Page 3: ...owhead symbol within an equilateral triangle is intended to alert the user to the presence of uninsulated dangerous voltage within the product s enclosure that may be of sufficient magnitude to constitute a risk of electric shock The exclamation point within an equilateral triangle is intended to alert the user to the presence of important operating and servicing instructions in the literature acc...

Page 4: ...heating These openings must not be blocked or covered These openings must not be blocked by placing the unit on a bed sofa rug or other similar surface This unit should never be placed near or over a radiator or heat radiator This unit should not be placed in a built in installation such as a bookcase or rack unless proper ventilation is provided or the manufacturer s instructions have been adhere...

Page 5: ...ing condition 22 WALL OR CEILING MOUNTING The product should be mounted to a wall or ceiling only as recommended by the manufacturer 23 HEAT The product should be situated away from heat sources such as radiators heat registers stoves or other products including amplifiers that produce heat 24 To prevent battery electrolyte leakage which may result in injury and damage to the unit or other objects...

Page 6: ..._____________________________6 Overview______________________________________7 Features _______________________________________11 Identification of Controls ______________________12 Introduction Connecting Antenna Cable ____________________17 Connecting a TV _______________________________17 Connecting an Amplifier Receiver _____________18 Connecting Optional Equipment ______________19 Connecting ...

Page 7: ...c Program Guide EPG for even better program information on all channels and information that enables subtitles and teletext for a bounty of useful information on programs and broadcast signals As a DVD Recorder our product supports dual media recording allows DVD RW format recording VR on either DVD R DVD RW DVD R or DVD RW media This system allows the flexibility for the consumer to use any of th...

Page 8: ... your player Program Recording Recording from TV tuner or AV input Manually set up timer recording for a TV program or a recurring TV program Personal video copying by external input DV camcorder tapes VCR tapes Simple easy video editing Rename programs Delete programs Split programs Segment programs Identify and keep the desired video and remove the parts you do not need DVD Playback DVD VCD SVCD...

Page 9: ...cess can be repeated more than a thousand times What is a DVD R Unlike a DVD RW disc a DVD R write once DVD can only be written to once If it is not finalised after a recording further recordings can be added to it Old recordings can be deleted but they can no longer be overwritten The deleted recordings titles are marked deleted title Before a DVD R can be played in a DVD player it must be finali...

Page 10: ...utomatically and an error message will be displayed on screen Copyright Notice Audio and video recordings you make using the DVB T DVD RECORDER are for your personal use only You may not sell lend or rent them to other people This product incorporates copyright protection technology that is protected by method claims of certain U S patents and other intellectual property rights owned by Macrovisio...

Page 11: ...perating environment For details please contact your nearest dealer Remote Control Operation Range Point the remote control at the remote sensor and press the buttons Distance Within 23 ft 7 m of the remote sensor Angle Within 30 in each direction of the remote sensor Remote Control Battery Installation Detach the battery cover on the rear of the remote control and insert two AAA batteries Make su...

Page 12: ...xt news sport information Digital super teletext where you can view up to the minute information User friendly EPG 8 days capability Parental control with block on system all channels and programs by age limitation Multiple Connectivity to Hi Fi or Home Theatre Channel list mode in both all and favorite groups Channel sorting by Channel Number Extended information shows the full program informatio...

Page 13: ...Pauses playback or recording temporarily STOP Stops playback PREV REW Skips to previous chapter Searches backward NEXT FF Skips to next chapter Searches forward STANDBY ON Turns the DVB T DVD RECORDER on and off REC Starts recording Press repeatedly to set the recording time REC MODE Selects Various recording mode HQ SP EP SLP 1 MENU Accesses media browser or return to previous menu 2 PR Scans up ...

Page 14: ... Recording is in standby mode 1 1 1 5 Indicates the DVD is recording REC Recording Pause mode 0 30 OTR Recording mode TV Indicates the DVD Recorder is in TV mode set by TV DVD button DVD Indicates the DVD Recorder is in TV mode set by TV DVD button NO No disc or unreadable disc Others optional Disc is loaded Timer Recording is set FRONT DISPLAY MESSAGE Indicates clock channel current mode OTR time...

Page 15: ...te list Returns to previous menu mode Selects numbered options in menus Selects TV channels Displays information on the current and next programmes on the channel Displays information on the disc when you press this button once Displays DVD navigator when you press this button twice Displays digital text of the programme Starts playback Pauses playback or recording temporarily Press again to exit ...

Page 16: ...rlace to Progressive Scart output is not adequate for Component video As component outputs have their own Jacks on the back side change the TV input into Component input after connecting the component cables from the DVB T DVD Recorder to the TV Changing from Interlace or RGB to Progressive should be the opposite of above Selects an audio language DVD audio channel CD or audio type TV Selects a su...

Page 17: ...d Plug into a power outlet COAXIAL OPTICAL Digital Audio Out Connect to an amplifier with a coaxial or optical digital audio input Scart socket 2 Connection of an additional device satellite receiver set top box video recorder camcorder etc ANT OUT Connect to a TV with an RF input Cooling Fan 16 Rear panel Caution Do not touch the inner pins of the jacks on the rear panel Electrostatic discharge m...

Page 18: ...cable to the jack marked ANT IN FROM ANT on the rear panel of the DVB T DVD Recorder There are a variety of ways to connect the DVB T DVD Recorder to your TV and other equipment Use only one of the connections described below Whichever TV connection you use will work with all input sources Please refer to the manuals for your TV VCR stereo system or other devices as necessary to make the best conn...

Page 19: ...right audio jacks on your TV using the audio cables Connections Be sure to set the DVB T DVD Recorder to Progressive Scan mode by pressing P SCAN or changing the Video Output in the Setup Menu see page 31 Due to the DTS Licensing agreement the digital output will be in DTS digital out when the DTS audio stream is selected If the audio format of the digital output does not match the capabilities of...

Page 20: ...nalog Camcorder etc Using the front panel DV IN jack it is possible to connect a DV digital camcorder video deck or DVD R RW recorder and digitally transfer DV tapes or DVD R RW discs to DVD R or DVD RW Use a DV cable not supplied to connect the DV In Out jack of your DV camcorder video deck to the front panel DV IN jack of the DVB T DVD Recorder Connecting a Digital Camcorder This jack is for con...

Page 21: ...must follow the initial installation process to set the time date channels and language preferences for the DVB T DVD Recorder 20 Initial Installation Initial Installation Re Installation 1 Press SETUP and select the Restore Defaults using œ Then RESET the set see page 35 2 Power On then you see the Initial Installation 3 Repeat the steps 1 4 Auto Tune Please press the Red Button to start tune Aut...

Page 22: ...too long to be displayed in the cell 2 Press œ or enter a channel number by using the number buttons to move around the list If you press the button after highlighting the last programme on the right the schedule for the next one hour is displayed depending on availability from the broadcaster 3 Press RED to record the programme refer to page 44 4 Press YELLOW to display the next day or BLUE to di...

Page 23: ... Dance Arts Culture Social Political Educational Science Leisure and Special Interest Note If you want to go to the previous mode press BACK on the remote control This feature allows you to search for channels related to a particular words For example if you enter Mad about you in the Keyword Search mode then only channels related to the keyword Mad about you will be shown in the EPG 1 Follow step...

Page 24: ...played programme 3 When you have finished viewing the text service follow the on screen instructions to exit Information Service Information Service Digital text services may also be available on other digital channels This is sometimes indicated by a small symbol on your TV screen superimposed on the programme you are watching 1 Select a channel 2 Press TEXT or the button indicated on screen by t...

Page 25: ...the stakes are The Prime Minister is urging governments to send more troops and equipment to support the British led Nato mission and to restore the authority of the Afghan Government in the south A senior government official said He wants governments to wake up to why this battle is important to our enemies Al Qaeda have chosen Iraq and Afghanistan as their two battlegrounds We have got to be vic...

Page 26: ...esired category 3 While the desired category is selected press to move to the second level 4 Press OK to move to the third level 5 Use to select the desired setting then press OK to confirm your selection Some items require additional steps Press SETUP at any time to return to the previous menu 6 Press SETUP to exit the Setup menu Menu Navigation Auto Tune The DVB T DVD Recorder has a frequency sy...

Page 27: ...Setup menu appears 2 Use œ to select Installation 3 Use to select Delete Services 4 Press OK Press to select the service you want to delete then press RED button to confirm it Auto Tune Adjust Services Edit Favourites Set Clock Press Ok To Select Installation Delete Services Adjust Services After tuning TV or Radio stations into your DVB T DVD Recorder you may wish to change the order of the stati...

Page 28: ...llow steps 1 2 as shown under Delete Services 2 Use to select Set Clock 3 Press OK The Set Clock menu appears 4 If you want to set the date and time manually œ left right Changes the setting at the current cursor position up down Moves the cursor to the previous or next line 5 Press RED button to save your setting then press SETUP to exit the Setup menu Auto Tune Delete Services Adjust Services In...

Page 29: ...ollow the same procedure as the DVD Quality œ SP Off Auto Chapter Press To Change Record Options SP œ Off DVD Quality Press To Change Record Options DVD Quality Auto Chapter LANGUAGES Settings OSD Language Select a language for the DVB T DVD Recorder Setup menu and on screen displays 1 Press SETUP The Setup menu appears 2 Use œ and to select Languages 3 While Languages is selected press to select ...

Page 30: ...les broadcasted by a digital channel when available English Off English œ English Off DVD Menu DVD Subtitle DVD Audio DVB Subtitles Press To Change Languages DVB Audio 4 3 Select when a standard 4 3 TV is connected 16 9 Select when a 16 9 wide screen TV is connected Televison Picture Format 1 Press SETUP 2 Use œ to select Preferences 3 While Preferences is selected press to select Television 4 Use...

Page 31: ...dio Out jacks PCM Select when connected to a 2 channel digital stereo amplifier The DVB T DVD Recorder s digital audio signal will be output in the PCM 2ch format when you play a DVD recorded with a Dolby Digital only for DVD or MPEG soundtrack If the DVD is recorded with a DTS sound track then no sound will be heard Bitstream Select when connected to a Dolby Digital or DTS decoder or an amplifier...

Page 32: ...gressive Scan Video provides the highest picture quality with reduced flickering RGB If you connect the DVB T DVD Recorder to an analog television using the SCART jacks set Video Output to RGB Interlace or Progressive If you connect the DVB T DVD Recorder to a digital television DTV or Monitor using the COMPONENT jacks set Video Output to Interlace or Progressive 1 Press SETUP 2 Use œ to select Pr...

Page 33: ... You must enter this password before you can change the Parental Level Set the new password to something other than 0000 5 After setting the password press Red button to end Then Parental Setting screen is displayed 6 Use œ to select the desired rating level Off If you select Unlock the Lock feature is not active All discs will play in full U Adult to Kids Kid safe Some discs contain scenes not su...

Page 34: ...4 Use to select channels you want to lock 5 Press RED to toggle Lock Unlock status 6 After you finish the setting press BACK to go back to exit Country Code 1 Press SETUP 2 Use œ to select Parental Settings 3 While Parental Settings is selected press to select Country Code 4 Use œ to select the desired country code Off Auto œ UK Off Press To Change Parental Settings Watershed Time Lock Unlock Serv...

Page 35: ... enter a new PIN code Change Press Red Button To Change 1 0 0 0 Master Password If you forget your password press 3 3 0 8 on the remote control and then press ENTER Set the new password to something other than 0000 SYSTEM Info Firmware Info System Information helps service personnel identify key firmware information about your DVB T DVD Recorder in case service is required 1 Press SETUP The Setup ...

Page 36: ...Setup menu appears 2 Use œ and to select Update Restore 3 While Update Restore is selected press to select Restore Default Settings 4 Press OK to select the Restore Default Settings 5 Use to select YES Then DVB T DVD Recorder is reset to its original factory settings Some options cannot be reset including Parental Controls Password and Country Code After Restoring Defaults the unit is powered off ...

Page 37: ... playback The on screen display appears on the TV screen 2 Use to select the Audio line on the on screen display 3 Use œ to select the desired audio language To display information about the currently loaded disc On screen display operation Press INFO once during playback Press INFO twice during playback 1 Press INFO twice to display the information displayed on screen 2 To remove the on screen di...

Page 38: ...d playing time and skips to the desired time 1 Press INFO twice during playback The on screen display appears on the TV screen 2 Use to select the Search To Time line on the on screen display You can see the elapsed playing time 3 Press OK to modify the time Use to change the time and use œ to move left or right 4 Press OK to confirm the start time Playback starts from the selected time on the dis...

Page 39: ...B T DVD Recorder Audio system Turn the audio system on and select the input source connected to the DVB T DVD Recorder 2 Press OPEN CLOSE to open the disc tray 3 Load your disc in the tray with the playback side down label side up 4 Press OPEN CLOSE to close the tray 5 LOAD appears on the front panel display and playback starts automatically If playback does not start press PLAY In some cases the ...

Page 40: ... DVDs ex Jpg The Zoom function does not work in PAUSE mode Repeat 1 To repeat the currently playing chapter press REPEAT CHAPTER appears on the TV screen 2 To repeat the currently playing title press REPEAT twice TITLE appears on the TV screen 3 To repeat the whole disc press REPEAT three times ALL appears on the TV screen 4 Each press of the REPEAT button changes the repeat mode as follows DVD VC...

Page 41: ...LAY PAUSE to pause playback while the disc is playing 5 To stop playback at any time press STOP Audio CD Playback MP3 Playback On the MP3 CD menu you can display the folders on the disc Use to select the folder icon on the MP3 CD menu then press OK You can also display just the tracks in the folders Use to select a folder then press OK Press REPEAT to repeat a track file and press again to repeat ...

Page 42: ...includes both MP3 and JPEG files 2 Insert the disc A disc is loaded and File Media screen displays 3 Select the Audio Browser and go to music category 4 During playback of the MP3 files press MENU to return to the Filemedia menu screen The music playback will not stop 5 Go to Picture category and select the image files and press OK to start the slide show 6 The MP3 files you selected continue to p...

Page 43: ...s 49 If the DVB T DVD Recorder is powered off during DVD recording the recording will not be saved If a DVD RW or unfinalised DVD R DVD RW disc is inserted in the tray no title is played automatically after loading is finished If you are recording to a blank DVD R RW disc it may take up to 7 minutes it depends on the disc for post processing after recording Record Quality DVD record quality HQ RW ...

Page 44: ...Quality Choose a Record mode HQ SP SLP or EP Repeat Choose frequency of the recording Daily or Weekly 4 Enter the necessary information for your Timer Recording s œ Moves the cursor left right Changes the setting of the current cursor position Press TIMER to exit the Timer Record menu Press OK after filling in all the program information Press TIMER to display the Timer Record List 5 Press OK or R...

Page 45: ...gramme you wish to record in the EPG display The date time and channel of that programme are set automatically 1 Insert recordable media such as DVD R DVD RW if you are recording to DVD 2 Press EPG to display the EPG The TV GUIDE menu appears 3 Press œ or enter a channel number by using the number buttons to move around the list To know more about the navigation options in the EPG application see ...

Page 46: ...wo or more Timer Recordings overlap The earlier program takes priority When the earlier program finishes the later program starts If two programs are set to start at exactly the same time the program entered first takes priority Confirmation is not possible when The Lock Disc setting is set to YES There are already 49 titles recorded on the disc If the disc is damaged the recording may not complet...

Page 47: ... 42 6 Press STOP to stop recording Recording from External Components You can record from a digital camcorder connected to the DV IN jack on the front panel of the DVB T DVD Recorder 1 Make sure your digital camcorder is connected to the front panel DV IN jack see page 19 2 Press INPUT to select the DV input DV Input screen appears Then if you select Yes it will be changed to DV input 3 Find the p...

Page 48: ...select Title or Chapter Use œ to select the desired title or chapter number Edit Chapter You can add a chapter marker anywhere in a title during playback Once the chapter is marked you can use the chapter search feature You can select one of the various chapter marker functions Add Delete or Delete All Hide Chapter This feature allows you to hide or unhide a chapter After hiding a chapter the chap...

Page 49: ... select the desired title you wish to erase 3 Press OK Use to highlight the Erase icon and press OK again 4 Please wait while Title xx is erased will display and the selected title will be erased For recordable DVD media such as DVD R and DVD RW discs you can manage the disc using the Disc Operation The DVD R DISC OP menu allows you to rename your disc or finalise it so it will be compatible with ...

Page 50: ...s a few seconds 5 After the process is finished the recorder goes to the Information menu automatically Edit Disc Name You can rename your disc to any name you choose The default disc name is MY DVD 1 Press DISC OP to go to Disc Operation mode 2 Use œ to select Edit Disc Name menu Then press or 3 If you want to change the disc name select Yes by using œ and pressing OK 4 The Keyboard Menu appears ...

Page 51: ...r 3 Use œ to select Yes and press OK to make the disc compatible 4 After the process is finished the recorder goes to the Information menu automatically Once you have finalised a DVD R or DVD RW disc you cannot edit or record anything else on that disc It may take over 7 minutes for finalizing the edited disk you must wait till the set finishes the finalizing operation Make Compatible can take up ...

Page 52: ...ected The TV is not set to receive DVB T DVD Recorder signal output The video cable is not connected securely The TV power is turned off The equipment connected with the audio cable is not set to receive DVB T DVD Recorder signal output The audio cables are not connected securely The power on the equipment connected with the audio cable is turned off The audio cables are damaged The disc is dirty ...

Page 53: ...s TV input Point the remote control at the remote sensor of the DVB T DVD Recorder Operate the remote control within 23 ft 7m Remove the obstacle Replace the batteries The remaining blank space on the disc is insufficient The source you are trying to record is copy protected When setting the recording channel the channel is tuned on your TV s tuner Clock in DVB T DVD Recorder is not set to correct...

Page 54: ...tion Over 500 lines HQ Recording Inputs Antenna In Out U V mixed 75 Ω unbalanced Video In 1 0 Vp p unbalanced Audio In 8 8 dBm DV IN 4pin i LINK IEEE 1394 standard Outputs Video output Video output terminal 1 0 Vp p unbalanced RGB output 75Ω in load R 0 7Vp p G 0 7Vp p B 0 7Vp p Audio output Audio output terminal 2 kinds 2Vrms DVD Analog audio output 2 0Vrms Digital audio output coaxial optical S ...

Page 55: ... MEMO 0817DTBD LN11PA AGN GB 2006 8 17 4 8 AM 54 ...

Page 56: ... needed on this product during the guarantee period KEEP THIS SECTION FOR FUTURE REFERENCE On the expiry date of the manufacturer s guarantee you will be sent details of our annual insurance plan but if you have already bought an extended warranty for this product from your retailer please tick box The information provided will be held on computer by the DAEWOO Registration Department of Domestic ...

Page 57: ...e manual It must be used solely for domestic purposes For further information regarding your guarantee please see the section at the rear of your user manual The guarantee will be rendered invalid if the product is resold or has been damaged by inexpert repair DAEWOO disclaims any liability for incidental or consequential damages The guarantee is in addition to and does not diminish your statutory...

Reviews: