background image

Adjusting Auto

Sound Mode

• Enjoy various sound

modes by selecting
your favorite Sound
Mode depending on
the kinds of moving
pictures. 

Adjusting Auto Sound Mode

29

INPUT

SELECT

POWER

DISPLAY

ZOOM-

PICTURE

MODE

SCREEN

MODE

FREEZE

MUTE

SOUND

MODE

SLEEP

ZOOM+

MENU

VOL

VOL

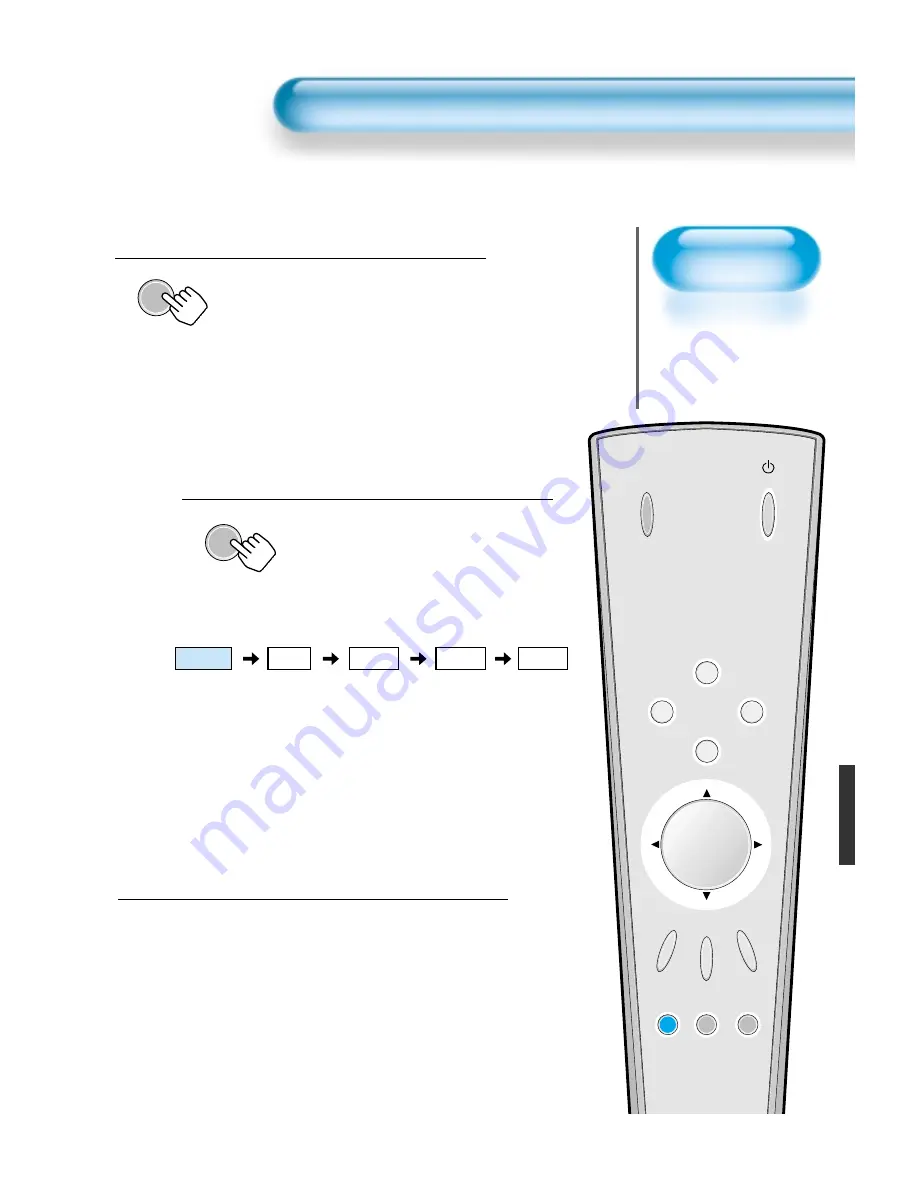
Select SOUND Mode.

SOUND

MODE

• Press the [SOUND MODE] on the

Remote Control. 

• Press of the [SOUND MODE] for the

first time will display the current
SOUND MODE.

Every Press of the Button Changes Modes.

SOUND

MODE

• Each time you press the button, a

different sound mode appears. 

The sequence used is as follows:

* Normal  : Suitable for watching any motion picture 

* Movie 

: Select this mode to simulate being at a movie theater

* Music 

: Ideal for listening to music 

* News 

: Allows human voice to be heard more clearly

* User

: Allows the user to adjust as desired. 

MENU will Disappear.

• After selecting a desired SOUND Mode,

on-screen menu will disappear in about
2~3 seconds. 

• Normal, Movie, Music, News Modes are

factory preset values.

If you want to customize the sound modes
at your preference, refer to the following
page.

1

2

Normal

Movie

Music

User

News

Summary of Contents for DP-42SP

Page 1: ...Direct Connection PC can be connected to the PDP without a separate device and can be used as a monitor so that the effect of presentation gets maximized making it more popular in various events and e...

Page 2: ...r in a particular installation If this equipment does cause harmful interference to radio or television reception which can be determined by turning the equipment off and on the user is encouraged to...

Page 3: ...always grip plug firmly and pull straight out from the receptacle It can result in fire or electric shock due to a damaged power cord This product must be properly grounded Improper grounding may caus...

Page 4: ...ausing personal injury Do not place a candle or a lighted cigarette on the monitor If these fall into the inside of the monitor it may cause a fire or explosion Do not disassemble batteries and do not...

Page 5: ...it will be exposed to the direct sunlight and the product should not be near heat sources such as radiators stoves etc It may cause malfunction Do not install where there is oil smog moist and dust I...

Page 6: ...between the Monitor screen and your eye should be as 5 7 times far as the diagonal distance of the Monitor Watching the TV for a long time may hurt your eye sight When cleaning of the inside of the m...

Page 7: ...EE P ZO OM MEN U VO L VO L Remote Control 1UNIT Batteries AAA 2UNITS PC 15pin Cable 1UNIT A V Cable 2UNITS Audio Cable 1UNIT Note Check to be sure that the following items are packed with your Monito...

Page 8: ...20 SP21 SP22 Speaker Main Unit Dimension 100 W x 628 H 83 D mm Including Speaker Stand Dimension 170 W x 729 H x 194 D mm Audio Amplifier 8W 8W Impedance 8 Weight 7 5kg DSP ST20 ST21 ST22 Dimension 66...

Page 9: ......

Page 10: ...ing PC APPLICATION 20 Selecting Auto Picture Mode 22 Adjusting Screen Size 24 Adjusting Screen Position and Size 26 Enlarging Screen Size 28 Watching a Still Image 29 Adjusting Auto Sound Mode 30 Cust...

Page 11: ...NPUT H V B Pb R Pr G Y AUDIO R L PC INPUT RS 232C PORT EXTERNAL PORT SPEAKER 8 Ohms AC IN R L L R AUDIO RGB COMPONENT INPUT H V B Pb R Pr G Y AUDIO R L Power Power control sensor Power Standby Red Sta...

Page 12: ...e Music News User Mutes sound Pressing the Power button of the Monitor allows the Display to be in standby Red light is shown in the Remote Control Sensor At this time if you press the Power button of...

Page 13: ...and with 4 screws M5 enclosed 3 Smoothly fit the Stand to the Plasma Display Panel 2 Erect the Display 4 When installing PDP Main Unit be sure it is done by more than 2 professionals For detailed inst...

Page 14: ...ecial screw securely Be sure to check if there is a sponge attached to the surface on which the speaker is contacted Connect one set two cables of the cable to the terminals on the back of the speaker...

Page 15: ...pare the PC cable D sub 15pin and the PC audio cable Sold separately Connect the PC Output to the PDP Input as shown below 2 Before connecting to the PDP set the resolution of the PC Go to SETUP CONTR...

Page 16: ...Component1 Enjoy Dynamic Ultra Screen Monitor by Using PC s Keyboard or Mouse 4 5 Press the Power button Turn on the PDP and the PC 3 NOTES The resolution of the PC monitor is best at 640 x 480 VGA I...

Page 17: ...480 720x576 800x600 832x624 1024x768 1152x864 1152x900 1280x720 1280x960 1280x1024 1600x1200 70 1 85 1 56 4 60 0 70 1 85 1 59 9 66 7 72 8 75 0 75 0 85 0 60 1 70 1 85 1 60 0 25 0 56 3 57 2 60 3 72 2 75...

Page 18: ...ppear After selecting a desired Picture mode the menu on the screen will disappear Normal Dynamic and Cinema Modes are factory preset values If you want to customize the Picture modes refer to the fol...

Page 19: ...following Select the Custom Mode Select User bythe buttons 3 Press the MENU Button The MENU shown below will display on the screen 1 2 Picture Sound Screen Utility Input Normal Move Previous Adjust Mo...

Page 20: ...ility Input Normal Move Previous Adjust User Mode Brightness Contrast Sharpness Color Temp 21 While you are in Picture Mode User press the buttons to select aspecificadjustmentitem NOTES While you are...

Page 21: ...16 9 and 4 3 Normal will be applied by Input signal Etc If input signal is 16 9 PDP displays in 16 9 mode The digital broadcasting 720p 1080i is fixed at the aspect ratio of 16 9 Displaying a picture...

Page 22: ...1 2 Adjusting from MENU Screen Picture Sound Screen Utility Input Mode Brightness Contrast Sharpness Color Temp Normal Normal Move Previous Select Picture Sound Screen Utility Input H Size V Size H P...

Page 23: ...ICTURE MODE SCREEN MODE FREEZE ZOOM MENU VOL VOL Press the MENU Button The MENU screen as shown below will appear Press the Button Pressthe buttonstoselect Screen 1 2 Picture Sound Screen Utility Inpu...

Page 24: ...e Previous Adjust NOTES Horizontal Vertical size and position values can be adjusted only in the PC input mode H Size As the value increases the screen width increases V Size As the value increases th...

Page 25: ...rrently selected screen size Each time you press the ZOOM button the screen size will increase stepwise in 0 20 scale Toreducethescreensize pressthe ZOOM button 1 26 Enlarging Screen Size You can view...

Page 26: ...stepwise up down left right respectively 2 27 NOTES When the screen is enlarged the pixel of the screen can become thick and dim When only subtitle of zoom level remains you can scroll the image If su...

Page 27: ...ing the same images such as still images for a long time may cause after image lagging Watching a Still Image NOTES Displaying the same images such as still images for a long time may cause after imag...

Page 28: ...Changes Modes SOUND MODE Each time you press the button a different sound mode appears The sequence used is as follows Normal Suitable for watching any motion picture Movie Select this mode to simula...

Page 29: ...ft and right speaker 3 Press the MENU Button The MENU Screen as below will be displayed 1 2 Picture Sound Screen Utility Input Balance Spatial Effect Sound Mode Off Normal Move Previous Select Picture...

Page 30: ...al Suitable for watching any motion picture Movie Select this mode to simulate being at a movie theatre Music Suitable for listening to music News Allows human voice to be heard more clearly User Allo...

Page 31: ...ency of the background screen and language used in MENU SelectingMENUBackgroundScreenandLanguage 32 INPUT SELECT POWER DISPLAY ZOOM PICTURE MODE SCREEN MODE FREEZE MUTE SOUND MODE SLEEP ZOOM MENU VOL...

Page 32: ...ust When INITIALIZATION iscompleted When INITIALIZATION is completed those values that have been set in the User Mode of SCREEN MODE and SOUND MODE will be returned to the factory preset values When y...

Page 33: ...any action for about two seconds after pressing the SLEEP button If you turn the Monitor off after setting SLEEP the setting is erased Sleep Timer Off Sleep Timer Off Sleep Timer 15 Minutes Sleep Time...

Page 34: ...properly Check for any obstacle between the Remote Control and the Display Check for dead batteries and incorrect battery orientation Check if the Remote Control is the right one Remove any obstacle...

Page 35: ...lors Contrast Ratio 3000 1 Video Signal VGA SVGA XGA SXGA UXGA Dimension 1039 W X 628 H X 80 D mm Weight 47Kg with Stand Power Consumption 320W Power Requirement AC 100 240V 50 60Hz 3 2 1 3A INPUT OUT...

Page 36: ...49586115E10B R0...

Page 37: ...PLASMA DISPLAY USER S MANUAL DAEWOO ELECTRONICS CO LTD Help Line No 01189 252577 D P 4 2 G P D P 4 2 S P D P 4 2 W P...

Reviews: