Contents
1.Safety Precaution
⋯⋯⋯⋯⋯⋯⋯⋯⋯⋯⋯⋯⋯⋯⋯⋯⋯⋯⋯⋯⋯⋯⋯⋯⋯⋯⋯⋯⋯⋯⋯
3
2.Product Specification
⋯⋯⋯⋯⋯⋯⋯⋯⋯⋯⋯⋯⋯⋯⋯⋯⋯⋯⋯⋯⋯⋯⋯⋯⋯⋯⋯⋯⋯
4
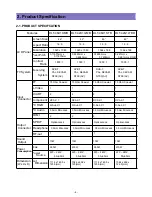
2-1.Product Specification
⋯⋯⋯⋯⋯⋯⋯⋯⋯⋯⋯⋯⋯⋯⋯⋯⋯⋯⋯⋯⋯⋯⋯⋯⋯⋯⋯⋯
4
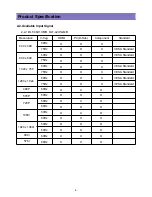
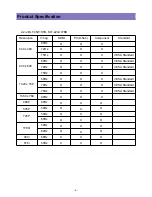
2-2.Available Input Signal
⋯⋯⋯⋯⋯⋯⋯⋯⋯⋯⋯⋯⋯⋯⋯⋯⋯⋯⋯⋯⋯⋯⋯⋯⋯⋯⋯
5
3.Block Diagram
⋯⋯⋯⋯⋯⋯⋯⋯⋯⋯⋯⋯⋯⋯⋯⋯⋯⋯⋯⋯⋯⋯⋯⋯⋯⋯⋯⋯⋯⋯⋯⋯
8
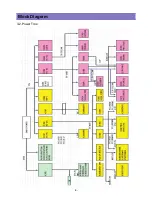
3-1.Signal Block Diagram
⋯⋯⋯⋯⋯⋯⋯⋯⋯⋯⋯⋯⋯⋯⋯⋯⋯⋯⋯⋯⋯⋯⋯⋯⋯⋯⋯
8
3-2.Power Tree
⋯⋯⋯⋯⋯⋯⋯⋯⋯⋯⋯⋯⋯⋯⋯⋯⋯⋯⋯⋯⋯⋯⋯⋯⋯⋯⋯⋯⋯⋯⋯⋯
9
4.SERVICE MODE
⋯⋯⋯⋯⋯⋯⋯⋯⋯⋯⋯⋯⋯⋯⋯⋯⋯⋯⋯⋯⋯⋯⋯⋯⋯⋯⋯⋯⋯⋯⋯
10
4-1.EEPROM initial DATA
⋯⋯⋯⋯⋯⋯⋯⋯⋯⋯⋯⋯⋯⋯⋯⋯⋯⋯⋯⋯⋯⋯⋯⋯⋯⋯⋯
10
4-2.Description of SERVICE MODE ITEM
⋯⋯⋯⋯⋯⋯⋯⋯⋯⋯⋯⋯⋯⋯⋯⋯⋯⋯⋯⋯
12
5.Trouble Shooting
⋯⋯⋯⋯⋯⋯⋯⋯⋯⋯⋯⋯⋯⋯⋯⋯⋯⋯⋯⋯⋯⋯⋯⋯⋯⋯⋯⋯⋯⋯⋯
13
5-1.No Signal
⋯⋯⋯⋯⋯⋯⋯⋯⋯⋯⋯⋯⋯⋯⋯⋯⋯⋯⋯⋯⋯⋯⋯⋯⋯⋯⋯⋯⋯⋯⋯⋯⋯
13
5-2.When No Sond
⋯⋯⋯⋯⋯⋯⋯⋯⋯⋯⋯⋯⋯⋯⋯⋯⋯⋯⋯⋯⋯⋯⋯⋯⋯⋯⋯⋯⋯⋯
20
5-3.When Key does not operte
⋯⋯⋯⋯⋯⋯⋯⋯⋯⋯⋯⋯⋯⋯⋯⋯⋯⋯⋯⋯⋯⋯⋯⋯⋯
20
5-4.Facts you must know when trouble diagnosing or repairing
⋯⋯⋯⋯⋯⋯⋯⋯⋯⋯⋯
21
6.Schematic
⋯⋯⋯⋯⋯⋯⋯⋯⋯⋯⋯⋯⋯⋯⋯⋯⋯⋯⋯⋯⋯⋯⋯⋯⋯⋯⋯⋯⋯⋯⋯⋯⋯⋯
22
7.Printed Circuit Board
⋯⋯⋯⋯⋯⋯⋯⋯⋯⋯⋯⋯⋯⋯⋯⋯⋯⋯⋯⋯⋯⋯⋯⋯⋯⋯⋯⋯⋯
34
8.Mechanical Exploded Diagram
⋯⋯⋯⋯⋯⋯⋯⋯⋯⋯⋯⋯⋯⋯⋯⋯⋯⋯⋯⋯⋯⋯⋯⋯⋯
35
9.Part List
⋯⋯⋯⋯⋯⋯⋯⋯⋯⋯⋯⋯⋯⋯⋯⋯⋯⋯⋯⋯⋯⋯⋯⋯⋯⋯⋯⋯⋯⋯⋯⋯⋯⋯⋯
38
-2-
Summary of Contents for DLT - 42U1GMB
Page 8: ...8 3 Block Diagram 3 1 Signal Block Diagram...
Page 9: ...9 Block Diagram 3 2 Power Tree...
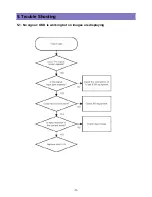
Page 13: ...13 5 Trouble Shooting 5 1 No signal OSD is working but on images are displaying...
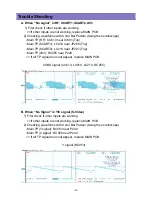
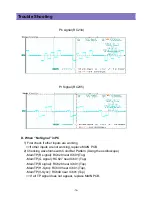
Page 17: ...17 Trouble Shooting 1024 X 768 60Hz R signal RC629 near IC601 G Signal RC627 near IC601...
Page 22: ...22 6 Schematic Diagram...
Page 23: ...23 Circuit Diagram...
Page 24: ...24 Circuit Diagram...
Page 25: ...25 Circuit Diagram...
Page 26: ...26 Circuit Diagram...
Page 27: ...27 Circuit Diagram...
Page 28: ...28 Circuit Diagram...
Page 29: ...29 Circuit Diagram...
Page 30: ...30 Circuit Diagram...
Page 31: ...31 Circuit Diagram...
Page 32: ...32 Circuit Diagram...
Page 33: ...33 Circuit Diagram...
Page 34: ...34 7 Printed Circuit Board TOP PCB BOTTOM PCB...
Page 35: ...35 8 Mechanical Exploded Diagram DLT 42G1...
Page 36: ...36 Exploded View DLT 42U1...
Page 37: ...37 Exploded View DLT 46U1...


