background image

42

VOL

PR

MENU

GHI

JKL

MNO

PQRS

PICTURE

TUV

WXYZ

4

5

6

7

8

0

9

VOL

PR

MENU

GHI

JKL

MNO

PQRS

PICTURE

TUV

WXYZ

4

5

6

7

8

0

9

PR 19      – – – – –

 Mono
 

1 2  :  0 0

PR 19      – – – – –

 Mono


1 2  :  0 0

PR 19      – – – – –

 Dual 

2


1 2  :  0 0

PR 19      – – – – –

 Dual 

1


1 2  :  0 0

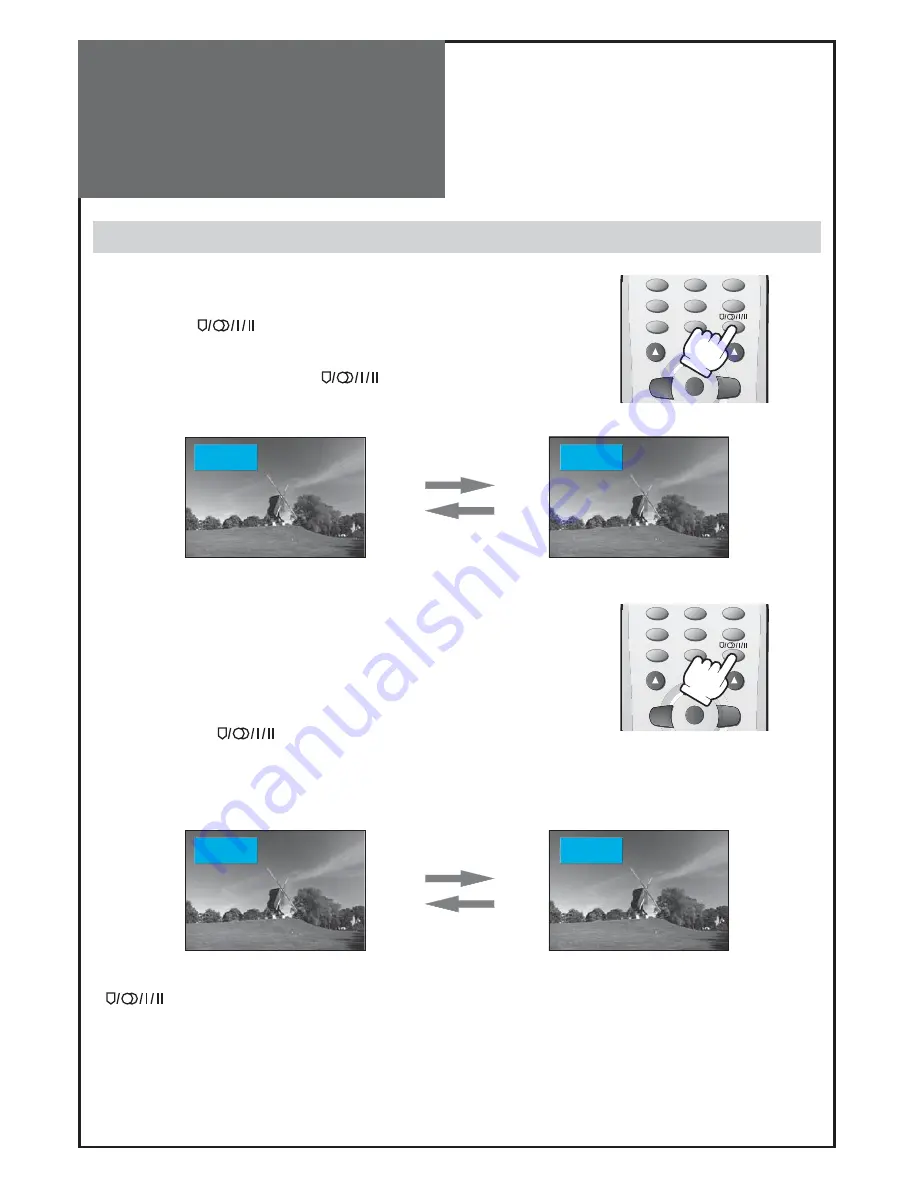
Sound Adjustment

Multi-Sound and Stereo


1. Mono Sound Selection.

  •  In Stereo reception if the stereo is weak, you can switch to MONO by 

pressing the “


(MTS)

” button. Then the colour of “MONO” 

character will be change to Black. In Mono reception the depth of 
sound is improved.

  • To switch back to stereo, press the “


(MTS)

” button again.

2. Adjustment of Bilingual sound.

  •  In bilingual broadcast reception, you can switch 

Dual 1

 to 

Dual 2


by pressing the “


(MTS)

” button repeatedly.

Note :

• “


(MTS)

” only works in RF mode.

Summary of Contents for DLT-26C2, DLT-26C3, DLT-32C1,

Page 1: ...LCD TELEVISION INSTRUCTION MANUAL DLT 26C2 DLT 26C3 DLT 32C1 DLT 32C2 DLT 32C3 DLT 37C3...

Page 2: ...LY INSERT DISPOSAL OF USED ELECTRICAL ELECTRONIC EQUIPMENT Europe only The meaning of the symbol on the product its accessory or packaging indi cates that this product shall not be treated as househo...

Page 3: ...space such as built in cabinet unless proper ventilation is provided Leave a minimum 10 cm gap all around the unit 8 Power Source This TV should be operated only from the type of power source indicat...

Page 4: ...on of an tenna discharge unit connection to grounding electrodes and re quirements for the grounding electrode 17 Servicing Do not attempt to service this TV yourself as opening or removing covers may...

Page 5: ...cause of fire or hazardous electric shock To prevent fire and damages to the product unplug the unit from the outlet during lightning storm or when it is left unat tended and unused for a long period...

Page 6: ...dawayfromany heat source such as radiators heat registers stoves or other products that produce heat Do not put on any heavy item on the power cord since it may result in fire or hazardous electric sh...

Page 7: ...h Part 21 Basic Guide Parts of the Remote Controller 24 Method To Use Basic Menu 26 To Watch TV 27 Setting Up TV Stations 29 Selection of AV and Multimedia Input Signal 33 Application Guide Screen Adj...

Page 8: ...4 5 6 7 8 0 9 AC cord Instruction manual Remote controller Microfiber Sheet Only 32C1 Cable Holder only 32C1 26 32 37C3 Batteries Note You should follow the hanger instruction manual to install a TV...

Page 9: ...ngle of 90 You can separate in reverse order of assembly 2 Open the cable holder picture 2 you can open the cable holder that press and push B part 3 After arrange lines with the cable holder lock the...

Page 10: ...e and bad reception may be a cause of wrong antenna con nection Be sure to check its direction and place when installing 2 Connect the combining adapter to the antenna input at the left side of the TV...

Page 11: ...na socket and fix it firmly by turning it to the right Antenna socket at the left side of the TV set Antenna socket on the wall ANT CABLE When a feeder cable is used Plug the coaxial cable to the ante...

Page 12: ...for installation at private houses Single Antenna Connection VHF Antenna UHF Antenna Back of the tv set ANT CABLE Separate Antenna Connection ANT CABLE ANTENNA combining Adapter Separate purchase In...

Page 13: ...Video connection is recom mended for better picture quality Connecting with SCART VIDEO 1 Prepare the scart lead for picture sound 2 Connect the SCART input output terminal of video with the SCART1 A...

Page 14: ...or AV 3 as shown in the picture below 3 Turn on the TV set and camcorder video game 4 Select AV3 or S video mode using the AV button of the Remote controller or button of the TV set Back of the tv se...

Page 15: ...Note When you connect with the component video please check the colour of the cable between the DVD and TV set When connecting with a S VHS cable and RCA cable Note If your AV device has both Video OU...

Page 16: ...deo please check the colour of the cable between the SetTop Box andTV set DVD player STB Set Top Box connection When connecting with a HDMI cable Back of the tv set Set Top Box When connecting with a...

Page 17: ...or button of the TV set Back of the tv set PC When connecting with a HDMI cable 1 Adjust PC resolution to available resolution in LCD TV 2 Connect between PC and TV set using the HDMI and Audio cable...

Page 18: ...esolution available in LCD TV Resolution V freq Component PC D Sub HDMI Standard 640 X 480 60Hz x o o VESA Standard 72Hz x o x VESA Standard 75Hz x o o VESA Standard 800 X 600 60Hz x o o VESA Standard...

Page 19: ...receiver You may make the connection to any of the Component input and SCART input AV1 AV2 Cable TV Broadcasting Station Input CATV Receiver Antenna Input Connection Watching cable television is only...

Page 20: ...20 Connect with the Dolby Digital AMP If you connect the optical output to a Dolby digital AMP you can listen to better sound Optical output Dolby Digital AMP L Woofer Center R Surround L Surround R...

Page 21: ...change your TV s volume or to move the cursor in the menu PR Buttons Use these buttons to change channels on your TV or to move the cursor in the menu Stand by TV ON button Button Use this button to T...

Page 22: ...nge your TV s volume or to move the cursor in the menu PR PR Buttons Use this buttons to change channels on your TV or to move the cursor in the menu Stand by TV ON button Button Use this button to ch...

Page 23: ...23 Name of Each Part Side and Rear Panel Left Side of the TV set Rear Panel...

Page 24: ...own 1 and 0 within 2 second If you only press down 1 after 2 second PR1 will be selected Note When the current state is ST BY you can turn on the TV using the digit key Then programme is selected acco...

Page 25: ...t for about 30 minutes the set will automatically turn to ST BY mode 22 SOUND EFFECT Using this button Select the desired sound mode Flat 3D Panorama Super Bass Speech Flat 23 Red button Skip the chan...

Page 26: ...displayed upward 1 Press the MENU button The main menu appears if you press the MENU button 2 Press the UP DOWN button You may setup according to the directions on the screen after selecting the desi...

Page 27: ...power turn on You must pull out the plug of TV set to shut off the AC Power When pressing the Program button Select two digits if using the number button for channel selection For example to watch the...

Page 28: ...by LED lamp on the front panel turns red to green col our and the TV turns on 2 Press the PR buttons Select the desired program by pressing the PR buttons or the number button 3 Adjust volume Sound r...

Page 29: ...can be received are stored by this method It is recommended that you use Auto tuning during instal lation of this set 1 Press the Menu button to select the Setup menu Move the selection bar to the Se...

Page 30: ...to select the Setup menu Move the selection bar to the Setup menu with UP DOWN buttons Place the selection bar on Manual Tuning and press the RIGHT button 2 Searching for channel in the ManualTuning...

Page 31: ...ove the selection bar to the System and select a system which you want 5 Enter a station name Move the selection bar to the Name with UP DOWN but tons You can enter a station name with the UP DOWN LEF...

Page 32: ...18 no PR04 S12 no PR05 S19 no Move Move Exit Edit Skip Delete Setting Up TV Stations Edit The Edit menu shows you information as follows Program position assignment Program number Real channel number...

Page 33: ...s as follows Analog AV1 AV2 AV3 S Video Component PC HDMI DVB T Analog 1 Press the AV button on the remote controller Screen changes as follows whenever pressing the AV button Analog or DVB T AV1 AV2...

Page 34: ...adjust the PC output to a format listed in the Multimedia Input table Multimedia Input Format Resolution V freq Component PC D Sub HDMI Standard 640 X 480 60Hz x o o VESA Standard 72Hz x o x VESA Sta...

Page 35: ...lows whenever pressing the PICTURE button Normal Cinema Dynamic Favourite Normal The screen adjustment status changes as the following screens are dis played sequentially whenever pressing the Picture...

Page 36: ...tem Move to the PICTURE menu Whenever pressing the UP DOWN buttons you can select in the order of Brightness Contrast Colour Sharpness and N R You can adjust all items by pressing the LEFT RIGHT but t...

Page 37: ...tion 4 3 General TV screen currently broadcasted 14 9 14 9 will display a 14 9 picture at its standard 14 9 size without any stretching Zoom 14 9 Screen vertically enlarges image bigger than 14 9 imag...

Page 38: ...IGHT button and the PC mode appears Press the UP DOWN buttons to adjust the horizontal position of displayed image 2 Adjustment of the H Position Move to H Position in the PC menu Press the LEFT RIGHT...

Page 39: ...orking you can adjust with H V position phase and clock Adjustment of Screen in Component mode 1 Adjustment of the H Position Select the Component from the screen menu and press the RIGHT button Move...

Page 40: ...ton then the sound status changes as followed Flat 3D Panorama Super Bass Speech Flat Note Flat Suitable for watching any motion picture or allows the user to adjust as desired 3D Panorama Makes virtu...

Page 41: ...but tons 2 Adjust the Balance level Move to Balance in the Sound menu Adjust the balance level by using the LEFT RIGHT buttons 3 Adjust the audio Equalizer Move to Equalizer in the Sound menu Press t...

Page 42: ...o 1 Mono Sound Selection In Stereo reception if the stereo is weak you can switch to MONO by pressing the MTS button Then the colour of MONO character will be change to Black In Mono reception the dep...

Page 43: ...ild Lock in the Utilities menu Select Child Lock to On Off using the LEFT RIGHT button Note This prevents the use of the TV set without the remote control If TV set is set up Child Lock LED will cycle...

Page 44: ...set and corrected automatically 2 Setting the Wake up time Program Volume Move to Timer in the Utilities menu To go to the Wake Up press the UP DOWN buttons Select the Wake Up to On Set On Timer Prog...

Page 45: ...ress the HOLD button The HOLD symbol appears and the contents of the subpage shown are kept on the screen and no longer updated or switched to other subpages Pressing the HOLD button again the current...

Page 46: ...er Channel name Displays the current channel name Service available Displays NO SIGNAL when no signal exists in the current channel or disconnect with signal input line NO SERVICE when no program exis...

Page 47: ...ton to display extended information on the current program If channel has no information RECALL but ton does not work 3 View the User Profile List Press YELLOW multifunction button to start your own u...

Page 48: ...NU button to select the DVB T Setup Move the selection bar to the DVB T Setup menu with UP DOWN buttons and press the RIGHT button 2 Select the Auto Setup Place the selection bar on Auto Setup and pre...

Page 49: ...te 1 Setting Banner Display Time Move to System in the DVB T Setup To go to the Banner Display Time press the RIGHT button Position a selection bar to Banner Display Time Press the LEFT RIGHT buttons...

Page 50: ...be made up of large blocks or to freeze intermittently If the picture disappears completely this could mean that signal quality is very poor If this happen often you may need to improve your aerial s...

Page 51: ...pdate is completed Please restart your TV Exit Setting up DVB T System Note The whole downloading process may take about 10 15 minutes according to signal status If you want to start the installation...

Page 52: ...Electronic Program Guide EPG The DTV Electronic Program Guide EPG displays program informa tion about each channel up to seven days ahead You can edit your own profiles and record programs By pressin...

Page 53: ...uide EPG 3 Category Theme Select Press the BLUE multi function button to display the Category list Press the YELLOW multi function button to change the Category Theme list Press LEFT RIGHT buttons to...

Page 54: ...odule as described below Some Common Interface Modules may be a two piece design consisting of a card reader together with the viewing card 1 Setting CI Card When using the design card first insert th...

Page 55: ...ve Select Back Exit Common Interface Module Menu 3 Module Information You can see information of CI Module Serial number SAP number Manufacturer SW version FW version 4 Smart Card Information This Fea...

Page 56: ...t Most of the Digital Teletext services currently available use simple navigation methods based on the following buttons 1 Press the RED multi function button to load the Digital Teletext service Note...

Page 57: ...f no user profile added 2 Press RED multifunctionbuttontoaddanewprofile Press number keys to rename the profile and press OK SELECT button to save the profile name 3 Press GREEN multi function button...

Page 58: ...lapped an tenna toward the broadcasting station Picture has snow noise Check the antenna or its connection is correct and if not correct the antenna fault or connection cable fault Check if car traffi...

Page 59: ...contains a complex microprocessor which enables you to view enhanced digital services Occasionally this device may need to be reset This can be done by pressing the stand by button on your remote cont...

Page 60: ...the table no listed then no picture will be displayed NO SIGNAL appears on the screen Ensure that the signal cable is firmly connected to PC and TV Image is not clear Adjust the PHASE control Image i...

Page 61: ...00 1 TV System Receiving System PAL I B G D K SECAM B G D K DVB T Stereo System 2 Carrer NICAM Power Consumption Max 130W 150W Power Source 100 240V 50 60Hz 100 240V 50 60Hz Dimension W x H x D Set Di...

Reviews: