background image

Camcorder & Video

Game Connection

13

Note :

If S-video and RCA jack are connected at the same time, the TV set only detects the S-Video mode.

* If your AV device has both Video OUT terminal and S-Video OUT terminal, the S-Video connection is

recommended for better picture quality.

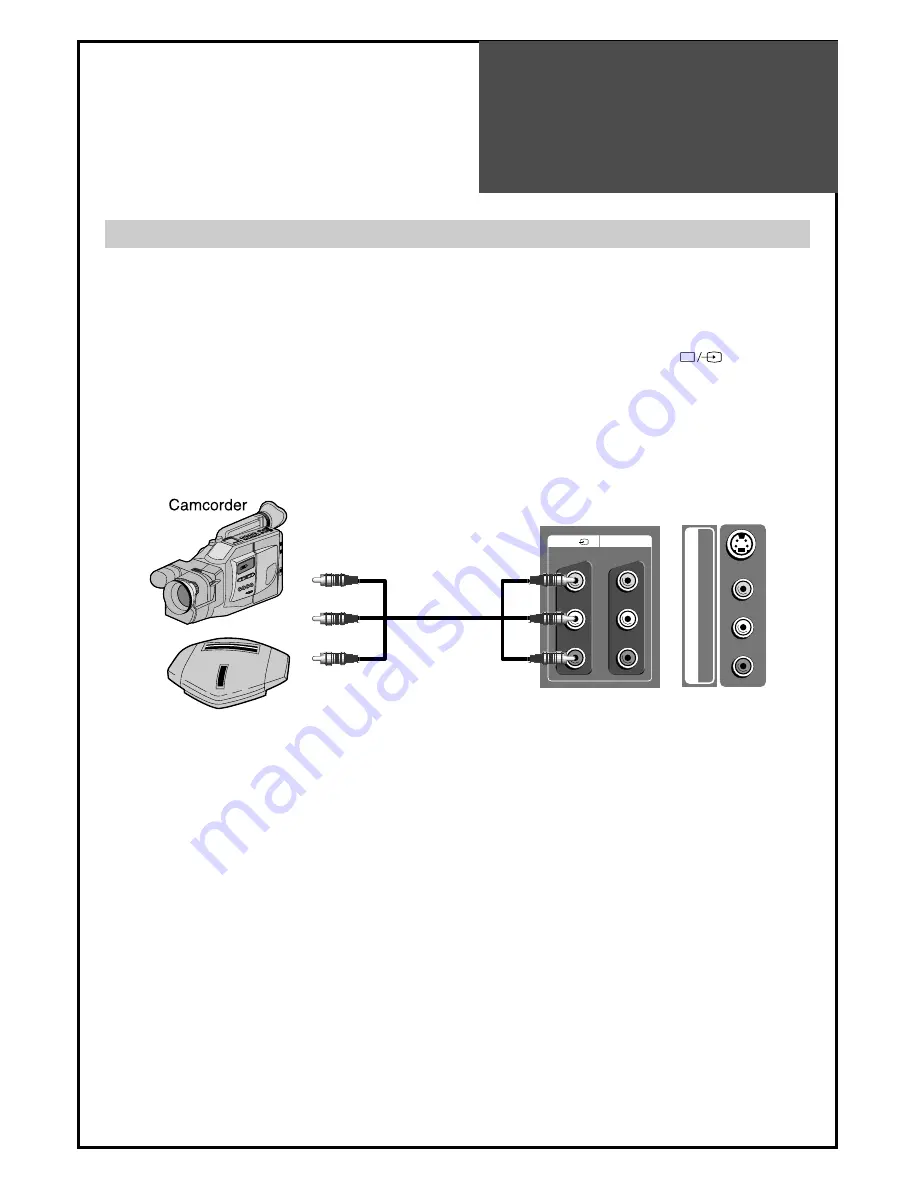
Watching the Camcorder Recording on TV

1. Prepare the S-video and RCA connector. 
2. These connectors connect to S-Video or AV1, AV2 as shown in the picture below.
3. Turn on the TV set and camcorder/video game.
4. Select AV1, AV2(S-Video) mode, using the ”TV/AV” button of the Remote controller or “

” button of

the TV set.

AV1

MONITOR OUT

VIDEO

R

 - 

AUDIO - L

Video game

AV 2

S-VIDEO

VIDEO

R

 - 

AUDIO - L

TV

Summary of Contents for DLM-32C3 Series

Page 1: ...PBD R DLM 32C1 B BD P PB PBD R DLM 32C3 B BD P PB PBD R DLM 32C5 B BD P PB PBD R DLM 32C7 B BD P PB PBD R DLM 32U1 B BD P PB PBD R DLM 32U2 B BD P PB PBD R DLM 37C7 B BD P PB PBD R DLM 42C1 B BD P PB PBD R DLM 42C5 B BD P PB PBD R DLM 42C7 B BD P PB PBD R ...

Page 2: ...SER SERVICEABLE PARTS INSIDE REFER SERVICING TO QUALIFIED SERVICE PERSONNEL The lightning flash with arrowhead symbol within an equilateral triangle is intended to alert the user to the presence of uninsulat ed dangerous voltage within the product s enclosure that may be of sufficient magnitude to constitute a risk electric shock The exclamation point within an equilateral triangle is intended to ...

Page 3: ...d space such as built in cabinet unless proper ventilation is provided Leave a minimum 10 cm gap all around the unit 8 Power Source This TV should be operated only from the type of power source indicated on the marking label If you are not sure of the type of power supplied to your home consult your appliance dealer or local power company 9 Grounding or Polarization This TV is equipped with a pola...

Page 4: ...alified service personnel 18 Damage Requiring Service Unplug the TV from the wall outlet and refer servicing to qualified service personnel under the following conditions a When the power supply cord or plug is damaged b If liquid has been spilled or objects have fallen into the TV c If the TV has been exposed to rain or water d If the TV does not operate normally by following the operating instru...

Page 5: ...roduct near water and moisture such as in a bathroom washbowl etc It may be a cause of fire and electric shock hazards To prevent fire and damages to the product unplug the unit from the outlet during lightning storm or when it is left unattended and unused for a long period of time Do not let children hang on or climb on the product since it may be a cause of serious injury Slots and openings in ...

Page 6: ...e of electric shock Pleasebeadvisedofelectricwiresandcables wheninstallingtheantenna Itmaybeacauseof hazardouselectricshockandfireiftheantenna touchesorfallsontheelectricwire thus itmustbe installedfirmly andfaraway from thecables This section must be read carefully and followed by the user prior to the operation of the product The manual states important instructions for the user s own safety and...

Page 7: ... Connection 18 Connect with the Dolby Digital AMP 19 Name of Each Part 20 Basic Guide Parts of the Remote Controller 22 Method To Use Basic Menu 24 To Watch TV 25 Setting Up TV Stations 27 Selection of AV and Multimedia Input Signal 31 Application Guide Screen Adjustment 33 PIP Mode 37 Sound Adjustment 39 Selection of Language 41 Adjustment of Time 42 Teletext 43 Troubleshooting 44 Standard of Pro...

Page 8: ...mote controller Batteries Cover Bottom When you install wall mounting you set up cover bottom like upper picture Cable holder Microfiber sheet For 32C1 U1 U2 42C1 1 2 3 The method of wire arrangement 1 Assemble the cable holder enclosed on the back of TV PICTURE 1 ASSEMBLY METHOD After you push the A prominence part of cable holder in the hole rotate the cable holder clockwise as an angle of 90 Yo...

Page 9: ...n image and bad reception may be a cause of wrong antenna connection Be sure to check its direction and place when installing 2 Connect the combining adapter to the antenna input at the left side of the TV set WHEN USING THE COMBINING ADAPTER You may obtain the combining adapter at your closest Service Center UP GRADE PORT Antenna Input BACK OF THE TV SET ...

Page 10: ... installation may be found in most of co op apartments When a coaxial cable is used Plug the coaxial cable to the antenna socket and fix it firmly by turning it to the right When a feeder cable is used Plug the coaxial cable to the antenna socket and fix it firmly by turning it to the right Antenna socket at the left side of the TV set ...

Page 11: ...tenna Connection Outdoor Antenna connection such as VHF or and UHF may be necessary for installation at private houses Single Antenna Connection Separate Antenna Connection UP GRADE PORT VHF Antenna UHF Antenna ANT CABLE TV ANT CABLE ...

Page 12: ...r AV2 input terminal of 2 st TV set 4 Turn on the TV sets Note If S video and RCA jack are connected the same time The TV set will only detect the S Video mode If your AV device has both Video OUT terminal and S Video OUT terminal the S Video connection is recommended for better picture quality Note Monitor out works only CVBS signal RF AV1 AV2 S Video Connecting with an External Source Connecting...

Page 13: ...tion is recommended for better picture quality Watching the Camcorder Recording on TV 1 Prepare the S video and RCA connector 2 These connectors connect to S Video or AV1 AV2 as shown in the picture below 3 Turn on the TV set and camcorder video game 4 Select AV1 AV2 S Video mode using the TV AV button of the Remote controller or button of the TV set AV1 MONITOR OUT VIDEO R AUDIO L Video game AV 2...

Page 14: ...omponent video please check the colour of the cable between the DVD and TV set Note If S video and RCA jack are connected at the same time the TV set will only detect the S Video mode If your AV device has both Video OUT terminal and S Video OUT terminal the S Video connection is recommended for better picture quality When connecting with a component cable When connecting with a S VHS cable and RC...

Page 15: ...OPTICAL Pr Pb Y VIDEO R AUDIO L R AUDIO L PC AUDIO DIGITAL AUDIO Set Top Box Set Top Box INPUT HDMI 1 HDMI 2 AV1 MONITOR OUT COMPONENT INPUT PC INPUT OPTICAL Pr Pb Y VIDEO R AUDIO L R AUDIO L PC AUDIO DIGITAL AUDIO When connecting with a HDMI cable When connecting with a component cable TV TV ...

Page 16: ...e TV set INPUT HDMI 1 HDMI 2 AV1 MONITOR OUT COMPONENT INPUT PC INPUT OPTICAL Pr Pb Y VIDEO R AUDIO L R AUDIO L PC AUDIO DIGITAL AUDIO 1 First adjust resolution of the PC Refer to table in page 17 2 Connect between PC and TV set using the HDMI and Audio cable as shown in the picture below 3 Turn on the PC and TV set 4 select HDMI mode by pressing MULTIMEDIA button on the remote control or button o...

Page 17: ...raphic card company for help Multi input resolution available in LCD TV Resolution V freq HDMI PC D Sub Component Standard 60Hz O O X 640 X 480 72Hz O O X 75Hz O O X VESA Standard 60Hz O O X VESA Standard 800 X 600 72Hz O O X VESA Standard 75Hz O O X 60Hz O O X VESA Standard 1024 X 768 70Hz O O X VESA Standard 75Hz O O X VESA Standard 1360 6 X 768 60Hz O O X 1280 X 768 75Hz O O X 720 X 480 60Hz O ...

Page 18: ...on INPUT HDMI 1 HDMI 2 AV1 MONITOR OUT COMPONENT INPUT PC INPUT OPTICAL Pr Pb Y VIDEO R AUDIO L R AUDIO L PC AUDIO DIGITAL AUDIO External Input Connection Source Antenna Input Connection Watching cable television is only possible after you have subscribed to the local broadcasting company and installed a cable receiver You may make the connection to any of the Component input and input AV1 AV2 TV ...

Page 19: ...R OUT COMPONENT INPUT PC INPUT OPTICAL Pr Pb Y VIDEO R AUDIO L R AUDIO L PC AUDIO DIGITAL AUDIO Surround L Surround R R L Center Woofer Dolby Digital AMP I N P U T Optical output If you connect the optical output to a Dolby digital AMP you can listen to better sound TV ...

Page 20: ...or in the menu Stand by TV ON button Use this button to change from TV STANDBY mode to TV ON mode Button Use this button to change from TV STAND by mode to TV ON mode LED Indicator Light up red in Stand by mode and Lights up green in TV on mode When TV is Child Lock mode LED will cycle through red green Remote controller signal receiver The screen contains the remote controller signal receiving wi...

Page 21: ...Name of Each Part 21 INPUT HDMI 1 HDMI 2 AV1 MONITOR OUT COMPONENT INPUT PC INPUT OPTICAL Pr Pb Y VIDEO R AUDIO L R AUDIO L PC AUDIO DIGITAL AUDIO AV 2 S VIDEO VIDEO R AUDIO L Rear Panel ...

Page 22: ...FFECT Press to use a spatial sound effect 8 You can select sound mode in Mono Stereo Dual1 Dual2 NiCAM STEREO It works only in TV mode 9 Adjust the volume 10 changes channels on your TV 11 OK Auto Tuning Start and Manual Tuning Store 12 STILL Press this button to freeze the picture 13 EDIT Press this button to EDIT mode 14 SOUND Not used 15 LOCK Child Lock This prevents the use of the TV set witho...

Page 23: ... 26 P INPUT Sub Screen input mode change as follows POP table mode Note This button is also used in teletxt mode 27 When sub screen is RF TV mode in the POP you can change PROGRAMMES using this button 28 MGDI Meta Genuine Digital Image Using this button you can enhance the Digital Image 29 P S STILL Using this button you can change the size for sub screen Note This button also uses channel move Ed...

Page 24: ...elect Exit MENU Picture Mode Brightness Contrast Colour Sharpness Tint N R Colour Temp Normal 45 42 40 31 0 Off Normal The basic menu appears on the screen if you press the MENU button of the remote control There are 5 items Picture Screen Sound Install and Function in the basic menu Each item has sub items under it If the desired item is selected the relevant sub items are displayed upward 1 Pres...

Page 25: ...me to select the channel Press the button of the front side of the set or Remote controller The buttons of the remote control or the front side of the set operate only when AC power is turned on Note You can also turn on the TV using PR or digit key in the ST BY mode To suddenly turn sound off Press the MUTE button No sound is heard if MUTE is displayed on the screen Sound is heard again if you pr...

Page 26: ...control 2 Adjust program Select the desired program by pressing the PR button or the number button 3 Adjust volume Sound reduces by pressing the VOL button Sound increases by pressing the VOL button Note Sound mutes by pressing the MUTE button 4 Turning off the TV Press button of the front side of the set or POWER button on the remote control TV turns off and the power lamp changes to red VOL VOL ...

Page 27: ...to Tuning Manual Tuning Setup Edit Access 1 Press the MENU button to select the Install menu Move the selection bar to the Install menu with buttons 2 Select the Auto Tuning Place the selection bar on Auto Tuning and press the button 3 Start the Auto Tuning Press the OK button to start Auto Tuning 4 Please wait until the Edit menu appears If you don t want to edit the programs now escape from the ...

Page 28: ... the selection bar on the Manual tuning at the Install menu Press the MENU button to select the Install menu Move the selection bar to the Install menu with buttons Place the selection bar on Manual Tuning and press the button 3 Execute Manual Tuning A tuning screen will appear and cursor will move from left to right from right to left If you want to stop tuning press the MENU button You should pr...

Page 29: ...UP in the Install menu Move the cursor to Name by pressing buttons You can enter a station name with the and buttons Note Only English is supported in this station name Picture Screen Sound Install Function Move Select Exit MENU Channel System Frequency Name Program Store To C 22 Euro 00 00 A B C D E F G H I J K L M N O P Q R S T U V W X Y Z 0 1 2 3 4 5 6 7 8 9 479 31 MHz Picture Screen Sound Inst...

Page 30: ...all menu Press the Move Yellow button The program and station name is highlighted in yellow Move the yellow block to the desired position using the buttons Press the Move Yellow button again then the program is changed 3 Skipping the Programs Move to EDIT in the Install menu Move the selection bar to the program number you want to skip Press the skip Green button then the skip area will cycle thro...

Page 31: ...econds from the menu appearing In the case of connecting both composite video signal and S video signal at the AV2 terminal the S video signal has priority If sound signal is mono only connect the white phono plug to the LEFT L terminal of the sound input terminal on the TV Pr 19 Mono Pr 19 AV1 CVBS Pr 19 AV2 CVBS When watching video Camcorder DVD Cable TV with AV 1 Pressing the TV AV button on th...

Page 32: ...600 72Hz O O X VESA Standard 75Hz O O X 60Hz O O X VESA Standard 1024 X 768 70Hz O O X VESA Standard 75Hz O O X VESA Standard 1360 6 X 768 60Hz O O X 1280 X 768 75Hz O O X 720 X 480 60Hz O X O 720 X 576 50Hz O X O 1280 X 720 50Hz O O O 60Hz O O O 1920 X 1080i 50Hz O X O 60Hz O X O 720 X 480i 60Hz X X O 720 X 576i 50Hz X X O When connecting PC STB DVD with Multimedia 1 Pressing the MULTIMEDIA butto...

Page 33: ...ment like sports Favourite Allows the user to customize settings as desired When setting up various screen modes 1 Pressing the NORMAL button The screen changes as follows Normal Movie Dynamic Favourite Normal The screen adjustment status changes as the following screens are displayed sequentially whenever pressing the NORMAL button Picture Mode Favourite Picture Mode Dynamic M PREV PR NORMAL RECA...

Page 34: ...atically in Favourite mode Picture Screen Sound Install Function Move Select Exit MENU Picture Mode Brightness Contrast Colour Sharpness Tint N R Colour Temp Normal 45 42 40 31 0 Off Normal Picture Screen Sound Install Function Move Adjust Exit MENU 45 42 40 31 0 Off Normal Normal Picture Mode Brightness Contrast Colour Sharpness Tint N R Colour Temp When adjusting the screen to taste 1 Select PIC...

Page 35: ...6 9 Screen that enlarges image by 1 33 times bigger than 16 9 image Auto This mode will display depending on the signal information of a broadcasting station Aspect Full Screen Aspect 14 9 Aspect Zoom 14 9 Aspect 4 3 Notices Can t select Aspect in Multimedia HDMI PC Component mode WSS Wide Screen Signaling mode like 14 9 is only available with CVBS signal Adjustment of Screen Size in TV and AV mod...

Page 36: ...ve to H Position in the Screen menu Press the buttons to adjust the horizontal position of displayed image Picture Screen Sound Install Function Move Adjust Exit MENU 31 44 21 Start PC Auto Adjustment H Position V Position Phase Clock 31 3 Adjustment of the V Position Move to V Position in the Screen menu Press the buttons to adjust the vertical position of displayed image 4 Adjustment of the Phas...

Page 37: ...PiP off Side by Side PiP PiP off Side by Side This mode will display two screen left Main and right Sub PiP This mode will display two screen Main is full screen and Sub is fixed on the right bottom side Note PiP is just consist of one Analog RF AV COMP and PC mode and one Digital HDMI mode It means if Main is on Analog then Sub must be on Digital 4 Pressing the P S STILL button on the remote contr...

Page 38: ...Analog Switch the Sub screen in the exterior input cycle RF AV1 AV2 PC COMP RF When press this button sound output change to Sub from Main 7 Pressing the PR buttons on the remote controller Sub screen is switched RF mode and change PR Up Down MAIN RF AV1 CVBS AV1 CVBS AV2 CVBS S Video AV2 CVBS S Video COMPONENT COMPONENT PC PC HDMI 1 HDMI 1 HDMI 2 HDMI 2 RF X X X X X O O X X X X X O O X X X X X O ...

Page 39: ...s function you are able to enjoy the bass effect Note Whenever you adjust the audio equalizer it stores in the Favourite mode Equalizer High quality sound range adjustment method used for audio product 120Hz 500Hz Low sound range 1 5KHz 5KHz Middle sound range 10KHz High sound range The user can enjoy various sounds by adjusting Sound Mode Equalizer Balance and Amp Speaker 5 Select S EFFECT Mode T...

Page 40: ...ur of MONO character will change to Red In Mono reception the depth of sound is improved To switch back to stereo press the button again 2 Adjustment of Bilingual sound In bilingual broadcast reception you can switch from Dual 1 to Dual 2 by pressing the button repeatedly Pr 19 Mono Pr 19 Mono Pr 19 Dual 1 Pr 19 Dual 2 Note only works in RF mode S EFFECT VOL PR S EFFECT VOL PR ...

Page 41: ... Function 2 Select Language by pressing button 3 Select your desired language by pressing the button Then it will be setting automatically The language changes as follows English German French Espanol Italian Danish Suomi Swedish Helinika Norska Dutch Portuguese Cesky Polish Romana Russian Magyar Bulgarian Arabic Persian Picture Screen Sound Install Function Move Adjust Exit MENU Language Clock Pr...

Page 42: ...ove for the Clock The set will turn off at the selected time 4 Sleep Mode By pressing the SLEEP button on the remote controller repeatedly you can select one of the following settings Sleep Timer Off 15 30 45 60 75 90 105 120 Off The set will turn off after the time you select Note Confirm the Time is set The Wake up time is only available when the Time is set If adjusted once the On time continues...

Page 43: ...ess the HOLD button The HOLD symbol appears and the contents of the subpage shown are kept on the screen and no longer updated or switched to other subpages Pressing the HOLD button again the current subpage appears CALLING UP SUBPAGE DIRECTLY Pressing the S CODE button appears Enter the subpage number that you want to call up with the NUMBER button for example the 2nd page sequence 0002 The desir...

Page 44: ...ing station Picture has snow Check the antenna or its connection is correct and if not correct the noise antenna fault or connection cable fault Check if car traffic or neon sign disturbs the sound effect Stripes on Check the susceptible interference by other electronic devices such picture as radio and television and keep magnetic or electronic devices away from the TV Bad stereo or Dual Long dis...

Page 45: ...cy on the table no listed then no picture will be displayed NO SIGNAL Ensure that the signal cable is firmly connected to PC and TV appears on the screen Image is not Adjust the PHASE control clear Image is not Adjust the H POSITION and V POSITION control centered AFTER SALES SERVICE Do not hesitate to contact your retailer or service agent if a change in the perfomance of your product indicates t...

Page 46: ...el Aspect Ratio 16 9 16 9 16 9 16 9 Resolution 1366 x 768 WXGA 1366 x 768 WXGA 1366 x 768 WXGA 1366 x 768 WXGA Pixel Pitch 0 4215 mm 0 51075 mm 0 200 x 0 600 mm 0 227 x 0 681 mm Contrast Ratio 5 000 1 10 000 1 10 000 1 10 000 1 Power Consumption The remarked back of product TV System PAL B G D K I I SECAM B G D K NTSC AV Power Source 110 240V 50 60Hz ...

Page 47: ...48586601E102 R0 ...

Reviews: