background image


19

Condenser cleaning 

A dirty or clogged condenser prevents proper airflow, reduces ice making capacity, and 
causes higher than recommended operating temperatures that may lead to component 
failure. Have the condenser cleaned at least once every six months.   

1. 

Unplug the ice maker or disconnect power. 

2. 

Gently pull off the 

lower front louver.


3. 

Remove dirt and lint from the condenser fins and the 
unit compartment with the brush attachment of a 
vacuum cleaner. 

4. 

Reassemble the 

lower front louver.


5. 

Plug in the ice maker or reconnect power. 


Water distribution tube cleaning 

When you find the ice cubes are incompletely formed or the output is low, the water 
distribution tube may be blocked. Turn off the power button, rotate the water distribution 
tube, locate the holes in the distribution tube and use a pointed object such as a toothpick 
to dredge the holes. Then rotate the water distribution tube back to its original position. If 
the tube is badly blocked, clean it as follows: 

1.


Shut off the water supply 

2.


Disconnect the water hose from the distribution tube. 

3.


Lift the right side up, then remove the distribution tube. 

4.


With a brush, clean the tube with a dilute solution of warm water and a mild detergent 
such as dishwashing liquid. After removing the dirt and lint from the surface, rinse the 
tube with clean water. 

5.


Replace the distribution tube. 

6.


Reconnect the water supply. 


Ice-making system cleaning 

Minerals that are removed from the water during the freezing cycle will eventually form a 
hard, scaly deposit in the water system. Cleaning the system regularly helps remove the 
mineral scale buildup. How often to clean the system depends upon how hard your water 
is or how effective your filtration may be. With hard water of 15 to 20 grains/gal. (4 to 5 
grains/ liter), you may need to clean the system as often as once every 6 months. 

DO NOT touch the condenser fins. They are sharp and can be easily damaged.


Summary of Contents for DIM-44

Page 1: ...User s Manual Be sure ice maker is standing upright 24 hours prior to plug in Model DIM 44 Automatic Undercounter Ice Maker...

Page 2: ...OPERATION 14 17 Final check list before operation 14 Operating method 14 15 How the machine makes ice 15 How the machine uses the water 15 16 Normal sounds 16 Preparing the ice maker for long storage...

Page 3: ...roduct damage serious personal injury or death CAUTION means that failure to heed this safety statement may result in minor or moderate personal injury or property or equipment damage All safety messa...

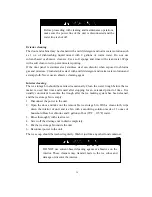
Page 4: ...operations make sure the power line of the unit is disconnected and the water line is shut off Before operating pull all panels back into place Never allow children to operate play with or crawl insi...

Page 5: ...e ice cubes or damage or discolor the interior The ice machine cleaner contains acids Do not use or mix with any other solvent based cleaners products Use rubber gloves to protect hands Carefully read...

Page 6: ...ce making harvest rated current 3 7A 4 8A Refrigerant R134a 7 06 oz High Low side pressure 350 psig 130 psig Width x depth x height 14 x 23 x 33 Unit weight 84 lbs Maximum ice storage 25 lbs Ice makin...

Page 7: ...T LOCATIONS Water distribution tube Evaporator ice mold Water trough Float Ice storage bin Control panel Front louver panel Door Caster Ice scoop Water supply hose Power cord Water inlet Drain outlet...

Page 8: ...th warm water and dry Do not use sharp instruments rubbing alcohol flammable fluids or abrasive cleaners to remove tape or glue These products can damage the surface of your ice maker Cleaning before...

Page 9: ...tic pressure not to exceed 80 psig The temperature of the water feeding into the ice maker should be between 41 F 5 C and 90 F 32 C for proper operation It is strongly recommended that a water filter...

Page 10: ...e turned off by a switch or pull chain The fuse or circuit breaker size should be 15 amperes Recommended grounding method For your personal safety this appliance must be grounded This appliance is equ...

Page 11: ...r one person to move the machine This is useful for cleaning and sanitizing the surface on which the ice maker is installed because it allows you to move the unit and have easy access to the surface t...

Page 12: ...ion the door on the bottom hinge 5 Align the door on the bottom hinge and replace the top hinge and top hinge mat 6 Replace top hinge cover 7 Push the plug buttons into the original screw holes See Fi...

Page 13: ...4 Connect the nut of the water supply hose to the tap and connect the other end with the water inlet Tighten firmly by hand then one half turn with wrench 5 Turn on main water supply and tap Check fo...

Page 14: ...s b Water supply c Leveling the ice maker Enclosed Installation An enclosed installation will allow you to install the ice maker under a cabinet or in a kitchen cabinet provided the required clearance...

Page 15: ...there a clearance of at least 4 102 mm at the rear and 1 25 mm at top and sides for proper air circulation 8 Has the power supply voltage been checked or tested against the nameplate rating And has p...

Page 16: ...e harvest cycle is when the ice is released and water enters the machine A complete cycle takes about 20 minutes but it depends on temperature and operating conditions Freeze During the freeze cycle t...

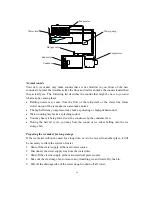
Page 17: ...You may hear air being forced over the condenser by the condenser fan During the harvest cycle you may hear the sound of ice cubes falling into the ice storage bin Preparing the ice maker for long sto...

Page 18: ...want to shorten the intervals if you have pets or there are other special considerations What shouldn t be done Never keep anything in the ice storage bin that is not ice objects like wine and beer b...

Page 19: ...e It is usually convenient to sanitize the trough after the ice making system has been cleaned and the ice storage bin is empty 1 Disconnect the power to the unit 2 Open the door and take out the remo...

Page 20: ...es Then rotate the water distribution tube back to its original position If the tube is badly blocked clean it as follows 1 Shut off the water supply 2 Disconnect the water hose from the distribution...

Page 21: ...es to rinse the ice making system thoroughly NOTE Ice Maker Cleaner Solution in the water bin during the rinse is not needed 6 Prepare a sanitizing solution made of 1 ounce of household bleach and 2 g...

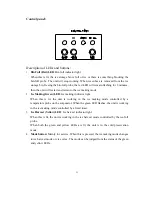
Page 22: ...indicator light When this is lit the unit is working in the ice making mode controlled by a temperature probe on the evaporator When the green LED flashes the unit is working in the ice making mode c...

Page 23: ...lly It starts making ice again after ice cubes are removed 3 The different colors of the LED display indicate various work modes 4 The fan motor responds to the ambient temperature If it is cold the m...

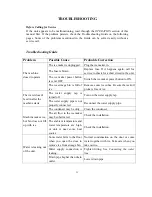
Page 24: ...e some ice cubes Be sure the ice full probe is free of ice The water doesn t feed in after the machine starts The water supply tap is turned off Turn on the water supply tap The water supply pipe is n...

Page 25: ...d leave the ice maker disconnected until the temperature returns to within the stated range The ice storage bin is full of ice Remove some ice cubes make sure the ice full probe is free of ice The bod...

Reviews: