INDEX
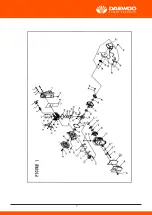
1. NOMENCLATURE
................................................................................................................................... 3
2. SPECIFICATIONS
.................................................................................................................................... 3
3. ASSEMBLING THE BLOWER
................................................................................................................. 4
4. STARTING THE BLOWER
....................................................................................................................... 9
5. USING THE BLOWER
........................................................................................................................... 11
6. SPARK ARRESTOR MAINTENANCE
................................................................................................... 13
7. TROUBLESHOOTING GUIDE
............................................................................................................... 16
8. LOW POWER OUTPUT
.......................................................................................................................... 17
9. ADDITIONAL PROBLEMS
.................................................................................................................... 18
WARRANTY
............................................................................................................................................... 19
1
ATTENTION STATEMENTS
This manual contains special“attention statements” surrounded by boxes and preceded by the
triangular Attention Symbol.
WARNING!
A statement preceded by the word “WARNING” contains information that should be acted upon to
prevent serious bodily injury.
CAUTION!
A statement preceded by the word “CAUTION” contains information that should be acted upon to
prevent machine damage.
Additional attention statements that are not preceded by the Attention Symbol are:
IMPORTANT!
A statement preceded by the word “IMPORTANT” is one that possesses special significance.
NOTE:
A statement proceeded by the word “NOTE” contains information that is handy to know and may
make your job easier.
IMPORTANT!
The operational procedures described in this manual are intended to help you get the most from
your machine and to protect you and others from harm. These procedures are general guidelines
only, and are not intended to replace any safety rules/laws that may be in force in your area.
If you have any questions regarding your EB-260 engine blower, or if you do not understand some-
thing in this manual, your dealer will be glad to assist you.
WARNING!
Do not make unauthorized modifications to this machine!
1. NOMENCLATURE
2. SPECIFICATIONS
Engine: 2 stroke, single cylinder, air cooled
Displacement: 26 cc
Power: 0.75 kW
Fuel tank capacity: 680 ml
Air flow: 0.13 m³/s
Noise: 96 dB (A)
3. ASSEMBLING THE BLOWER
Place the blower upright on the ground or on a sturdy work surface.
1. Grasp the straight tube as shown,and push the tube over the blower dischange port and locking
pins.
2. Lock the straight tube to the blower discharge port by rotating the tube as shown.
3. Grasp the nozzle tube with the label “TOP” positioned as shown,and then push the nozzle over
the straight tube and lockung pins.
4. Lock the nozzle tube to the straight tube bu rotating the nozzle tube as shown.
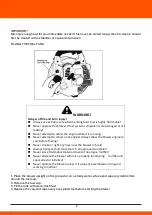
IMPORTANT!
Blower tube installation affects both
blower balance and performance!
The tube and nozzle are correctly installed
when the label “TOP” is visible to the
operator during normal operation.
MIXING FUEL
Fuel Requirements
-
Use only fresh,clean fuel
-
Use only fuel with an octane rating of
90 or higher
-
Mix all fuels with premium 2-cycle engine
Summary of Contents for DABL2600
Page 7: ...6...
Page 8: ...7...
Page 15: ...14...
Page 17: ...16 7 TROUBELSHOOTING GUIDE ENGINE DOES NOT START WHAT TO CHECK POSSIBLE CAUSE REMEDY...
Page 18: ...17 8 LOW POWER OUTPUT...
Page 19: ...18 9 ADDITIONAL PROBLEMS...


