background image

27

COMPONENT TEST PROCEDURE

1. High voltage is present at the high voltage terminal of the high voltage transformer during any cook cycle.
2. It is neither necessary not advisable to attempt measurement of the high voltage.
3. Defore touching any oven components or wiring, always unplug the oven from its power source and discharge the

capacitor (see page 13).

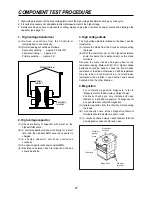
1. High voltage transformer

(A) Remove connections from the transformer

terminals and check continuity.

(B) Normal readings should be as follows:

Secondary winding…… Approx. 90.0

±10%

Filament winding…… Approx. 0

Primary winding…… Approx. 0

2. High voltage capacitor

(A) Check continuity of capacitor with meter on the

highest OHM scale.

(B) A normal capacitor will show continuity for a short

time, and then indicate 9M

once the capacitor is

charged.

(C) A shorted capacitor will show continuous

continuity.

(D) An open capacitor will show constant 9M

.

(E) Resistance between each terminal and chassis

should be infinite.

3. High voltage diode

The high voltage diode is located on the base near the
transformer.
(A) Isolate the diode from the circuit by disconnecting

the leads.

(B) With the ohmmeter set on the highest resistance

scale, measure the resistance across the diode
terminals.

Reverse the meter leads and again observe the
resistance reading. Meter with 6V, 9V or higher voltage
batteries should be used to check the front-to-back
resistance of the diode, otherwise an infinite resistance
may be read in both directions. A normal diodes
resistance will be infinite in one direction and several
hundred K

in the other direction.

4. Magnetron

For complete magnetron diagnosis, refer to
“Measurement of the Microwave Output Power”.
Continuity checks can only indicate and open
filament or a shorted magnetron. To diagnose for
an open filament or shorted magnetron.

(A) Isolate magnetron from the circuit by disconnecting

the leads.

(B) A continuity check across magnetron filament

terminals should indicate one ohm or less.

(C) A continuity check between each filament terminal

and magnetron case should read open.

Secondary

terminal

Primary

terminal

Filament terminal

Magnetron
antenna

Metallic
gasket
plate

Cooling fin

Magnetron

Filament
terminal

Summary of Contents for KOG-87550S

Page 1: ... LTD OVERSEASSERVICEDEPT Caution In this Manual some parts can be changed for improving their performance without notice in the parts list So if you need the latest parts information please refer to PPL Parts Price List in Service Information Center http svc dwe co kr ...

Page 2: ...f f f f f f f f h f f h g g e e g g e e g g e e g g e e g g e e g g e e g g e e g g e e g g e e g g e e g g e e g g e e g g e e g g e e g g e e g g e e g g e e g g e e g g e e g g e e g g e e g g e e g g e e g g e e g g e e g g e e g g e e g g e e g g e e g g e e g g e e g g e e g g e e g g e e g g e e g g e e g g e e g g e e g g e e g g e e g g e e g g e e g g e e g g e e g g e e g g e e g g e e ...

Page 3: ...sure the power is turned off when the door is opened Do not attempt to defeat them DO NOT ATTEMPT TO SERVICE THIS APPLIANCE UNTIL YOU HAVE READ THIS SERVICE MANUAL 2 Correct Installation 1 This microwave oven weighs 17 6kg 38 9 lbs and must be placed on a horizontal base strong enough to support this weight 2 The oven should be placed as far from high temperature source and vapour as possible 3 Th...

Page 4: ...erminal which is marked with the letter L or coloured red e e h h h h h h e e e e e e e e e e e e e e e e e e e e e e e e e e e e e e e e e e e e e e e e e e e e e e e e e e e e e e e e e e e e e e e e e e e e e e e e e e e e e e e e e e e e e e e e e e e e e e e e e e e e e e e e e e e e e e e e e e e e e e e e e e e e e e e e e e e e e e e e e e e e e e e e e e e e e e e e e e e e e e e e e e e ...

Page 5: ...501 X 320 X 413 mm 19 7 X 12 6 X 16 2 in Cavity Dimensions W X H X D 310 X 229 X 320 mm 12 2 X 9 0 X 12 6 in Net Weight Approx 17 6 kg 38 9 Ibs Timer 60 min Dual Select Function Microwave Grill Combination Heating Microwave Power Level High Med High Med Defrost Low 900W 695W 495W 290W 150W Combination Heating Level 3 Levles Grill M W 3 Power levels Specifications subject to change without notice 4...

Page 6: ...ave leakage 3Oven cavity 4Spatter shield Protects the microwave outlet from splashes of cooking foods 5Safety interlock system Prevents the oven from operating while the door is opened 6Heater Grill or Combi Mode has need for the heater 7Glass cooking tray Made of special heat resistant glass The tray must always be in proper position before operating Do not cook food directly on the tray 8Roller ...

Page 7: ... microwave 2 GRILL Used to browning food with grill heater 3 COMBINATION used to simultaneous cooking with microwave and grill heater TIMER KNOB Used in setting cooking time for all functions NOTE When setting TIMER for less than 1 minute turn the TIMER past 1 minute and then return to correct timing e e h h h h h h e e e e e e e e e e e e e e e e e e e e e e e e e e e e e e e e e e e e e e e e e ...

Page 8: ...mply adjust the TIMER to desired minutes When time has elapsed a bell will ring and the oven will turn off e e h h h h h h e e e e e e e e e e e e e e e e e e e e e e e e e e e e e e e e e e e e e e e e e e e e e e e e e e e e e e e e e e e e e e e e e e e e e e e e e e e e e e e e e e e e e e e e e e e e e e e e e e e e e e e e e e e e e e e e e e e e e e e e e e e e e e e e e e e e e e e e e e e...

Page 9: ...ood on the Metal Rack and set it on the Tray 2 Set POWER knob to GRILL position 3 Set TIMER knob to the cooking time EXAMPLE To Grill hamburgers steaks kabobs etc use the trays this way Power 0 1 2 3 4 5 6 7 8 9 10 20 30 40 50 60 Timer METAL RACK TURNTABLE To use Place food on Metal Rack Place the Metal Rack directly on the Turntable ...

Page 10: ...s will be hot to touch use oven mitts or pot holders while handling trays Power 0 1 2 3 4 5 6 7 8 9 10 20 30 40 50 60 Timer COMBI 1 COMBI 2 COMBI 3 Grill Grill Grill M W Low M W Med Low M W Med GENERAL COOKING HINTS 1 When cook a roast with an excess amount of drippings it is helpful to remove the drippings at trurnover time to prevent spattering 2 Prick the meats fish or poultry with a fork to pr...

Page 11: ...from the leakage of microwave 1 Primary interlock switch When the door is closed the hook locks the oven door If the door is not closed properly the oven will not operate When the door is closed the hook pushes the lever downward The lever press the button of the primary interlock switch to bring it under ON condition INTERLOCK MECHANISM FUNCTIONS AND ADJUSTMENTS Mounting screw Hook Primary interl...

Page 12: ...ock switch to bring it under ON condition Adjustment Interlock monitor switch When the door is closed the monitor switch should be opened before other switches close When the door is opened the monitor switch should be closed after other switches open Adjustment steps a Loosen the two mounting screws b Adjust the interlock switch assembly position c Make sure that the latch lever moves smoothly af...

Page 13: ...ed screw driver to discharge 4 When the 15 Amp fuse normal blow type is blown due to the operation of the monitor switch replace primary secondary interlock switch and monitor switch Refer to 11 page for the necessary adjustment 5 After repair or replacement of parts make sure that the screws are properly tightened and all electrical connections are tightened 6 Do not operate without cabinet CAUTI...

Page 14: ...inet backward 2 To remove guide wind assembly Refer to Fig 2 1 Release an two screws 2 2 Remove back cover 3 3 Pull the fan 5 to the motor shaft 4 Release two screws 1 which secure the motor shaded pole 4 5 Reverse the above steps for reassembly DISASSEMBLY AND ASSEMBLY Fig 1 Fig 2 5 4 3 2 1 ...

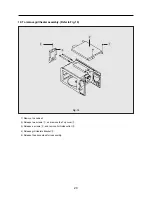
Page 15: ...former Refer to Fig 3 1 Remove four screws 1 which secure the H V Transformer bracket to the base plate 2 Remove the H V Transformer 2 High voltage circuit wiring Fig 3 2 1 Magnetron H V Capacitor H V Diode H V Fuse H V Trans ...

Page 16: ...all not exceed 4mW cm2 for a fully assembled oven with door normally closed e e h h h h h h e e e e e e e e e e e e e e e e e e e e e e e e e e e e e e e e e e e e e e e e e e e e e e e e e e e e e e e e e e e e e e e e e e e e e e e e e e e e e e e e e e e e e e e e e e e e e e e e e e e e e e e e e e e e e e e e e e e e e e e e e e e e e e e e e e e e e e e e e e e e e e e e e e e e e e e e e e ...

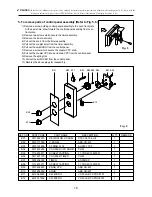
Page 17: ...bly to the oven front plate At the same time draw forward the control panel assembly from oven front plate 2 Remove two screws which secure the timer assembly 3 Remove the timer assmebly 4 Pull out the knob from the timer assembly 5 Pull out the coupler timer from the timer assembly 6 Pull out the sw MICRO from the control panel 7 Remove a screw which secure the coupler VPC knob 8 Pull out the cou...

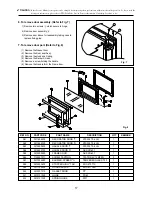
Page 18: ...3511604300 DECORATOR DOOR U STS304 T0 6 H L 1 A03 3512602600 HANDLE DOOR T STS304 T0 6 H L 1 A04 3512602700 HANDLE DOOR U ABS XR 401 1 A05 3512203590 FRAME DOOR ABS XR 401 1 A06 7122401211 SCREW TAPPING T2S TRS 4X12 MFZN 2 A07 3517004580 BARRIER SCREEN O TEMPERED GLASS T3 2 1 A08 3515203600 STOPPER HING T AS KOC 970T1S 1 A09 3511709000 DOOR SEAL AS KOC 871C0S 1 A10 3512301310 GASKET DOOR PP 1 A11 ...

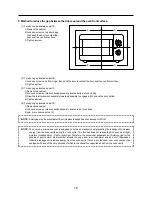
Page 19: ... e e e e e e e e e e e e e e e e e e e e e e e e e e e e e e e e e e e e e e e e e e e e e e e e e e e e e e e e e e e e e e e e e e e e e e e e e e e e e e e e e e e e e e e e e e e e e e e e e e e e e e e e e e e e e e e e e e e e e e e e e e g g g g g g NOTE The door on a microwave oven is designed to act as an electronic seal preventing the leakage of microwave energy from the oven cavity duri...

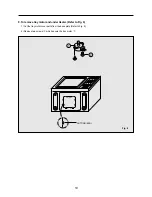
Page 20: ...19 9 To remove tray motor and under Heater Refer to Fig 9 1 Cut the tray motor cover parts from the base plate Refer to Fig 9 2 Remove two screws 2 which secure the tray motor 1 1 2 CUTTING 8EA Fig 9 ...

Page 21: ...embly Refer to Fig 10 1 Remove the cabinet 2 Release two screws 1 and remove the Top cover 2 3 Release a screws 3 and remove Air Guide outlet 4 4 Release grill Heaters Bracket 5 5 Release the above steps for reassembly Fig 10 3 4 2 1 ...

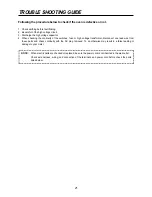
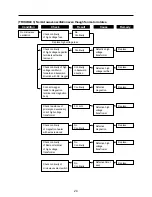
Page 22: ... e e e e e e e e e e e e e e e e e e e e e e e e e e e e e e e e e e e e e e e e e e e e e e e e e e e e e e e e e e e e e e e e e e e e e e e e e e e e e e e e e e e e e e e e e e g g g g g g Following the procedure below to check if the oven is defective or not 1 Check earthing before fault finding 2 Be careful of the high voltage circuit 3 Discharge the high voltage capacitor 4 When checking th...

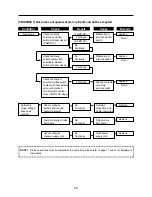
Page 23: ...of primary interlock switch No Continuity No Continuity Malfunction of interlock switch Check continuity of interlock monitor switch with door closed COM NC Check continuity of both primary and secondary interlock switch with door closed Check continuity of primary interlock switch contact with door partially open until interlock monitor switch contact close COM NC close Malfunction of interlock m...

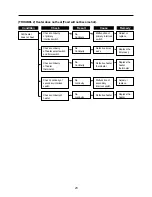
Page 24: ...ck switch No continuity Malfunction of secondary interlock switch Adjust or replace Check continuity of heater No continuity Defective heater Replace the heater No Continuity Defective heater thermostat Replace the heater thermostat No Continuity Defective timer ass y Replace the timer ass y Malfunction of primary interlock switch Adjust or replace Check Result Cause Remedy TROUBEL 2 Heater does n...

Page 25: ... Check resistance of primary and secondary coil of high voltage transformer 0 Ω or Defective high voltage transfromer Defective high voltage transfromer Defective timer ass y Check continuity of magnetron heater with wires removed No Continuity No Continuity No Continuity Defective magnetron Check continuity of filament terminal of high voltage transformer Check continuity of microwave select swit...

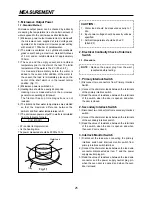
Page 26: ...tch 2 1 Procedure 1 Primary Interlock Switch 1 Disconnect two connectors from Primary Interlock Switch 2 Connect the ohmmeter leads between the terminals of the primary interlock switch 3 Read the value of resistance between the terminals of the switch when the door is opened and when the door is closed 2 Secondary Interlock Switch 1 Disconnect two connectors from secondary interlock switch 2 Conn...

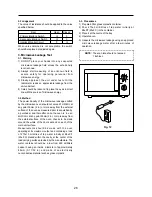
Page 27: ...de around the whole of the door seal and on each of the main unit surface Measurements should be made with the oven operating at its maximum output and containing a load of 275 15 mililitres of tap water initially at 68 9 F 20 5 C placed within the cavity at the center of the load carrying surface provided by the manufacture The water container should be a low from 600 milliliters beaker having an...

Page 28: ... voltage diode is located on the base near the transformer A Isolate the diode from the circuit by disconnecting the leads B With the ohmmeter set on the highest resistance scale measure the resistance across the diode terminals Reverse the meter leads and again observe the resistance reading Meter with 6V 9V or higher voltage batteries should be used to check the front to back resistance of the d...

Page 29: ...28 WIRING DIAGRAM ...

Page 30: ...29 EXPLODED VIEW ...

Page 31: ...61 4415A66910 1 29 SW MICRO VP 533A 0F SPNO 187 200G 4415A17352 2 30 LEVER LOCK POM 3513701300 1 31 SCREW TAPPING T2S TRS 4 12 MFZN 7122401211 2 32 SCREW TAPPING T2S TRS 4 12 MFZN 7122401211 1 33 COVER INSUATOR T SECC T0 5 3511405000 1 34 HEATER MIRACLON 115V 550W 3512803000 1 35 SCREW TAPPING T1 TRS 4X10 MFZN 7112401011 2 36 MAGNETRON 2M218H MF I 3518002200 1 37 SPECIAL SCREW T2 BOLT FLANGE 4 10 ...

Page 32: ...DAEWOO ELECTRONICS CO LTD 686 AHYEON DONG MAPO GU SEOUL KOREA C P O BOX 8003 SEOUL KOREA TELEX DWELEC K28177 8 CABLE DAEWOOELEC FAX 02 82 32 510 7630 TEL 02 82 32 510 7628 http www dwe daewoo co kr PRINTED DATE NOV 1999 ...

Reviews: