25
MEASUREMENT
1. Microwave Output Power
1-1. Standard Method
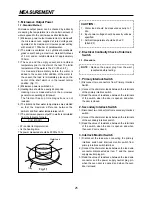
Microwave output power can be checked by indirectly
measuring the temperature rise of a certain amount of
water exposed to the microwave as directed below.
1) Microwave power output measurement is made with
the microwave oven supplied at rated voltage and
operated at its maximum microwave power setting
with a load of 1,000± 5cc of potable water.
2) The water is contained in a cylindrical borosilicate
glass vessel having a maximum material thickness
of 3 mm and an outside diameter of approximately
190 mm.
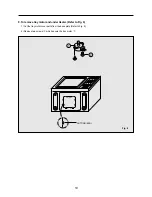
3) The oven and the empty vessel are at ambient
temperature prior to the start of the test. The initial
temperature of the water is 10± 2˚C (50± 3.6˚F).
It is measured immediately before the water is
added to the vessel. After addition of the water to
the vessel, the load is immediately placed on the
center of the shelf which is in the lowest normal
position. (Fig. 11).
4) Microwave power is switched on.
5) Heating time should be exactly 46 seconds.
Heating time is measured while the microwave
generator is operating at full power.
The filament heat-up time magnetrons is not
included.
6) The initial and final water temperatures are selected
so that the maximum difference between the
ambient and final water temperatures is 5K.
7) The microwave power output P in watts is calculated
from the following formula:
•
∆
T is actual temeprature rise.
• t is the heating time.
The power measured should be 900W± 10 %.
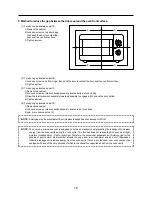
2. Electrical Continuity Check of Interlock
Switch
2-1. Procedure
1. Primary Interlock Switch
1) Disconnect two connectors from Primary Interlock
Switch.
2) Connect the ohmmeter leads between the terminals
of the primary interlock switch.
3) Read the value of resistance between the terminals
of the switch, when the door is opened, and when
the door is closed.
2. Secondary Interlock Switch
1) Disconnect two connectors from secondary interlock
switch.
2) Connect the ohmmeter leads between the terminals
of the secondary interlock switch.
3) Read the value of resistance between the terminals
of the switch, when the door is opened, and when
then oven door is closed.
3. Interlock Monitor Switch
1) Disconnect the lead wire connecting the primary
interlock switch and interlock monitor switch from
primary interlock switch terminal.
2) Connect the ohmmeter leads between the lead wire
connector disconnected as item ‘1’ and the power
supply neutral plug pin.
3) Read the value of resistance between the lead wire
connector and the power supply neutral plug pin,
when the oven door is opened, and when the oven
door is closed.
P=4187X
∆
T/t
Water Load
Tray
Fig. 14
CAUTION :
1. Water load should be measured exactly to 1
litre.
2. Input power voltage should be exactly volts as
specified.
3. Ambient temperature should be 20±2˚C
(68±3.6˚F)
@@@@@@@@e?
@@@@@@@@e?
@@h?
@@h?
@@h?
@@h?
@@h?
@@h?
@@@@@@@@e?@@@@@@@@?e@@@@@@@@e?@@@@@@@@?e@@@@@@@@e?@@@@@@@@?e@@@@@@@@e?@@@@@@@@?e@@@@@@@@e?@@@@@@@@?e@@@@@@@@e?@@@@@@@@?e@@@@@@@@e?@@@@@@@@?e@@@@@@@@e?@@@@@@@@?e@@@@@@@@e?@@@@@@@@?e@@@@@@@@e?@@@@@@@@?e
@@@@@@@@e?@@@@@@@@?e@@@@@@@@e?@@@@@@@@?e@@@@@@@@e?@@@@@@@@?e@@@@@@@@e?@@@@@@@@?e@@@@@@@@e?@@@@@@@@?e@@@@@@@@e?@@@@@@@@?e@@@@@@@@e?@@@@@@@@?e@@@@@@@@e?@@@@@@@@?e@@@@@@@@e?@@@@@@@@?e@@@@@@@@e?@@@@@@@@?e
@@@@@@@@
@@@@@@@@
@@
@@
@@
@@
@@
@@
@@
@@
@@
@@
@@
@@
@@
@@
@@
@@
@@
@@
@@
@@
@@
@@
@@
@@
@@
@@
@@
@@
@@
@@
@@
@@
@@
@@
@@
@@
@@
@@
@@
@@
@@
@@
@@
@@
@@
@@
@@
@@
@@
@@
@@
@@
@@
@@
@@
@@
@@
@@
@@
@@
@@
@@
@@
@@
@@
@@
@@
@@
@@
@@
@@
@@
@@
@@
@@
@@
@@
@@
?@@
?@@
?@@
?@@
?@@
?@@
?@@@@@@@@
?@@@@@@@@
?@@@@@@@@?e@@@@@@@@e?@@@@@@@@?e@@@@@@@@e?@@@@@@@@?e@@@@@@@@e?@@@@@@@@?e@@@@@@@@e?@@@@@@@@?e@@@@@@@@e?@@@@@@@@?e@@@@@@@@e?@@@@@@@@?e@@@@@@@@e?@@@@@@@@?e@@@@@@@@e?@@@@@@@@?e@@@@@@@@e?@@@@@@@@?e@@@@@@@@
?@@@@@@@@?e@@@@@@@@e?@@@@@@@@?e@@@@@@@@e?@@@@@@@@?e@@@@@@@@e?@@@@@@@@?e@@@@@@@@e?@@@@@@@@?e@@@@@@@@e?@@@@@@@@?e@@@@@@@@e?@@@@@@@@?e@@@@@@@@e?@@@@@@@@?e@@@@@@@@e?@@@@@@@@?e@@@@@@@@e?@@@@@@@@?e@@@@@@@@
@@g
@@g
@@g
@@g
@@g
@@g
@@@@@@@@
@@@@@@@@
@@
@@
@@
@@
@@
@@
@@
@@
@@
@@
@@
@@
@@
@@
@@
@@
@@
@@
@@
@@
@@
@@
@@
@@
@@
@@
@@
@@
@@
@@
@@
@@
@@
@@
@@
@@
@@
@@
@@
@@
@@
@@
@@
@@
@@
@@
@@
@@
@@
@@
@@
@@
@@
@@
@@
@@
@@
@@
@@
@@
@@
@@
@@
@@
@@
@@
@@
@@
@@
@@
@@
@@
NOTE : Remove the power plug from the wall
receptacle before testing.
@@@@@@@@e?
@@@@@@@@e?
@@h?
@@h?
@@h?
@@h?
@@h?
@@h?
@@@@@@@@e?@@@@@@@@?e@@@@@@@@e?@@@@@@@@?e@@@@@@@@e?@@@@@@@@?e@@@@@@@@e?@@@@@@@@?e@@@@@@@@e?@@@@@@@@?e@@@@@@@@e?@@@@@@@@?e@@@@@@@@e?@@@@@@@@?e@@@@@@@@e?@@@@@@@@?e@@@@@@@@e?@@@@@@@@?e@@@@@@@@e?@@@@@@@@?e
@@@@@@@@e?@@@@@@@@?e@@@@@@@@e?@@@@@@@@?e@@@@@@@@e?@@@@@@@@?e@@@@@@@@e?@@@@@@@@?e@@@@@@@@e?@@@@@@@@?e@@@@@@@@e?@@@@@@@@?e@@@@@@@@e?@@@@@@@@?e@@@@@@@@e?@@@@@@@@?e@@@@@@@@e?@@@@@@@@?e@@@@@@@@e?@@@@@@@@?e
@@@@@@@@
@@@@@@@@
@@
@@
@@
@@
@@
@@
@@
@@
@@
@@
@@
@@
@@
@@
@@
@@
@@
@@
@@
@@
@@
@@
?@@
?@@
?@@
?@@
?@@
?@@
?@@@@@@@@
?@@@@@@@@
?@@@@@@@@?e@@@@@@@@e?@@@@@@@@?e@@@@@@@@e?@@@@@@@@?e@@@@@@@@e?@@@@@@@@?e@@@@@@@@e?@@@@@@@@?e@@@@@@@@e?@@@@@@@@?e@@@@@@@@e?@@@@@@@@?e@@@@@@@@e?@@@@@@@@?e@@@@@@@@e?@@@@@@@@?e@@@@@@@@e?@@@@@@@@?e@@@@@@@@
?@@@@@@@@?e@@@@@@@@e?@@@@@@@@?e@@@@@@@@e?@@@@@@@@?e@@@@@@@@e?@@@@@@@@?e@@@@@@@@e?@@@@@@@@?e@@@@@@@@e?@@@@@@@@?e@@@@@@@@e?@@@@@@@@?e@@@@@@@@e?@@@@@@@@?e@@@@@@@@e?@@@@@@@@?e@@@@@@@@e?@@@@@@@@?e@@@@@@@@
@@g
@@g
@@g
@@g
@@g
@@g
@@@@@@@@
@@@@@@@@
@@
@@
@@
@@
@@
@@
@@
@@
@@
@@
@@
@@
@@
@@
@@
@@
Fig. 11
Summary of Contents for KOG-87550S
Page 29: ...28 WIRING DIAGRAM ...
Page 30: ...29 EXPLODED VIEW ...


