background image

SETUP

PLAYBACK

33

You can change the TV audio using the [AUDIO] button.

Press [AUDIO] repeatedly to change the TV audio, according to the Broadcast audio signal as shown below.

• STEREO Audio Signal

Stereo 

➝ 

Mono 

➝ 

Stereo

•  BIL Audio Signal

BIL I 

➝ 

BIL II 

➝ 

(BIL Off) 

➝ 

BIL I

•  MONO Audio Signal

Mono

The current audio channel is displayed on-screen.

•  If the sound is poor quality when set to Stereo, you can often improve it by changing to Mono.
•  When an external input is selected, the audio channel can be switched only to Stereo.

Changing the TV Audio Channel

The On-Screen Display provides feedback on the status of the DVD RVCR and/or the currently loaded
disc or tape. To access the On-Screen Display (or OSD), press [DISPLAY].

To display information about the currently loaded disc or tape:

On-screen display operation

1

Press [DISPLAY] repeatedly to display/change the information displayed on-screen.

2

To remove the on-screen display, press [DISPLAY] repeatedly until it disappears.

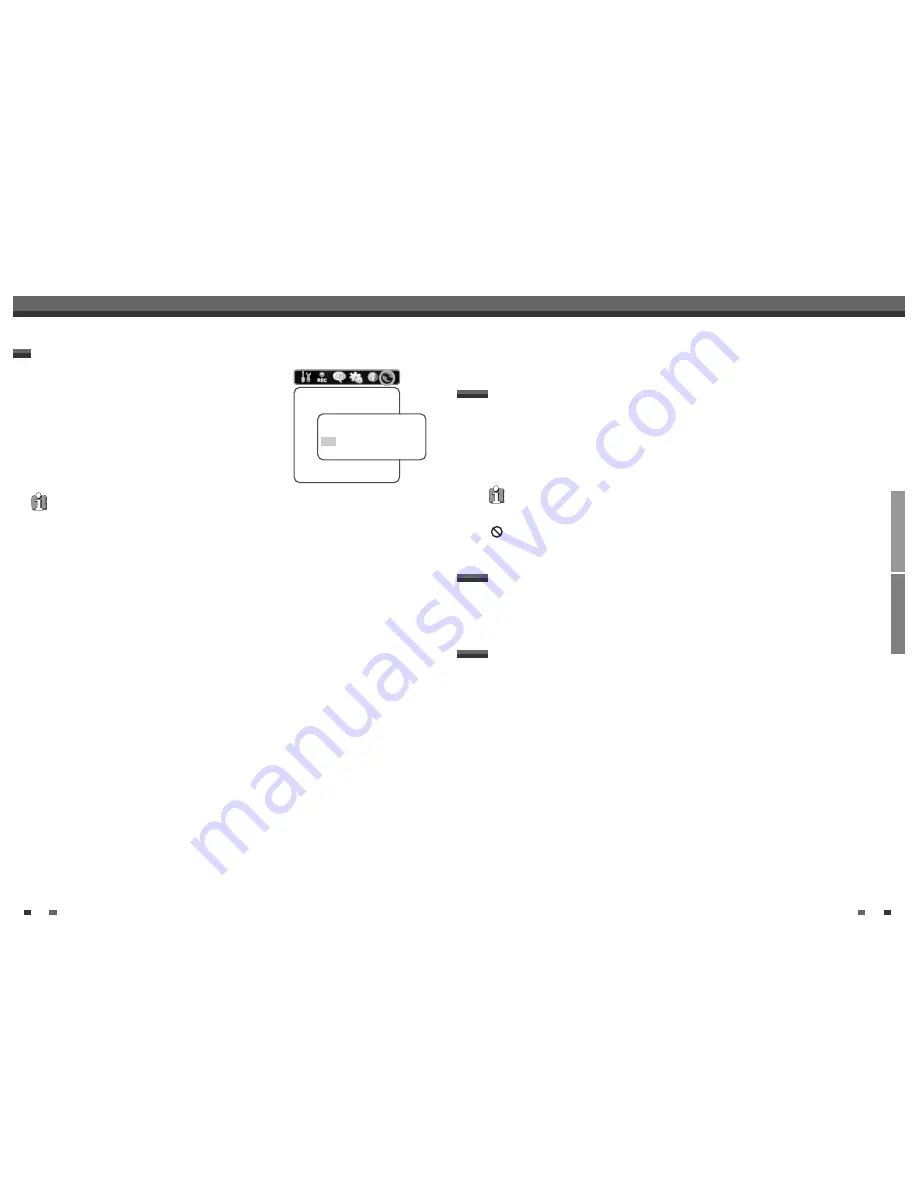
See the descriptions below for detailed explanations of the on-screen displays for each media type.

Temporary Feedback Icons

Action prohibited or not available

Displaying Disc Information

Changing TV Channels

• Some discs may not provide all the features shown in the on-screen display examples.

If no disc is playing, you can change TV channels using the [0-9] or [PR+/–] buttons on the remote control or
[PR+/–] buttons on the front panel.

32

Initial Setup

• Some options cannot be reset, including Parental Controls, Password, and Country Code.
• After Restoring Defaults the unit reboots automatically and the Installation menu appears.  You must set the

country, language, channel, and clock settings again.

If you wish, you can reset the DVD RVCR to its original factory
settings. 

1

Press [SETUP].

2

Use [

œ

/

] to select ‘Restore Defaults‘.

3

Press [ENTER].

4

The Initialize menu will appear. Use the [

/

] buttons to select

‘Yes‘ and press [ENTER].

Restore Defaults

Restore Defaults

If you select this function all
settings will be removed and
the product will be set into
initial (factory) mode.

Instructions

Enter-Confirm   Setup-Exit
Move 

…†

Are you sure you want to restore
default settings?

Yes

No

On-Screen Display Overview

On-Screen Display Overview

Downloaded from 

www.Manualslib.com


manuals search engine


Summary of Contents for DF-7150D

Page 1: ...DF 7150D P N 97P95600D0 7N DVD Recorder VCR DVD Recorder VCR User Manual...

Page 2: ...x 2 hrs for it to reach room temperature Make sure the DVD Recorder VCR is placed at least 10 cm apart from other home appliances or obstacles to ensure sufficient ventilation The apparatus should not...

Page 3: ...tions should be adhered to 4 FOLLOW INSTRUCTIONS All operating and use instructions should be followed 5 CLEANING Unplug this unit from the wall outlet before cleaning Do not use liquid cleaners or ae...

Page 4: ...ic shock 16 OBJECT AND LIQUID ENTRY Never push objects of any kind into this unit through openings as they may touch dangerous voltage points or short out parts that could result in a fire or electric...

Page 5: ...n a thousand times What is a DVD R Unlike a DVD RW disc a DVD R write once DVD can only be written to once If it is not finalized after a recording further recordings can be added to it Old recordings...

Page 6: ...strictions on Video Recording You cannot record copy protected video using this DVD Recorder VCR Copy protected video includes DVD Video discs and some satellite broadcasts If copy protected material...

Page 7: ...ndicates a DVD is playing with a Dolby Digital soundtrack 1 2 3 4 Identification of Controls STANDBY ON Turns the DVD Recorder VCR on and off Cassette Compartment VCR deck Insert a video cassette here...

Page 8: ...ontrols Switches the DVD Recorder VCR input to Tuner AV AVF or DV Displays a disc s Title menu if available Selects Recording mode DVD HQ 1hr SP 2hrs EP 4hrs or SLP 6hrs VCR SP or LP Copies from DVD t...

Page 9: ...om your TV and attach it to the RF IN FROM ANT jack on the rear panel of the DVD Recorder VCR Use the supplied RF cable to connect between the DVD Recorder VCR s OUT TO TV jack and the antenna input j...

Page 10: ...to set the DVD Recorder VCR to Progressive Scan mode by pressing and holding P SCAN for 3 seconds or changing the Video Output in the Setup Menu see page 27 Progressive Scan does not work with the RF...

Page 11: ...lect the desired language for the on screen menu using Press ENTER to confirm 3 Select the desired country using Press ENTER to confirm 4 Select the desired disc menu language using Press ENTER to con...

Page 12: ...erview 1 Press SETUP The Setup menu appears 2 Use to select the desired category 3 While the desired category is selected press to move to the second level 4 Press ENTER to move to the third level 5 U...

Page 13: ...Please set the clock Time 13 00 Date 02 Jan 2010 Sat Instructions Enter Confirm Setup Exit Move 22 9 Use to select Auto Search 10 Search the real channel number by pressing 11 Select Fine Tune You ca...

Page 14: ...elect Auto Chapter Off 5min 10min 15min Initial Setup Adjust Channels 1 Follow steps 1 2 as shown under Manual Set 2 Use to select Adjust Channels 3 Press ENTER The Adjust Channels menu appears 4 Use...

Page 15: ...Scan mode Video TV Aspect Auto Video Output Interlace Instructions Enter Confirm Setup Exit Move Select Picture Format 4 3 LB 4 3 PS 16 9 Auto Video TV Aspect Auto Video Output Interlace Instructions...

Page 16: ...firm Setup Exit Move Select Dynamic Range Off Low High Set Parental Level The Parental Controls feature allows you to prevent DVDs from being played based on their ratings or to have certain discs pla...

Page 17: ...Enter Confirm Master Password If you forget your password press 3 3 0 8 on the remote control and then press ENTER Set the new password to something other than 0000 Parental Country Code PleaseselectC...

Page 18: ...low for detailed explanations of the on screen displays for each media type Temporary Feedback Icons Action prohibited or not available Displaying Disc Information Changing TV Channels Some discs may...

Page 19: ...he disc remaining time OSD Menu Options for DVD DVD Playback DVD Playback 1 Press DVD to set the remote control to operate the DVD deck Turn the TV on and select the video input source connected to th...

Page 20: ...e TV screen A B You can repeat a scene between two points A and B 1 Press PLAY PAUSE play to the start of the desired scene 2 Press A B to mark the start point 3 Use FF NEXT to search the end point 4...

Page 21: ...automatically Notes on special playback features Horizontal lines noise bars will appear on the TV screen This is normal The audio is automatically muted during special playback modes so there is no...

Page 22: ...VCR can display JPEG files on CD R RW 1 Insert your CD and close the tray The JPEG CD folder tree appears 2 If there are folders which contain JPEG files select the desired folder using and press ENTE...

Page 23: ...ding time by 15 minutes DVD within the available space or 30 minutes VCR to a maximum of 10 hours The recording time is displayed on the front panel display One Touch Record OTR Total time and recorde...

Page 24: ...dit Timer Media PR No PR 03 Date Jan 02 Sun Start 13 30 End 14 30 Mode HQ Repeat Once Delete Instructions Enter Save Setup Exit Timer Recording PR No Date Start End Mode PR03 01 02 13 30 14 30 HQ Inst...

Page 25: ...uality 1 hr disc SP Standard Play 2 hrs disc EP Extended Play 4 hrs disc or SLP Super Long Play 6 hrs disc VCR SP Standard Play LP Long Play 2 times SP 5 Press REC once Recording will start The REC in...

Page 26: ...structions Enter Confirm Lock Unlock Disc Disc is unlocked Do you want to lock it Yes No Instructions Enter Confirm Move Lock Unlock Disc Changing disc lock status Please wait a moment For recordable...

Page 27: ...ke any previous title editing compatible with your DVD player Instructions Enter Confirm Make Compatible Make disc compatible with your DVD player Yes No Instructions Enter Confirm Move Make Compatibl...

Page 28: ...select SAVE and press ENTER Record Option To set DVD R and DVD RW recording options 1 Follow steps 1 to 3 under Play Title 2 Select Record Options using and press ENTER 3 Select your preferred record...

Page 29: ...Chapter 1 of 11 DVD Edit Title 1 of 2 Chapter 1 of 11 Edit Chapters Hide Chapter Change Index Picture Split Title Instructions Enter Confirm Setup Exit Move Choose the edit Function Add Delete Delete...

Page 30: ...t via the DVD Recorder VCR Connect the component directly to your TV Use the Adjust Channels feature to restore channels Tighten connections or replace cable Try all Auto Set options see page 23 for d...

Page 31: ...er 240 lines Standard recording DVD Specifications Laser system Semiconductor laser wavelength 650 nm Frequency response DVD PCM 48 kHz 8 Hz to 22 kHz CD 8 Hz to 20 kHz Video S N More than 60 dB Audio...

Reviews: