


3
Installation Instructions
Unpacking the Appliance
WARNING
If you receive a damaged product, immediately contact your
•
dealer or builder. Do not install or use a damaged appliance.
To prevent personal injury, property damage or damage to
•
the unit, this appliance should only be unpacked and set up
by two people.
Keep packaging materials away from children. Plastic sheets
•
and bags can cause suffocation.
Keep the appliance out of the weather. Avoid placing the
•
appliance in direct sunlight or near a stove, range top,
radiator or similar heat source.
To protect the unit from possible damage, allow it to stand in
•
place 1/2 to 1 hour after delivery before turning the electricity
on. Doing so allows the refrigerant and system lubrication to
reach equilibrium.
Protect the floor surface before you un
◊
-crate the unit. Put the
unit on cardboard, plywood, or preferably, a carpet remnant
(backing up) placed on the floor.
Keep the floor protected
◊
when moving the appliance.
Tools Required for Installation
Make sure that you have the necessary tools and materials
available for a proper installation.
Phillips screwdriver set
◊
Level
◊
Crescent wrenches
◊
Four (4) mounting screws (included)
◊
Allen wrench (included)
◊
Two (2) set screws (included)
◊
Handle (included)
◊
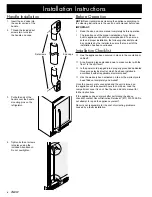
Installation
Adjust the appliance height to fit the cutout using the four
1.
adjustable feet on the underside of the appliance.
Make sure all four feet hit the floor and that the appliance
2.
does not rock.
Place the level on one of the racks inside the appliance.
3.
Check to make sure the appliance is level front to back and
side to side. Readjust the feet if necessary.
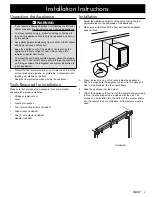
Slide the appliance into the cutout.
4.
Attach the appliance to the front of the cutout as shown using
5.
the four (4) mounting screws included with the unit. The
screws can be installed into the bottom of the counter and/or
into the cabinet in any combination. All four screws must be
used.
Continued...
Summary of Contents for EF24LWCZ1SS
Page 7: ......
Page 8: ...Dacor Phone 800 793 0093 FAX 626 403 3130 www Dacor com...


