background image

English  9

Installation instructions

Make electrical connection

This cooktop is manufactured with ground wire (bare or green) connected to the 
cooktop frame connect the cooktop cable to the junction box through the UL listed 
or CSA approved conduit connector.

Electrical Connection Options

If your home has:

And you will be connecting to :

Go to section:

4-wire direct

Afused disconnect or circuit 
breaker box

4-Wire Cable from Power 
supply to 3-Wire Cable 
from Cooktop

3-wire direct

Afused disconnect or circuit 
breaker box

3-Wire Cable from Power 
supply to 3-Wire Cable 
from Cooktop

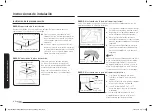
4-Wire Cable from Power Supply to 3-Wire Cable from Cooktop
IMPORTANT:

 Use the 4-wire cable from power supply where local codes do not 

permit connecting the frame-ground conductor to the Neutral (N) junction box 
wire.

A

B

C

D

E

G

H

I

F

A. 

4-wire cable from power 
supply

B. 

L1 wires

C. 

Ground (G) or bare ground 
wire (from cooktop)

D. 

3-wire cable from cooktop

E. 

Junction box

F. 

N (normally White) wire (from 
power supply)

G. 

UL listed wire connector

H. 

L2 (normally Red) wires

I. 

UL listed or CSA approved 
conduit connector

1. 

Disconnect power.

2. 

Remove Junction box cover if present.

3. 

Connect the flexible cable condult from 
the cooktop to the junction box using 
a UL listed or CSA approved condult 
connector.

4. 

Tighten screws on condult connector, if 
present.

5. 

Connect the two L2 wires together using 
the UL listed wire connectors.

6. 

Connect the two L1 wires together using 
the UL listed wire connectors.

7. 

Connect the Ground (G) or bare ground 
wire from the cooktop cable to the 
Ground (G) or bare ground wire (in the 
junction box) using a UL listed wire 
connectors.

8. 

Put a UL listed wire connector on the 
end of the Neutral (N) wire.

9. 

Install junction box cover.

10. 

Reconnect power.

NOTE

• 

Usually L1 is Black, L2 is Red, Ground (G) is Green or bare wire and Neutral (N) is 
White wire.

• 

Do not connect the bare ground wire to the Neutral (N) wire in the junction box.

DTI36P876BB,DTI30P876BB_DG68-01292A-00_EN+MES+CFR.indb   9

2020-06-02   �� 1:21:04

Summary of Contents for DTI30P876BB

Page 1: ...Installation Manual Induction Cooktop DTI30P876BB DTI36P876BB DTI36P876BB DTI30P876BB_DG68 01292A 00_EN MES CFR indb 1 2020 06 02 1 21 02...

Page 2: ...nstallation contact your Dacor dealer or the Dacor Customer Service team If your Dacor appliance is under warranty call Dacor Distinctive Service Have the appliance s model serial numbers available wh...

Page 3: ...he risk of burns or fire due to reaching over heated surface elements cabinet storage located above the surface units should be avoided If cabinet storage space is necessary the risk can be reduced by...

Page 4: ...cuit breaker or a time delay circuit breaker as noted on name plate We recommend you have the electrical wiring and hookup of your cooktop connected by a qualified electrician After installation have...

Page 5: ...ctrical supply is required See Electrical Requirements section NOTE It is recommended to install the juction box on right side of the cabinet If installing the junction box near the left side make sur...

Page 6: ...d combination above the cooktop follow the range hood or microwave hood combination installation instructions for dimensions and clearance above the cooktop surface G F A C E E D B Cooktop Rear Wall C...

Page 7: ...iring to the added section of copper wire using special connectors and or tools designed and UL listed for joining copper to aluminum Follow the electrical connector manufacturer s recommended procedu...

Page 8: ...to bottom and select bracket location 2 Tighten screw bracket guide to base of cooktop 3 Install UNC 243 16 L75 screw until it touches the bottom of the countertop Turn the thumbscrew until bracket to...

Page 9: ...m cooktop D 3 wire cable from cooktop E Junction box F N normally White wire from power supply G UL listed wire connector H L2 normally Red wires I UL listed or CSA approved conduit connector 1 Discon...

Page 10: ...e to the neutral wire from the junction box A B C D E F G H I A 3 wire cable from power supply B L1 wires C Ground G or bare ground wire from cooktop D 3 wire cable from cooktop E Junction box F N nor...

Page 11: ...Architect Designer C Appliance Dealer Showroom H Another Dacor Owner D Kitchen Dealer Showroom I Model Home E Home Show J Other 2 Where did you buy your Dacor appliances A Appliance Dealer D Builder B...

Page 12: ...or 14425 Clark Avenue City of Industry CA 91745 Phone 833 35 ELITE 833 353 5483 Fax 626 403 3130 www dacor com DG68 01292A 00 DTI36P876BB DTI30P876BB_DG68 01292A 00_EN MES CFR indb 12 2020 06 02 1 21...

Page 13: ...Manual de instalaci n Cubierta de inducci n DTI30P876BB DTI36P876BB DTI36P876BB DTI30P876BB_DG68 01292A 00_EN MES CFR indb 1 2020 06 02 1 21 04...

Page 14: ...Pac fico Servicio de atenci n al cliente de Dacor Tel fono 833 35 ELITE 833 353 5483 int 2813 EE UU y Canad Lunes a viernes de 5 00 a m a 5 00 p m Hora del Pac fico Sitio web www dacor com Todas las...

Page 15: ...timientos de las paredes alrededor de la placa de cocci n puedan soportar las temperaturas hasta 194 F que esta genera La placa de cocci n debe ser de f cil acceso y estar iluminada por la luz natural...

Page 16: ...la placa Le recomendamos que el cableado y la conexi n de su placa de cocci n sean realizados por un electricista calificado Luego de la instalaci n solic tele al electricista que le muestre d nde se...

Page 17: ...de la placa de cocci n Se requiere un suministro el ctrico con conexi n a tierra Consulte la secci n Requisitos el ctricos NOTA Se recomienda instalar la caja de empalmes en el lado derecho del gabin...

Page 18: ...re la placa de cocci n siga las instrucciones de instalaci n de dichas campanas para conocer las dimensiones y el espacio libre por encima de la superficie de la placa de cocci n G F A C E E D B Placa...

Page 19: ...o herramientas dise adas para unir cobre con aluminio aprobadas por UL Siga el procedimiento recomendado por el fabricante del conector el ctrico La conexi n entre aluminio y cobre debe cumplir con lo...

Page 20: ...e a la parte inferior y seleccione la ubicaci n del soporte 2 Apriete el tornillo de la gu a del soporte a la base de la placa de cocci n 3 Instale el tornillo UNC 243 16 L75 hasta que toque la parte...

Page 21: ...conductores de la placa de cocci n E Caja de empalmes F Cable N normalmente blanco del suministro el ctrico G Conector de cables aprobado por UL H Cables L2 normalmente rojos I Conector de conductos...

Page 22: ...ro de la caja de empalmes A B C D E F G H I A Cable de 3 conductores del suministro el ctrico B Cables L1 C Tierra G o cable a tierra desnudo de la placa de cocci n D Cable de 3 conductores de la plac...

Page 23: ...u l fue su primer contacto con los productos Dacor Marque solo uno A Televisi n Programa culinario F Constructor B Revista G Arquitecto Dise ador C Exposici n del distribuidor H Otro propietario de Da...

Page 24: ...r 14425 Clark Avenue City of Industry CA 91745 Tel fono 833 35 ELITE 833 353 5483 Fax 626 403 3130 www dacor com DG68 01292A 00 DTI36P876BB DTI30P876BB_DG68 01292A 00_EN MES CFR indb 12 2020 06 02 1 2...

Page 25: ...Manuel d installation Table de cuisson induction DTI30P876BB DTI36P876BB DTI36P876BB DTI30P876BB_DG68 01292A 00_EN MES CFR indb 1 2020 06 02 1 21 06...

Page 26: ...ient Dacor T l phone 833 35 ELITE 833 353 5483 ex 2813 tats Unis et Canada du lundi au vendredi de 05 h 00 17 h 00 heure du Pacifique Site Web www dacor com Toutes les sp cifications peuvent tre modif...

Page 27: ...n r es par la table de cuisson pouvant aller jusqu 194 C La table de cuisson doit tre facile d acc s et clair e par la lumi re naturelle en journ e D branchez toujours l alimentation lectrique sur la...

Page 28: ...sur la plaque signal tique Nous vous recommandons de demander un lectricien qualifi de brancher pour vous le c blage lectrique et d effectuer les branchements de votre table de cuisson Une fois l inst...

Page 29: ...rre est requise Reportez vous la section Exigences en mati re de raccordement lectrique REMARQUE Il est recommand d installer une bo te de jonction sur le c t droit du meuble Si vous installez la bo t...

Page 30: ...ions d installation de la hotte pour cuisini re ou de la hotte pour micro ondes concernant les dimensions et les d gagements requis au dessus de la surface de la table de cuisson G F A C E E D B Table...

Page 31: ...ciaux et ou d outils adapt s et r pertori s UL pour relier le cuivre l aluminium Suivez la proc dure recommand e du fabricant du connecteur lectrique La connexion aluminium cuivre doit tre conforme a...

Page 32: ...cement du support 2 Serrez la vis du guide de support sur la base de la table de cuisson 3 Installez la vis UNC 243 16 L75 jusqu toucher le bas du plan de travail Tournez la vis serrage main jusqu ce...

Page 33: ...ise la terre d nud au niveau de la table de cuisson D C ble 3 fils au niveau de la table de cuisson E Bo te de jonction F Fil N normalement blanc depuis l alimentation G Serre fils r pertori UL H Fils...

Page 34: ...reliez le fil de mise la terre au fil neutre au niveau de la bo te de jonction A B C D E F G H I A C ble 3 fils au niveau de l alimentation B Fils L1 C Masse G ou fil de mise la terre d nud au niveau...

Page 35: ...roduits Dacor Une seule r ponse possible A T l vision mission culinaire F Constructeur B Magazine G Architecte Designer C Exposition chez un revendeur H Un autre propri taire Dacor D Exposition de cui...

Page 36: ...425 Clark Avenue City of Industry CA 91745 T l phone 833 35 ELITE 833 353 5483 T l copie 626 403 3130 www dacor com DG68 01292A 00 DTI36P876BB DTI30P876BB_DG68 01292A 00_EN MES CFR indb 12 2020 06 02...

Reviews: