background image

7

NOTE

: If installing the hood in the recirculating configura-

tion (recirculating kit # AVPH1), consult the instructions 

that come with the kit before starting installation.

Installing the Chimney Mounting 

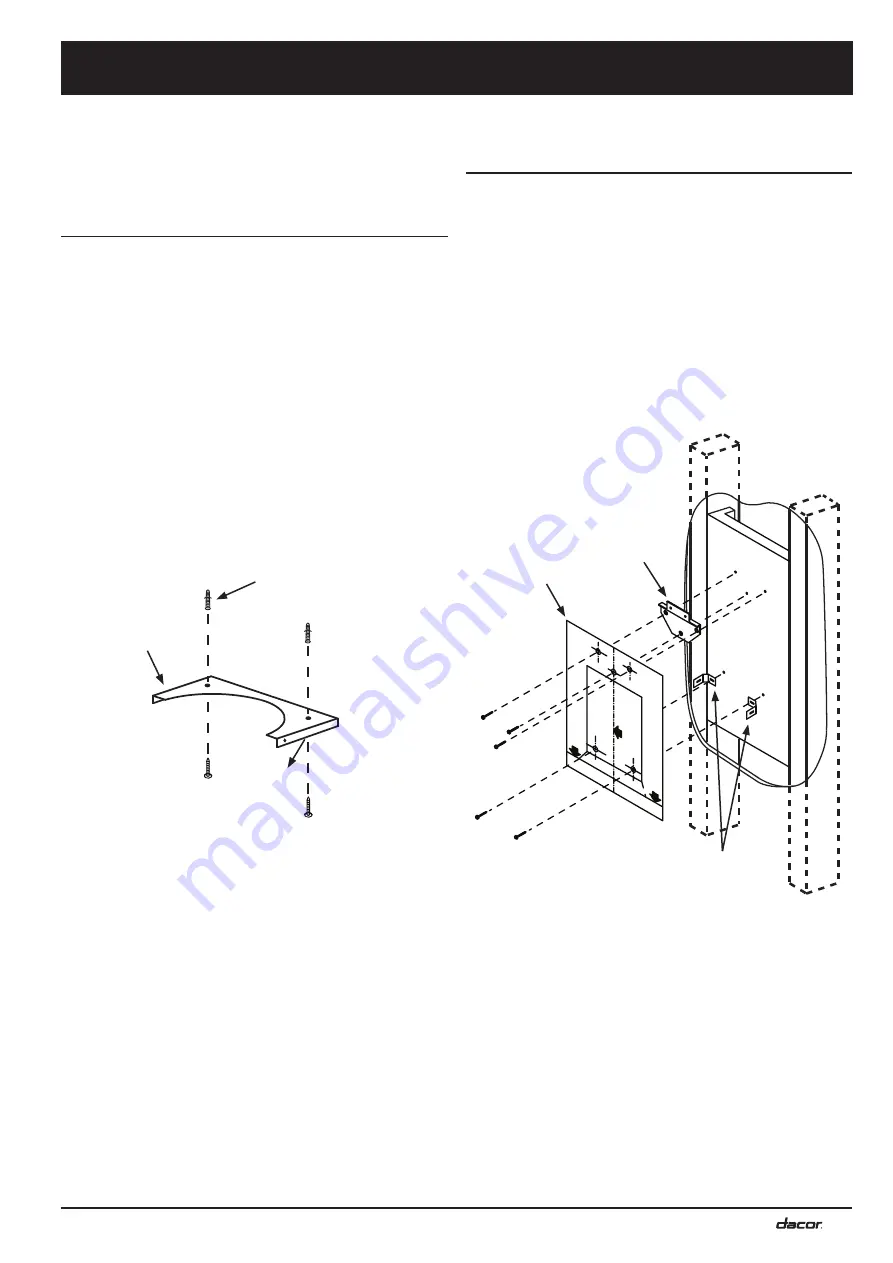
Bracket

1.  Determine the vertical center line for the range hood. 

The center line for the hood is usually the same as 

the center line of the range or cooktop.

2.  Using a pencil, mark the vertical center line on the 

wall from where the bottom of hood will be located to 

where the top of the chimney will be located.

3.  Draw a horizontal line 9 inches long at 90° to the 

vertical center line where the bottom of the hood will 

be located. The minimum allowable distance is 30” 

above the cooktop.

4.  Locate the chimney mounting bracket and position it 

against the ceiling as shown. Center it on the vertical 

center line drawn on the wall.

5.  Mark the ceiling in two places through the holes in 

the top of the bracket. Remove the bracket from the 

ceiling.

6.  Drill 5/16” holes through the two spots marked on the 

ceiling.

7.  Insert the two of the provided wall anchors into the 

holes on the ceiling.

8.  Place the chimney mounting bracket against the ceil-

ing  and attach it using two included 1 1/2” screws.

Installing the Blower Mounting 

Bracket

1.  Find the mounting bracket template in the shipping 

box. Put the template against the wall and line up the 

horizontal line drawn on the wall with the horizontal 

line on the template.

2.  Line up the vertical line drawn on the wall with the 

center line on the template. Iron out all creases and 

folds and tape the template to the wall using tape that 

will not damage the wall finish.

3.  Using a sharp object, mark the wall through the 

template at the center of the three blower mounting 

bracket hole positions (near the top) and the position 

of the two “L” brackets, near the bottom.

4.  Remove the template.
5.  Drill the mounting holes.

If mounting the hood to drywall:
•  Drill five appropriate sized holes for the mount-

ing hardware being used (mounting hardware for 

attachment to drywall or plaster not provided). 

The drywall mounting hardware must be pur-

chased separately.

Installation Instructions

Anchor

Chimney mounting 

bracket

"L" brackets

Template

Mounting to Drywall or Plaster

Mounting 

bracket

Summary of Contents for Discovery PHW Series

Page 1: ...Installation Instructions Discovery GlassWall Mount Range Hood PHW Model Series Part No 101745 Rev H...

Page 2: ...installation process Leave these installation instructions with the customer Customer Keep these installation instructions for future reference and the local electrical inspector s use If You Need Hel...

Page 3: ...G a Use this unit only in the manner intended by the manufacturer If you have questions contact the manufacturer b Before servicing or cleaning unit switch power off at service panel and lock the serv...

Page 4: ...rfaces often to prevent grease fires and maintain performance If the cooktop and range hood are near a window use an appropriate window treatment Avoid long drapes or other window coverings that could...

Page 5: ...ation Contact your local building department for further information The minimum installed distance from the rear of blower unit base to the cooktop surface must be no less than 30 inches 76 2 cm 26 i...

Page 6: ...ceilings or into attics crawl spaces or garages To prevent combustion by products smoke or odors from entering the home and to improve efficiency tape all duct joints securely Do not exhaust more than...

Page 7: ...Work Design Tips Wherever possible reduce the number of transitions and turns to as few sharp angles as possible Two staggered 45 angles are better than one 90 Keep turns as far away from the hood exh...

Page 8: ...ure Replacement kit PN 101963 includes both chimney and blower mounting bracket Order the correct size see page 3 A A B C C B D D E F G G H H F E 8 20 cm WARNING Do not install the range hood unless t...

Page 9: ...7 Insert the two of the provided wall anchors into the holes on the ceiling 8 Place the chimney mounting bracket against the ceil ing and attach it using two included 1 1 2 screws Installing the Blowe...

Page 10: ...k or masonry Drill five 5 16 X 1 1 2 holes in the locations marked Insert five of the provided wall anchors into the five holes The anchors provided are for attaching the hood to masonry or brick only...

Page 11: ...er flaps on the top of the hood from opening 1 Inside the exhaust outlet on the top of the blower assembly there are metal or plastic damper flaps The flaps close to help prevent back drafts when the...

Page 12: ...fire hazard make sure the power supply at the fuse or junction box is turned off before proceeding with final installation Improper connection of the hood electrical wiring may create an electric shoc...

Page 13: ...on the bottom of the blower assembly 4 Insert all four thumb screws into the bottom of the glass and tighten into place Installing the Chimney 5 Carefully put the chimney over the blower assembly taki...

Page 14: ...d filled out completely and mailed Verifying Proper Operation 1 Turn on power at the junction or fuse box 2 If the control panel is not lit turn on the main power switch located next to the light fixt...

Page 15: ......

Page 16: ...Dacor 14425 Clark Avenue City of Industry CA 91745 Phone 800 793 0093 Fax 626 403 3130 www dacor com...

Reviews: