background image

3

NOTE: 

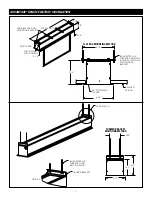
Use a screw driver or 5/32" Allen wrench to make adjustments.

MORE SCREEN DROP

   1.   Place operating switch in 

“down”

 position.

  2.   When the screen stops, turn the white 

“down” 

limit knob (Fig. 2) one-quarter turn counterclockwise. Test by raising 

picture surface approximately two feet, then lower again. Repeat until desired picture surface position is attained.

CAUTION: Do not adjust for more drop than what was ordered. At least 1-1/2 wraps of fabric must remain on the roller. This 
screen comes standard with 0" or 2" black at the top. See the specification data sheet for details.

  3.   Recalibrate according to above instructions. Press "up" button to close door after recalibration.

LESS SCREEN DROP

  1.   Raise picture surface approximately two feet above desired level.
  2.   Place operating switch in 

“off”

position.

  3.   Turn the white 

“down”

 limit switch (Fig. 2) one-quarter turn clockwise. Test by raising picture surface approximately 

two feet, then lower again. Repeat until desired picture surface position is attained.

  4.   Recalibrate according to above instructions. Press "up" button to close door after recalibration.

CONTACT DA-LITE AT 800-622-3737 IF DOOR MOTOR NEEDS ADjUSTMENT.

s

!

SCREEN ADJUSTMENT

RECALIBRATION

The screen controller (standard control, not SCB100 or SCB200) is factory calibrated to control the screen and door 

sequence timing.  If the line voltage varies 10% or more from the factory setting, the door will not close properly and the 

unit will need to be recalibrated.  The steps are:
  1.  The screen surface must be all the way up
  2.  Press and hold the stop button for 10 seconds
The screen will then run through a whole cycle and be recalibrated upon completion. Press "up" button to close door after 

recalibration.
If the screen limit switch setting is changed in the up direction, the unit must be recalibrated. Surface travel is stopped 

automatically in the fully opened and closed positions by limit switches that are factory set at Da-Lite. Should it be 

necessary to adjust for more or less drop of picture, proceed in the following manner:

Summary of Contents for ADVANTAGE DELUXE ELECTROL

Page 1: ...roit Street Post Office Box 137 Warsaw Indiana 46581 0137 Phone 574 267 8101 800 622 3737 Fax 574 267 7804 Toll Free Fax 877 325 4832 www da lite com e mail info da lite com Instruction Book for Advantage Deluxe Electrol The Da Lite Difference ...

Page 2: ...rounding the junction box Remove two screws for access 1 Carefully unpack screen and remove outer wrapping from case 2 Make sure to recheck measurements of screen location before installation IMPORTANT SAFETY INSTRUCTIONS When using your video equipment basic safety precautions should always be followed including the following 1 Read and understand all instructions before using 2 Position the cord...

Page 3: ... 6 Carefully remove tape strips securing picture surface around roller Slat should move freely Fig 2 Only if the roller assembly is preinstalled 7 Test installation by operating the screen several times Be prepared to stop the screen Standard Duty Cycle 1 MIN ON 3 MIN OFF The fabric door rear door will not close until the wall switch is placed in the up position and when the screen motor stops at ...

Page 4: ...o feet then lower again Repeat until desired picture surface position is attained 4 Recalibrate according to above instructions Press up button to close door after recalibration Contact Da Lite at 800 622 3737 if door motor needs adjustment s SCREEN ADJUSTMENT RECALIBRATION The screen controller standard control not SCB100 or SCB200 is factory calibrated to control the screen and door sequence tim...

Page 5: ...R FRONT OF WALL SWITCH BACK OF WALL SWITCH BLACK HOT GREEN GROUND BLACK DOWN WHITE COMMON RED UP BLACK DOWN BLACK DOWN WHITE COMMON RED UP RED DOWN WHITE COMMON RED UP BLACK DOWN GREEN GROUND WHITE COMMON RED UP BLACK DOWN GREEN GROUND WHITE COMMON RED DOWN BLACK UP GREEN GROUND WHITE COMMON RED DOWN BLACK UP GREEN GROUND NOTE Electrical connections on left end of case AUX EYE FRONT OF WALL SWITCH...

Page 6: ...L MOTOR CONTROLLER 5 ADVANTAGE DELUXE ELECTROL INSTRUCTIONS SCB 100 CONTROL POWER INPUT AND CONTROL BOARD ARE LOCATED ON RIGHT SIDE OF SCREEN HOUSING 220 240V WIRING DIAGRAM 120V WIRING DIAGRAM NOTE Electrical connections on right side of case NOTE Electrical connections on right side of case BLACK HOT GREEN GROUND WHITE COMMON POWER INPUT 120VAC 60HZ DOWN STOP UP NOT USED BACK OF FRONT OF WALL SW...

Page 7: ...BLUE COMMON B A 6 ADVANTAGE DELUXE ELECTROL INSTRUCTIONS SCB 200 CONTROL POWER INPUT AND CONTROL BOARD ARE LOCATED ON RIGHT SIDE OF SCREEN HOUSING 220 240V WIRING DIAGRAM 120V WIRING DIAGRAM NOTE Electrical connections on right side of case NOTE Electrical connections on right side of case BLACK HOT GREEN GROUND WHITE COMMON POWER INPUT 120VAC 60HZ NOT USED ENCODER 5V A B GND SCREEN MOTOR DOOR MOT...

Page 8: ...CKET FINISHED CEILING SELF TRIMMING FLANGE 7 1 4 8 3 4 CASE LENGTH VARIABLE POSITION MOUNTING BRACKETS 7 1 4 6 1 8 MOTOR END 6 1 8 ELECTRICAL JUNCTION BOX SEE DETAIL A suggested 3 8 THREADED ROD NOT INCLUDED 4 59 7 21 8 75 DETAIL A 8 74 HANGER BRACKET 7 1 4 Flat Bar Mounting Method formed bracket Mounting Method ...

Page 9: ... g Broken wire in the up position h Defective motor limit switch or capacitor i Capacitor burned out Solution a Verify 115 125V or 220 240V If insufficient voltage rewire incoming electric line b Replace facility fuse c Reset facility circuit breaker d Check above Tighten all loose wire connections Recheck wiring See installation instructions Down Position Check for power across black and white le...

Page 10: ...ed a Down limit switch out of adjustment a Buzzing noise b Gear noise a Defective brake a Pin end slipped out of nylon bearing a Screen not installed properly b Fabric is damaged a Screen up limit out of adjustment a Loose wire Solution a Check installation to free door Clear any foreign substance i e paint or plaster from hinge b See above a Replace switch b Replace screen motor c Recalibrate per...

Page 11: ...10 ...

Page 12: ...le by the purchaser and Da Lite is not responsible for damage in shipment To protect yourself against damage or loss in transit insure the product and prepay all transportation expenses THIS WARRANTY IS IN LIEU OF ALL OTHER WARRANTIES EXPRESS OR IMPLIED INCLUDING WARRANTIES AS TO FITNESS FOR USE AND MERCHANT ABILITY Any implied warranties of fitness for use or merchantability that may be mandated ...

Reviews: