background image

35

www.d16.pl

cOnFiguratiOn

 • 

plug-in’s dEfaulT sETTings

There are 4 sections:

• 

Processing Quality 

- Default Processing Path Quality

• 

Presets 

- Presets loading settings

• 

MIDI 

- Default MIDI CC Map

• 

User Interface 

- Default UI size

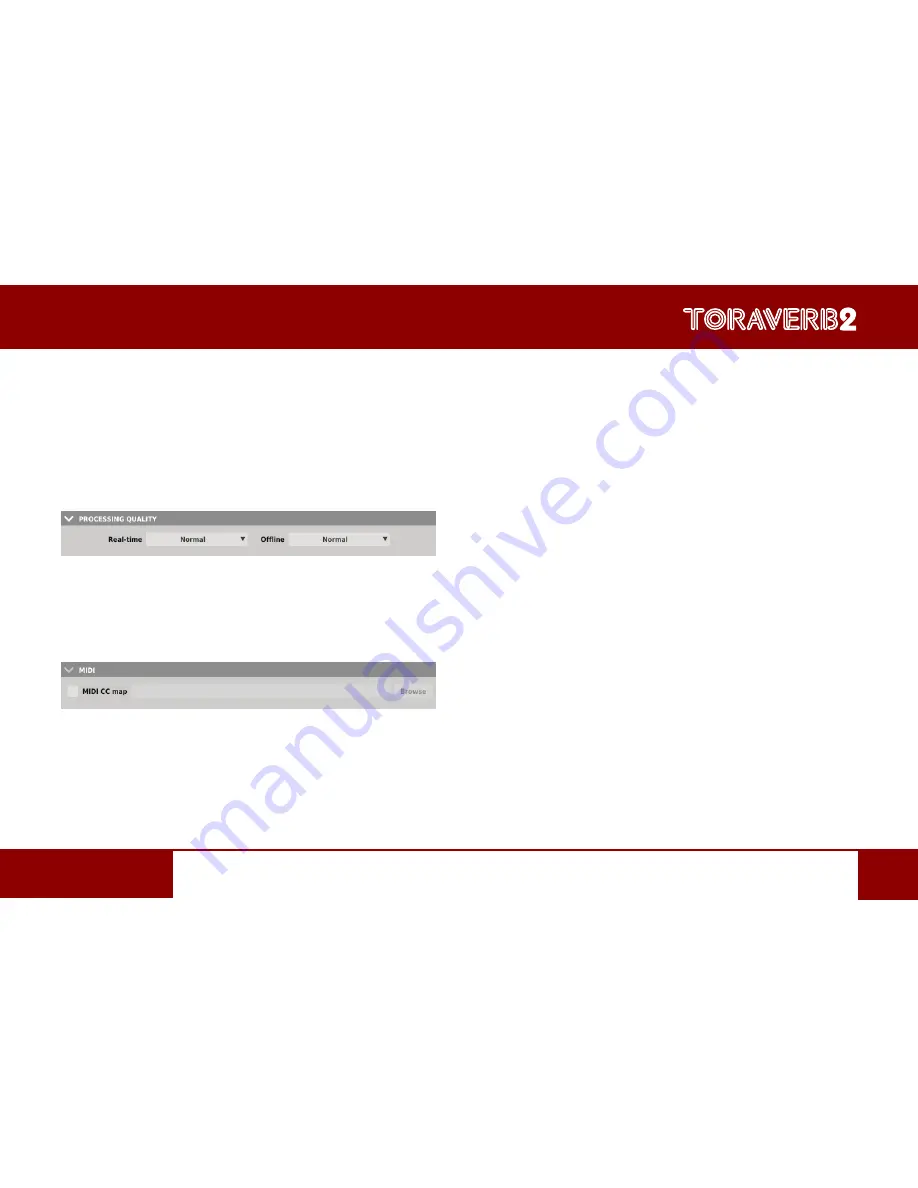
Default Processing Path Quality

Processing Quality Choice Section

In this section you can configure a default quality of the processing path for the 

Real-time 

mode and the 

Offline

 mode.

Default MIDI CC Map

Default MIDI Map Choice Section

This section allows for setting of a path to a file with a default

 MIDI Map 

that was prepared before. Clicking 

MIDI CC 

Map check box 


activates load of 

MIDI Map 

and the possibility of pointing it (

Browse 

button).

Summary of Contents for TORAVERB2

Page 1: ...User Manual 8 September 2017 ...

Page 2: ...2 Overview Overview Toraverb 2 is a high quality studio reverb effect unit with a modulated tail Toraverb graphical interface ...

Page 3: ...16 pl Overview There are two sections to the user interface Configuration and preset management Configuration and preset selection section Signal processing control section contains all the remaining controls ...

Page 4: ...b 2 It explains the basic components of the unit and its control parameters Basic modules Internally Toraverb 2 consists of a few basic components These correspond to the sections on the graphical user interface Pre delay Controls the delay between Dry and Reverberated signals Pre delay section ...

Page 5: ...positions on the display Sync toggle button Sync button This activates deactivates the synchronization of the Pre delay with the host application tempo When enabled the delay is represented as a Rhythmic value in tempo dependent units consisting of Note value and Rhythmic modifier It should be noted that when this mode is active the Pre delay value is controlled in a slightly different manner and ...

Page 6: ...wing values 1 Bar 1 2 1 4 1 8 1 16 1 32 and 1 64 Rhythmic modifiers Clicking one of available Rhythmic modifiers selects it Pre delay s Rhythmic modifier There are 3 values to choose from Full Effective delay value is equal to set Note value Tri Effective delay value is equal to 2 3rds the duration of set Note value Dot Effective delay value is equal to 3 2nds the duration of set Note value ...

Page 7: ...Late reflections section This section controls the Early and Late reflections of reverb Early Late section Switching between Early and Late tabs gives an access to parameters controlling Early and Late reflections respectively Early and Late tabs ...

Page 8: ... cut below the value selected The range is from 0Hz to 22kHz Crosstalk Between the left and right channel delay lines Attenuation This parameter changes the characteristic of the reflecting surface it s damping properties Diffusion Is the reflecting surface s ability to spread the echoes out If this parameter is set to Sharp the reflecting surface is perfectly flat and does not distort reflected w...

Page 9: ...les Modulation This controls the Early reflections delay lines modulation Parameters to the right on the tab ones labeled with orange color controls single band parametric EQ which processes Early Reflections output Parametric EQ section ...

Page 10: ...ow Basic modules Type There are three different types of EQ filter available Low shelf Bell High shelf Gain Gain value for a band in range 24 dB to 24 dB Freq EQ Frequency Bandw Band width in range 0 5 to 4 octaves ...

Page 11: ...ch of wave energy is consumed every reflection The less value the more energy consumes every reflection that means the feedback is weaker then Attenuation This parameter changes the characteristic of the reflecting surface it s damping properties Diffusion Is the reflecting surface s ability to spread the echos out If this parameter is set to Sharp the reflecting surface is perfect ly flat and doe...

Page 12: ...ch alter the Late Reflections The parameters for the EQ are the same as the parameters in the Early Reflections tab Early and Late decay times The Early time and Late time display shows the decay times of Early and Late reflections respectively This is purely for informational purpose Early time and Late decay time displays ...

Page 13: ...ic modules Early Late reflections mixer Early Late reflections mixer This controls the mix of the signals coming from the Early and Late Reflections modules The Gain knobs set the level for each signal Early and Late output levels ...

Page 14: ...pper row control the Left Right panning or Mid Side balance of the signal leaving the Early and Late sections The MS Mode button selects between Left Right or Mid Side mode MS Mode toggle button Master section This is where global reverb parameters are set ...

Page 15: ...s FX Curve Transition characteristics between Dry and Wet for FX knob Ducking Controls the compressor which suppresses the Wet signal proportionally to the level of the Dry signal This knob controls the strength of the effect Att Rel Adjusts the Ducking Attack and Release times starting from 2ms of attack and 50ms of release for minimum value up to 16ms of attack and 400ms of release for maximum v...

Page 16: ...on characteristics The image below depicts the general characteristics of the reverberation tail within Toraverb 2 TIME AMPLITUDE PRE DELAY EARLY REFLECTIONS LATE REFLECTIONS E A R L Y D I F F U S I O N L A T E D I F F U S I O N Reverberation characteristics ...

Page 17: ...re below shows the signal flow through the plug in EARLY REFLECTIONS LATE REFLECTIONS IN OUT REVERBERATOR IN OUT PRE DELAY IN OUT EQ IN OUT REVERBERATOR IN OUT EQ X FEEDBACK LATE IN EARLY IN OUT MIXER AUDIO IN CONTROL IN OUT DUCKER DRY WET OUT IN1 IN2 INPUT OUTPUT Signal flow through the plug in ...

Page 18: ...structure list in the Preset Browser Browsing Presets Presets Configuration and Management section enables quick navigation and browsing the presets structure Presets Configuration and Management Section PRESET NAME Displays the name of the currently loaded preset PREV NEXT Buttons that allow for linear browsing of presets list depending on currently set filters see sections below INIT Win Ctrl PREV ...

Page 19: ...isting one see sections below BROWSE Expands the Preset Browser panel at the bottom of GUI section The Preset Browser looks as follows Preset Browser One can see three main sections Content Sources from which presets can be read Filters Configuration of presets Filters non active by default Results List of presets from resources that meet criteria set by Filters ...

Page 20: ...t be modified read only User Created by the user during using the plug in and can be freely modified shared with other users etc Choosing any of them will cause narrowing the results to the presets from one resource Preset Filters The plug in enables classification of presets with the use of Categories and Tags system whose aim is to facilitate the process of browsing the content by filtering Preset B...

Page 21: ...chosen in such a way so as to describe the content in the best possible way taking into account the plug in purpose Editing of Categories and Tags in case of Factory content is not possible it is blocked User presets may be described only with Categories and Tags from factory content or alternatively the users may define their additional Tags in order to describe their own presets Results This is a...

Page 22: ...of these columns represent Tags available within each Category Preset Browser Categories Filters Filtering results have a form of a cascade columns from left to right This means that all presets available in the selected resources are filtered as to presence of Tags from the first Category first column from the left next a set of presets being a result of filtering by the first Category is filtere...

Page 23: ...e Tag Grey color means that the Tag in inactive teal blue means that the Tag is active If at least one Tag in a column Category is active then the Filter also becomes active For example if the first column represents Category 1 Category with a set of the following Tags Tag 1 1 Tag 1 2 Tag 1 3 clicking the Tag 1 1 Tag will activate the Category Filter Category 1 and narrow down a list of presets to...

Page 24: ...resets Filtering with the Use of Categories Tags Clicking the left arrow for the Category located on the far left does not change anything The same is true for the Category located far to the right and right arrow as the column has no predecessor successor with which it could be replaced Presets Editing Edit Mode An active Edit Mode in Preset Browser changes its function enables the change of pres...

Page 25: ... The section is used not as a filter but as an editor of Categories and Tags of chosen presets 2 The role of the Results section is to choose presets for edition edition is possible only for user presets 3 At the bottom of the screen there are Delete Export and Import buttons used respectively to delete or export selected User presets as well as to import a set of presets to the User resources 4 Th...

Page 26: ...rom the last chosen preset to the item clicked together with Shift key Tags Edition Change of Tags status in Presets Tag buttons work in toggle mode similarly as in case of filtering Clicking them you can respectively set Tag or erase them from chosen presets Filters tags Choosing a greater number of presets in which the tags were already defined enables their re edition Consequently in case when a ...

Page 27: ...ns Notification about Changes in Tags Status in Chosen Presets Elements Tag buttons highlighted with pale teal blue colour meaning different values of a particular Tag buttons for the highlighted pre sets work in a three state system erasing the Tag grey colour setting of the Tag intensive teal blue colour or no changes pale teal blue for all selected items Changes introduced during edition do not ...

Page 28: ...Delete button at the bottom left corner It can be used to delete the selected presets Presets Export and Import The use of Import or Export buttons at the bottom part of the Preset Browser enables a proper import of presets package exported before or export to the presets package the presets selected in the Results section Export and Importare possible only for presets from User resources ...

Page 29: ... Preset Browser with an active Edit Mode Saving the Settings as Preset Additionally at the bottom there will be a textbox into which you should enter a name of a newly created preset and then confirm it by clicking Save or cancel by clicking Cancel As the Preset Browser is in the Edit Mode before confirmation of the newly created setting as preset we can straightaway categorize a particular settin...

Page 30: ...ecking the name and current value of a parameter Checking if the parameter is attributed to MIDI CC controller and if it is to which number Linking the parameter to MIDI CC controller Clicking the arrow in any area of the menu expands it and displays all available options Next right click on the parameter or left click outside the menu area closes it automatically ...

Page 31: ...a few steps 1 Right click the parameter which you want to attribute to physical MIDI controller in order to expand the context menu 2 Click arrow at the bottom in order to expand the context menu Expanded Context Menu 3 Click the Learn button to put the plug in into a pending state until you move any MIDI CC controller 4 Click OK to save the change or click the Cancel button to restore the previou...

Page 32: ...Clear button 8 Confi rm with OK button Plug in s current settings Current settings are relevant to a specific instance of a plug They are initialized with the Default settings when the plug in is loaded see the next chapter At the bottom of UI there is a status bar that enables the change of Current settings Current Settings in a Status Bar From left to right there are The setting of Current proce...

Page 33: ...d for Real time or Offline modes In a case of Repeater the quality setting doesn t affect the delay loop but audio clipper only ProcessingPathQualitySettings We can choose from four available grades for each mode Saving Loading the MIDI CC Map This item enables to save current parameters of MIDI CC codes as MIDI Map in a file or to load them Saving Loading the MIDI CC Map ...

Page 34: ...ted a Default settings are used for initialization of the Current settings Default settings are stored within a configuration file of the plug in This file is updated at the moment of unloading any of active plug in instances from the host application Use the Options button on GUI to open the panel Options button The Options panel operates as an accordion where you can click a specific section to ...

Page 35: ...ssing Path Quality Processing Quality Choice Section In this section you can configure a default quality of the processing path for the Real time mode and the Offline mode Default MIDI CC Map Default MIDI Map Choice Section This section allows for setting of a path to a file with a default MIDI Map that was prepared before Clicking MIDI CC Map check box activates load of MIDI Map and the possibili...

Page 36: ...rmation dialog option If you do a change to any of the plug in s parameters after you load a preset or started with initial parameter setting and you ll try to load another preset using Prev Next buttons The plug in will try prevent against unintentional losing the changes you ve made and will show a dialog confirmation window This checkbox allows to choose whether this dialog will be shown or not...

Page 37: ...egories and Tags 21 Results 21 Presets Filtering 22 Basic Actions on Filters 23 Reordering Categories 24 Presets Editing Edit Mode 24 Selection of Presets for Editing 26 Tags Edition 26 Change of Tags status in Presets 26 Presets Names Editing 28 Deleting Presets 28 Presets Export and Import 28 Saving the current settings as Preset 29 Configuration 30 Parameter settings 30 MIDI Learn 31 MIDI Unlin...

Reviews: