background image


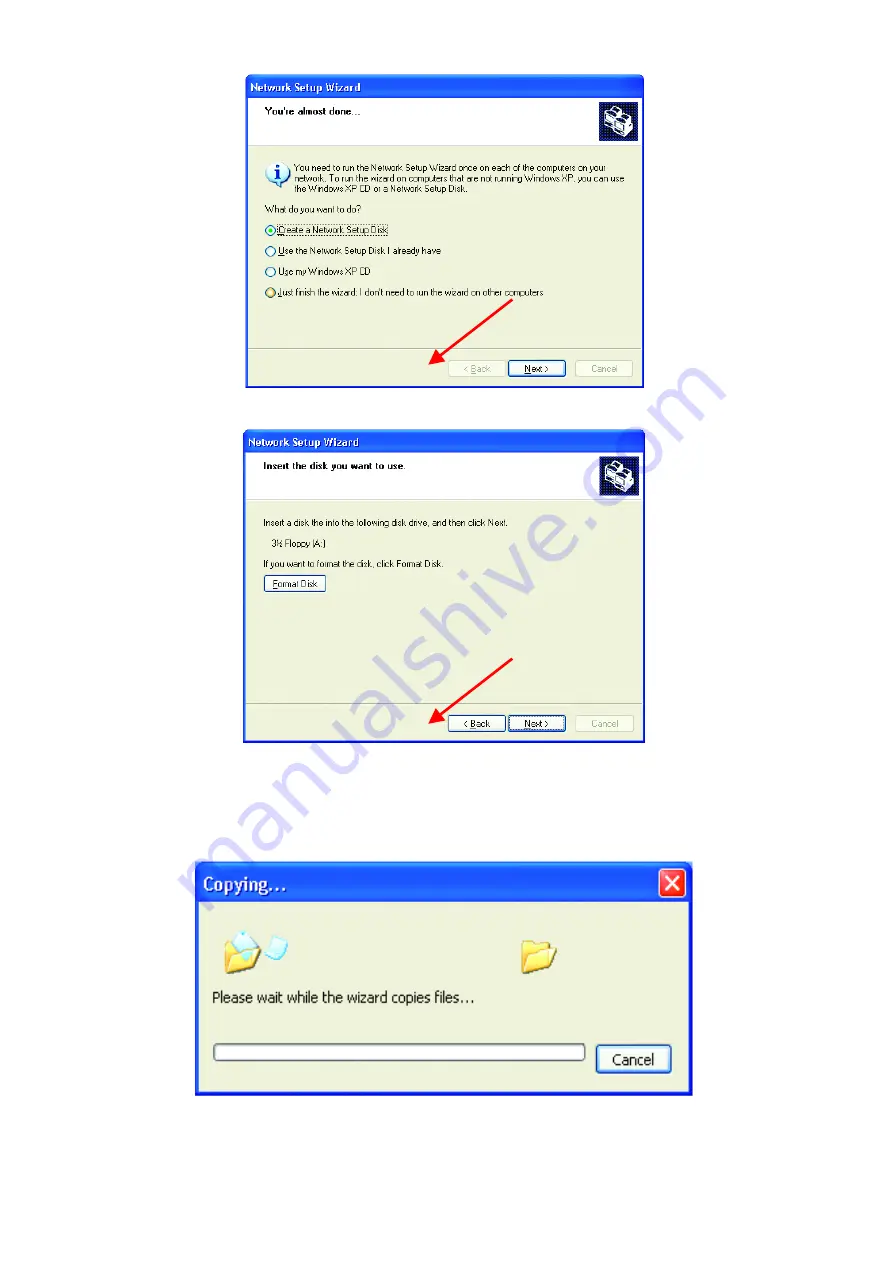
In the window below, select the best option.  In this example, 

“Create a Network Setup Disk”

 has

been selected.  You will run this disk on each of the computers on your network.  

Click Next

.


Insert a disk into the Floppy Disk Drive, in this case drive 

“A:” 

Format the disk if you wish, and 

Click

Next.

Networking Basics


Please wait while the wizard copies the files.


Please read the information under 

Here’s how 

in the screen below.  After you complete the 

Network

Setup Wizard

 you will use the 

Network Setup Disk 

to run the 

Network Setup Wizard

 once on each

of the computers on your network.  To continue 

Click Next

.

Summary of Contents for WUS-B12

Page 1: ...WUS B12 2 4 GHz Wireless USB Adapter Manual Rev 042003 Building Networks for People ...

Page 2: ...ction 4 Wireless Basics 6 Getting Started 8 Installation 14 Using the Configuration Utility for Windows 2000 98 or ME 24 Using the Configuration Utility for Windows XP 28 Networking Basics 36 Troubleshooting 59 Technical Specifications 62 ...

Page 3: ...items are missing please contact your reseller System Requirements A laptop computer with an available USB port Windows XP Windows 2000 Windows ME or Windows 98 SE At least 32 MB of memory and a 300 MHz processor or higher An 802 11b Access Point e g WAP B11 for Infrastructure Mode or another 802 11b wireless adapter e g WCB B13 for Ad Hoc mode ...

Page 4: ... 2000 Windows ME and Windows 98SE in either Ad Hoc mode without an Access Point or Infrastructure mode with an Access Point This manual provides a quick introduction to wireless technology and its application as it relates to networking Take a moment to read through this manual and get acquainted with wireless technology Product Features z Compatible with IEEE 802 11b high rate standard to provide...

Page 5: ...LEDs POWER The LED lights steady to indicate when power on LINK The LED lights steady to indicate a proper connection to the network POWER LINK ...

Page 6: ...real time information can significantly improve worker efficiency Low Implementation Costs WLANs are easy to set up manage change and relocate Networks that frequently change both physically and logically can benefit from WLANs ease of implementation WLANs can operate in locations where installation of wiring may be impractical Furthermore IEEE standardization mandates interoperability of all WLAN...

Page 7: ...Try to position Access Points and computers with wireless adapters so that the signal passes through drywall or open doorways and not other materials 4 Make sure that the antenna is positioned for best reception by using the software signal strength tools included with your product 5 Keep your product away at least 3 6 feet or 1 2 meters from electrical devices or appliances that generate extreme ...

Page 8: ...o share files printers and Internet access using a DHCP capable Residential Gateway Router or if you want to connect to an Ethernet network that uses Dynamic DHCP IP addresses then follow the instructions on the next page When it is complete your network may look similar to this 1 A Home Internet Network with A Residential Gateway Router continued Requirements A Residential Gateway Router connecte...

Page 9: ... IPs can also follow these instructions If you have two or more computers laptops or desktops and want to share files printers and Internet access using multiple IP addresses that you have purchased from your Internet Service Provider or you want to connect to an Ethernet network that uses Static IP Addresses then follow the instructions on the next page When you have completed your network it sho...

Page 10: ...hese steps 1 Install the WUS B12 Wireless USB Adapter into your desktop computers 2 Set the Static IP Address of the wireless adapters Please refer to the Networking Basics section in this manual entitled Assigning an IP Address Note The IP Address for all computers must be in the same IP Address range and the Subnet Mask must be the same for all computers on your network For example If the first ...

Page 11: ......

Page 12: ...ntitled Checking the Installation of the Drivers for the Wireless Adapter 3 Install your Internet Sharing Software 4 If required by the ICS software set the static IP Address for the wireless adapter Please refer to the Networking Basics section in this manual entitled Assigning an IP Address Note The IP Address for all the computers on the network must be in the same IP Address range and the Subn...

Page 13: ...ange Please refer to the Networking Basics section in this manual entitled Checking your IP Address Note By default the wireless adapter is set to obtain a Dynamic IP Address automatically 3 Learn to share printers and files Please refer to the Networking Basics section in this manual entitled Adding and Sharing Printers in Windows XP ...

Page 14: ... be installed for users using the XP operating system System Requirements A laptop computer with an available USB port At least a 300 MHz processor and 32 MB of memory USB Controller properly installed and working An 802 11b Access Point for Infrastructure Mode or another 802 11b wireless adapter for Ad Hoc mode 1 Installing the WUS B12 2 Installing the Driver Installing the software involves two ...

Page 15: ...ppear Click on Next to proceed with the installation Insert the Driver CD into the CD ROM drive The Install Hardware Device Drivers window will appear Click Next The installation will continue with the following screen Click Next Click Next Click Next Click Next ...

Page 16: ...16 The following screen will appear The installation will continue with the following screen Click Next The installation will continue with the following screen Click Yes Click Next ...

Page 17: ...lick Finish 3 Installing the Configuration Utility Look for the file named Setup exe on the installation CD Rom Double click on it to start the installation for the configuration utility z When this screen appears click Next Click Next Setup exe Click Finish ...

Page 18: ...8 z To install to the folder C Program Files NonBrand click Next Otherwise click on Browse to choose an alternate location z Click Next to proceed with the utility installation Click Next Or Click Browse ...

Page 19: ... the one below z After the Utility has been successfully installed InstallShield Wizard will prompt you to restart your computer Select Yes I want to restart my computer now and click on Finish This completes the Utility installation Click Next ...

Page 20: ... Uninstalling the Configuration Utility To uninstall the configuration utility simply click Uninstall under ProgramsÆWLAN MonitorÆUninstall z To uninstall the driver right click on My Computer Click Finish ...

Page 21: ...z Left click on Properties to bring up the System Properties screen z Click on the Hardware tab ...

Page 22: ...22 z Click on Device Manager z Click on Network adapters ...

Page 23: ...z Right click on the Wireless LAN Card RTL8180 icon z Click on Uninstall You will then receive a Confirm Device Removal screen Click OK to complete the uninstallation ...

Page 24: ...figuration Utility program In this section we will describe the uses for each tab in the Configuration Utility window To access WLAN Monitor once it has been installed just right click on the WLAN Monitor icon in the taskbar and then click on Wireless Network Under the Configuration Tab you will find a list of access points to which you may add or change connections Configuration Tab Using the Con...

Page 25: ... network Click New to rename the WLAN and reset its properties You will see the Wireless Network Properties screen as displayed previously when you click New This is also the same screen that will appear when you click Properties on the right side of the Configuration Tab screen Click Remove to remove the connection On the right side of the screen you may click Move Up to move the selected WLAN up...

Page 26: ...settings and exit the GUI Using the Configuration Utility for Windows 2000 98 or ME continued Under the Options Tab general settings and advanced settings are shown Options Tab Check Auto launch when Windows starts up so that WLAN Monitor automatically launches when Windows starts up Part of the GUI for WLAN Monitor is a mini status dialog box that appears when you left click on the WLAN Monitor i...

Page 27: ...SB adapter You may select the Current Chanel 1 2 or 3 and Power Save Mode Disable Max Save Fast Save You may enter the Fragmentation Threshold and RTS Threshold Using the Configuration Utility for Windows 2000 98 or ME continued The About Tab gives the utility version of WLAN Monitor About Tab ...

Page 28: ...e the utility built into Windows XP by unchecking the box below Using the Configuration Utility for Windows XP continued If you leave the Use Windows to configure my wireless network settings box checked you will use the Windows XP utility for wireless devices The following demonstrates how to manage wireless network connections with the Windows XP built in utility Creating a connection z Right cl...

Page 29: ...Using the Configuration Utility for Windows XP continued z Left click on Properties to obtain the Network Connections screen ...

Page 30: ...indows XP continued z Right click on the Wireless Network Connection icon to produce another drop down menu with item Properties Using the Configuration Utility for Windows XP continued z Left click on Properties to bring up the screen below ...

Page 31: ...Using the Configuration Utility for Windows XP continued z Click on the Wireless Networks tab ...

Page 32: ...32 Using the Configuration Utility for Windows XP continued z Click on the Access Point under Available Networks with which you wish to establish a connection ...

Page 33: ...a connection with the chosen access point D Link A screen such as the following called Wireless Network Properties will then appear Using the Configuration Utility for Windows XP continued z Enter the appropriate settings and click OK ...

Page 34: ...ndows XP continued z The access point D Link has been added to the network under Preferred networks Using the Configuration Utility for Windows XP continued z The Network Connections window now shows the wireless network connection as Enabled ...

Page 35: ......

Page 36: ...Note Please refer to websites such as http www homenethelp com and http www microsoft com windows2000 for information about networking computers using Windows 2000 ME or 98 Go to START CONTROL PANEL NETWORK CONNECTIONS Select Set up a home or small office network z When this screen appears Click Next Networking Basics Please follow all the instructions in this window ...

Page 37: ...uter connects to the Internet through a gateway router select the second option as shown and Click Next Networking Basics Enter a Computer description and a Computer name optional and Click Next Enter a Workgroup name and Click Next All computers on your network should have the same Workgroup name ...

Page 38: ...etworking Basics Please wait while the wizard applies the changes When the changes are complete Click Next Please wait while the wizard configures the computer This may take a few minutes Networking Basics ...

Page 39: ...to the Floppy Disk Drive in this case drive A Format the disk if you wish and Click Next Networking Basics Please wait while the wizard copies the files Please read the information under Here s how in the screen below After you complete the Network Setup Wizard you will use the Network Setup Disk to run the Network Setup Wizard once on each of the computers on your network To continue Click Next ...

Page 40: ...ll take effect when you restart the computer Click Yes to restart the computer You have completed configuring this computer Next you will need to run the Network Setup Disk on all the other computers on your network After running the Network Setup Disk on all your computers your new wireless network will be ready to use Networking Basics ...

Page 41: ...ick on My Computer Select Properties and Click Select the Computer Name Tab in the System Properties window You may enter a Computer description if you wish this field is optional To rename the computer and join a domain Click Change In this window enter the Computer name Select Workgroup and enter the name of the Workgroup All computers on your network must have the same Workgroup name Click OK ...

Page 42: ... the Wireless Adapter Networking Basics Checking the Installation of the Drivers for the Wireless Adapter Go to Start Right click on My Computer Click Properties Select the Hardware Tab Click Device Manager Click on Network Adapters Right click on Wireless LAN Card Select Properties to check that the drivers are installed properly ...

Page 43: ... check that the device is working properly Click OK Double click on the Networking Icon in the taskbar In this window you will see the Signal Strength and the Status of the WUS B12 In this case the Status and the Signal Strength are fine For more information Click Properties Click Configure to access more information ...

Page 44: ...e Turbo Mode setting Disabled in the example here must be the same on all the stations in your network Click on the Security Tab If Enable Security is selected on one station on your network it must be selected on all stations Likewise if Enable Security is deselected on one station it must be deselected on all stations Check to see that your IP Address and your Subnet Mask are in the correct rang...

Reviews: