background image

5

Check


Launch  D-Link

®

  Media Server

Installing the D-Link

®

 Media Server 

Software (continued)

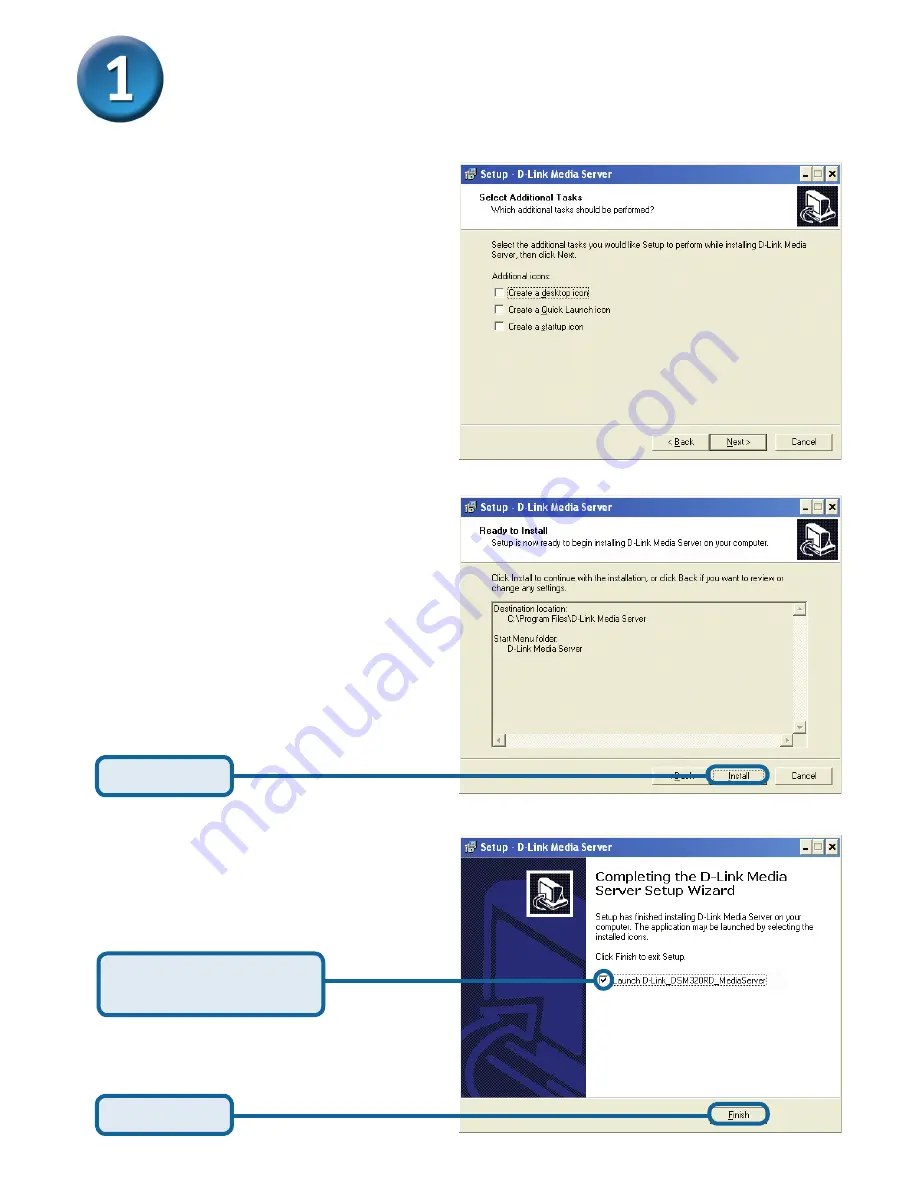
The  necessary  software  will  be 

copied to the specified locations 

on your  computer.

Click


Install

Click


Finish

Select the icons you want created.
Select 

Create  a  desktop


icon


to  access  the  program  from  your 

desktop.
Select 

Create  a  Quick  Launch


icon

 to access the program from 

your taskbar.
Select 

Create  a  startup


icon

  so 

the program launches on startup.

Summary of Contents for MediaLounge DSM-320RD

Page 1: ...Ver Version 1 3 ...

Page 2: ...s or Ethernet network 2006 D Link Systems Inc All rights reserved Trademarks or registered trademarks are the property of their respective holders Software and specifications subject to change without notice DSM 320RD 01102006 DSM 320RD Wireless Media Player with DVD and Card Reader Installation CD Contains D Link Media Server Software Quick Installation Guide and Manual Antenna Ethernet CAT 5 UTP...

Page 3: ...D Follow the steps in this section to install the software Insert the DSM 320RD CD ROM into the CD ROM drive and the following screen will appear The D Link Media Server Setup Wizard will appear Click Next Click on Install D Link Media Server If the screen on the right does not appear go to My Computer and double click on the CD ROM drive The screen at right will appear ...

Page 4: ...k license agreement screen appears Choose a Destination location or accept the default location This is where the D Link Media Server software will be copied to on your system Click Next Click Next Click Next Choose a start menu folder or accept the default location ...

Page 5: ... copied to the specified locations on your computer Click Install Click Finish Select the icons you want created Select Create a desktop icon to access the program from your desktop Select Create a Quick Launch icon to access the program from your taskbar Select Create a startup icon so the program launches on startup ...

Page 6: ...ect the types of audio video and photo files that you want to share If you checked the Launch D Link Media Server check box the following screens will be displayed The Shared Folders tab is where you select the folders that contain your audio video and photo files Click Add a folder ...

Page 7: ...e D Link Media Server Software continued Repeat the steps until all of the folders containing audio video and photos you want to share have been added Select the folder containing the files you wish to share Click OK ...

Page 8: ... Configuring the D Link Media Server Software continued The Media Files tab will show all your audio video and photo files as well as display important file information Click Close ...

Page 9: ...selected the screen will be tinted blue Composite Video Connector Plug the supplied yellow video cable into the DSM 320RD and the matching opposite end of the cable to your television input S Video Connector Plug the supplied S Video cable into the S Video connector and the opposite end into the S Video connector on your television Component Connectors Match the color coded cables to the matching ...

Page 10: ...DSM 320RD and the matching opposite end of the cable to the audio input of your audio system Note This cable is not supplied Optical Digital Audio Connect an optical audio connector into the DSM 320RD and the matching opposite end of the cable to the audio input of your audio system Note This cable is not supplied Composite Audio Plug the supplied red and white connectors into the color coded matc...

Page 11: ...ed antenna by threading it onto the antenna connector Be sure the antenna is secure and in an upright position Note You may have an Ethernet cable plugged into the unit and have the wireless antenna connected Neither will interfere with the other but only one network can be accessed at a time wired or wireless The network connection type is selected in the Setup Wizard and can be changed by going ...

Page 12: ...12 Connecting the DSM 320RD continued Below is a diagram displaying what your network might look like once all of the connections have been made to the MediaLounge DSM 320RD Wireless Media Player ...

Page 13: ...w Motion 18 Play Pause 19 Fast Forward 20 Previous 21 Rewind 22 Next 23 Stop 24 Zoom 25 Rotate 26 Angle 27 Search 28 Menu 29 Subtitle 30 Title 31 Repeat 32 Language 33 Shuffle 34 A B Video Replay 35 Progressive Interlaced 36 Audio Out 37 Left Right Audio Channel 38 Video Out Using the Remote Control 1 2 3 4 9 7 10 11 12 13 14 17 15 18 19 20 21 22 5 6 8 23 24 25 26 29 32 34 36 38 27 28 30 31 33 35 ...

Page 14: ...ows Connect Now WCN to simplify the wireless setup skip to step 7 on page 17 Click Next to begin the DSM 320RD Setup Wizard The keyboard is used for a variety of functions such as naming your DSM 320RD and performing searches for music photos or video To use the keyboard highlight a character with the arrow buttons on the remote control and press the ENTER button Text can also be entered by using ...

Page 15: ...ault setting Select your network connection type If you are using a wireless n e t w o r k c o n n e c t i o n please select the SSID of the network If selecting Wired skip to Your Current Network Settings on page 15 Click Next to continue Click Next to continue Click Next to continue ...

Page 16: ... at this point Keys can be entered in hex or ASCII format See the User Manual located on the CD ROM for details Your current network settings are displayed and can be changed at this point Please select a Media Server from the list Click Next to continue Click Next to continue Click Next to continue ...

Page 17: ...ment on your home entertainment center From this home screen you can access MY MEDIA DVD MEMORY CARD or ONLINE MEDIA To jump directly to the home screen press the HOME button on the remote control For detailed usage instructions and information on supported file types please refer to the User Manual that is located on the MediaLounge CD ROM Click Done to finish ...

Page 18: ...r PC instead of using the setup wizard you can use Windows Connect Now WCN to configure the wireless settings on your DSM 320RD Note WCN is only available on PCs running Windows XP with Service Pack 2 installed Go to Start All Programs Accessories Communications and click Wireless Network Setup Wizard Click Next to continue ...

Page 19: ...tings using WCN continued Click Next to continue Select the option to add new computers or devices to your existing wireless network Click Next to continue Select the option Use a USB flash drive to save your wireless network settings ...

Page 20: ...ng Your Wireless Settings using WCN continued Plug your flash drive into a USB port on this computer Click Next to continue This screen will appear when the wireless settings have been saved to the USB flash drive ...

Page 21: ... the DSM 320RD Click OK to continue The following screen confirms that your wireless settings have been applied Next remove the USB Flash Drive from your PC and insert it into the USB port on the DSM 320RD which is located on the back panel and is labeled Windows Connect Now Click OK to continue ...

Page 22: ...s Settings using WCN continued Click Next to continue Next remove the USB Flash Drive from the DSM 320RD and insert it back into the USB port on your PC You have Completed Configuring your Wireless Settings using WCN Click Finish ...

Page 23: ...23 Notes ...

Page 24: ...our website or by phone Tech Support for customers within the United States D Link Technical Support over the Telephone 877 453 5465 24 hours a day seven days a week D Link Technical Support over the Internet http support dlink com email support dlink com Tech Support for customers within Canada D Link Technical Support over the Telephone 800 361 5265 Monday to Friday 7 30am to 9 00pm EST D Link T...

Reviews: