background image

-12- 

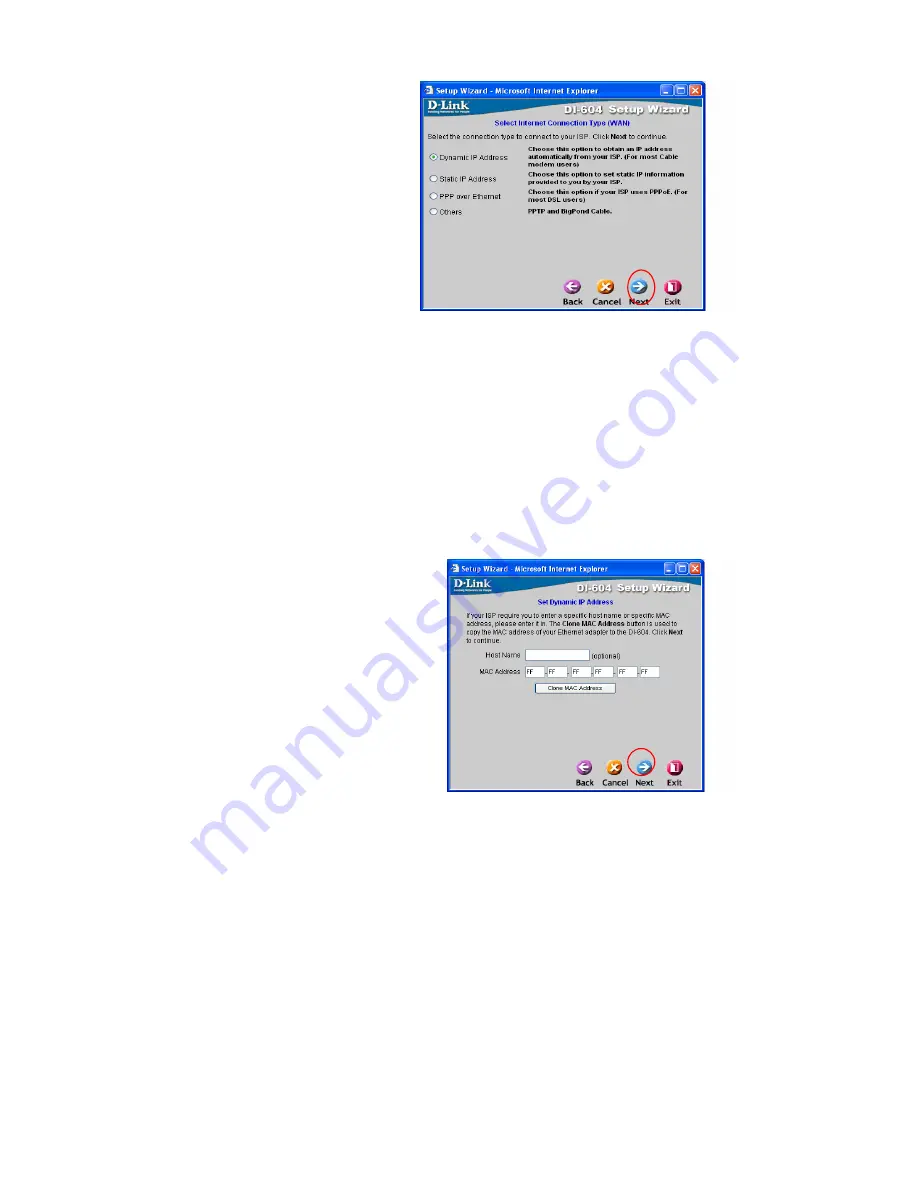
There will be three options to select from. Please select the appropriate 
option that is used by your ISP. 


Dynamic IP Address:


(ex: 

Cable users) Select this 
option to obtain an IP address 
automatically from your ISP.   

Please see Dynamic IP 
Address section. 

Static IP Address:


Select this 

option to manually input the 
IP address that your ISP 
assigned to you.   

Please see 

Static IP Address section. 

PPP over Ethernet (PPPoE)

:  

(ex: DSL users) Select this option if your ISP requires the use of PPPoE to 
connect to their services. 

Please see PPPoE section. 

Others (PPTP and BigPond Cable)

Select this option if your ISP requires 

the use of PPTP to connect to their services or your ISP is BigPond Cable. 

Please see PPTP section, or follow BigPond Cable’s configuration guide. 


Once you have made the appropriate selection, click 

Next


Dynamic IP Address 

If you selected 

Dynamic IP Address

, you will see the following page.     

 
If your ISP requires you to enter a 
specific host name or specific 
MAC address, please enter it in. 
The CLONE MAC Address button 
is used to copy the MAC address 
of your Ethernet adapter to the 
DI-604 WAN interface.   
 
Click 

Next 


Summary of Contents for Express EtherNetwork DI-604

Page 1: ...Express EtherNetwork TM DI 604 4 Port Ethernet Broadband Router Manual Rev 040903 Building Networks for People ...

Page 2: ...scription 7 Reset 8 Getting Started 9 Configuring the DI 604 10 Using the Configuration Wizard 11 Using the Configuration Menu 17 Troubleshooting 49 Networking Basics 55 Technical Specifications 82 Contacting Technical Support 84 Warranty and Registration 85 ...

Page 3: ...ect the D Link Express EtherNetwork DI 604 to a high speed Internet connection and 4 Ethernet PC connections This manual provides a quick introduction to Broadband Router Technology Firewalls and Local Area Networking Please take a moment to read through this manual and get acquainted these various technologies Features and Benefits Broadband Modem and IP Sharing Connects multiple computers to a B...

Page 4: ...xpose WWW FTP and other services on your LAN to be accessible to Internet users Special Application Supported Special applications requiring multiple connections like Internet gaming video conferencing Internet telephony and so on The DI 604 can sense the application type and open a multi port tunnel for it DMZ Host Supported Allows a networked computer to be fully exposed to the Internet This fun...

Page 5: ...porate LAN s and Intranets A firewall watches all of the information moving to and from your network and analyzes each piece of data Each piece of data is checked against a set of criteria that the administrator configures If any data does not meet the criteria that data is blocked and discarded If the data meets the criteria the data is passed through This method is called packet filtering A fire...

Page 6: ...t for a specific piece of data A switch minimizes network traffic overhead and speeds up the communication over a network Networks take some time in order to plan and implement correctly There are many ways to configure your network You may want to take some time to determine the best network set up for your needs Package Contents DI 604 Ethernet Broadband Router Power Adapter Ethernet Cable Quick...

Page 7: ... indicator will light Green WAN WAN status indicator will light Green when there is good physical WAN connection LAN Link Act Link status indicators light Green The LED flickers when the corresponding port is sending or receiving data Power WAN LAN ...

Page 8: ...5 Ethernet RJ 45 cable This is where you will connect to your Cable or DSL modem Power Connect one end of your included power adapter to the power port and the other end into your power outlet Reset To reset the system settings to factory defaults please follow these steps 1 Leave the device powered on do not disconnect the power 2 Press the reset button and hold use a paper clip 3 Keep the button...

Page 9: ...f your computers The default IP address of the DI 604 is 192 168 0 1 and the default subnet mask is 255 255 255 0 These addresses can be changed as needed but the default values are used in this manual If the TCP IP environment of your computer has not yet been configured you can refer to Configuring Your PCs to Connect to the DI 604 to configure it For example 1 Configure your computer IP as 192 ...

Page 10: ... version 4 and higher with Java Script enabled Start up and Log in Activate your web browser and type in the IP address of the DI 604 into the Location for Netscape or Address for IE field and press Enter The default IP address of the DI 604 is 192 168 0 1 For example http 192 168 0 1 After the connection is established the logon screen will pop up To log in as an administrator enter the username ...

Page 11: ...ep to quickly configure the DI 604 Click Next It is recommended that you change the admin password for security purposes Enter in your new password Enter it in a second time for verification Click Next Click on the drop down box arrow and select the appropriate time zone for your location Click Next ...

Page 12: ...requires the use of PPPoE to connect to their services Please see PPPoE section Others PPTP and BigPond Cable Select this option if your ISP requires the use of PPTP to connect to their services or your ISP is BigPond Cable Please see PPTP section or follow BigPond Cable s configuration guide Once you have made the appropriate selection click Next Dynamic IP Address If you selected Dynamic IP Addr...

Page 13: ...ddress WAN Subnet Mask WAN Gateway and Primary DNS Click Next PPPoE If you select PPP over Ethernet PPPoE you will see the following page Enter in the username and password provided to you by your ISP Enter in the Service Name if your ISP uses a Service Name for the PPPoE connection Click Next NOTE Please be sure to remove any existing PPPoE client software installed on your computers ...

Page 14: ...e provided to you by your ISP If you select PPTP you will see the following page Enter in the IP address information provided to you by your ISP You will need to enter in My IP Address My Subnet Mask Server IP Address and Primary DNS Enter in the Account and password provided to you by your ISP Click Next ...

Page 15: ...BigPond Cable you will see the following page Enter in the Account and password provided to you by your ISP Click Next At this point the Setup Wizard has completed Click Restart to save the settings and reboot the DI 604 ...

Page 16: ... 16 The DI 604 will save the changes and reboot Click Continue to close out the Setup Wizard screen Your setup of the DI 604 is now complete You should be able to access the Internet ...

Page 17: ...to your ISP You will be connected to your ISP Internet Service Provider and have Internet access within minutes WAN WAN is short for Wide Area Network The WAN settings can be referred to as the Public settings All IP information in the WAN settings are public IP addresses which are accessible on the Internet The WAN settings consist of three options Dynamic IP Address Static IP Address PPPoE and O...

Page 18: ...field is optional but may be required by some ISPs The host name is the device name of the Broadband Router MAC Address The default MAC address is set to the WAN s physical interface MAC address on the Broadband Router You can use the Clone MAC Address button to copy the MAC address of the Ethernet Card installed by your ISP and replace the WAN MAC address with this MAC address It is not recommend...

Page 19: ...ed in the fields must be in the appropriate IP form which are four IP octets separated by a dot x x x x The Router will not accept the IP address if it is not in this format IP Address Public IP address provided by your ISP Subnet Mask Subnet mask provided by your ISP ISP Gateway Address Public IP address of your ISP that you are connecting to Primary DNS Address Primary DNS Domain Name Server IP ...

Page 20: ...e an IP address automatically from your ISP Static PPPoE PPPoE connection where you have an assigned static IP address User Name Your PPPoE username provided by your ISP Password Your PPPoE password provided by your ISP Retype Password Re enter PPPoE password Service Name Enter the service name provided by your ISP optional IP Address This option is only available for Static PPPoE Enter in the sta...

Page 21: ...ve for longer than the defined Maximum Idle Time then the connection will be dropped Either set this to zero or enable Auto reconnect to disable this feature MTU MTU stands for Maximum Transmission Unit For PPPoE connections you may need to change the MTU settings in order to work correctly with your ISP Auto Reconnect If enabled the Broadband Router will automatically connect to your ISP after yo...

Page 22: ...P Address Primary DNS the Account and password provided to you by your ISP My IP Address IP address provided by your ISP My Subnet Mask Subnet mask provided by your ISP Server IP Address Server IP Address provided by your ISP PPTP Account Your PPTP username provided by your ISP PPTP password Your PPTP password provided by your ISP ...

Page 23: ... define a maximum period of time for which the Internet connection is maintained during inactivity If the connection is inactive for longer than the defined Maximum Idle Time then the connection will be dropped Either set this to zero or enable Auto reconnect to disable this feature Auto Reconnect If enabled the Broadband Router will automatically connect to your ISP after your system is restarted...

Page 24: ...our ISP Password Password provided to you by your ISP Retype Password Re enter BigPond Cable password Login Server IP Login Server IP provided to you by your ISP Optional Auto Reconnect If enabled the Broadband Router will automatically connect to your ISP after your system is restarted or if the connection is dropped ...

Page 25: ...e settings You may change the LAN IP address if needed The LAN IP address is private to your internal network and cannot be seen on the Internet IP Address The IP address of the LAN interface The default IP address is 192 168 0 1 Subnet Mask The subnet mask of the LAN interface The default subnet mask is 255 255 255 0 Local Domain Name This field is optional Enter in the your local domain name ...

Page 26: ...atically When you turn your computers on they will automatically load the proper TCP IP settings provided by the DI 604 The DHCP Server will automatically allocate an unused IP address from the IP address pool to the requesting computer You must specify the starting and ending address of the IP address pool Starting IP Address The starting IP address for the DHCP server s IP assignment Ending IP A...

Page 27: ...ct your LAN network so all computers networked with the DI 604 are invisible to the outside world If you wish you can make some of the LAN computers accessible from the Internet by enabling Virtual Server Depending on the requested service the DI 604 redirects the external service request to the appropriate server within the LAN network The DI 604 is also capable of port redirection meaning incomi...

Page 28: ...umber on the WAN side that will be used to access the virtual service Schedule The schedule of time when the virtual service will be enabled The schedule may be set to Always which will allow the particular service to always be enabled If it is set to Time select the time frame for the service to be enabled If the system time is outside of the scheduled time the service will we disabled Example 1 ...

Page 29: ...168 0 30 FTP uses port 21 TCP Name FTP Server Private IP 192 168 0 30 Protocol Type TCP Private Port 21 Public Port 2100 Schedule From 01 00AM to 01 00AM Sat to Sun All Internet users who want to access this FTP Server must connect to it from port 2100 This is an example of port redirection and can be useful in cases where there are many of the same servers on the LAN network ADVANCED APPLICATION ...

Page 30: ...em for inbound traffic The DI 604 provides some predefined applications in the table on the bottom of the web page Select the application you want to use and enable it Note Only one PC can use each Special Application tunnel Trigger Name This is the name referencing the special application Trigger Port This is the port used to trigger the application It can be either a single port or a range of po...

Page 31: ...rs from accessing restricted web sites IP Filters Use IP Filters to deny LAN IP addresses from accessing the Internet You can deny specific port numbers or all ports for the specific IP address IP The IP address of the LAN computer that will be denied access to the Internet Port The single port or port range that will be denied access to the Internet Schedule This is the schedule of time when the ...

Page 32: ...AC Filters to allow or deny LAN computers by their MAC addresses from accessing the Internet You can either manually add a MAC address or select the MAC address from the list of clients that are currently connected to the Broadband Router ...

Page 33: ...eny LAN computers from accessing specific web sites by its URL A URL is a specially formatted text string that defines a location on the Internet If any part of the URL contains the blocked word the site will not be accessible and the web page will not display ...

Page 34: ...ing is used to allow or deny LAN computers from accessing specific domains on the Internet Domain blocking will deny all requests to a specific domain such as http and ftp It can also allow computers to access specific sites and deny all other sites ...

Page 35: ...ss rules for the DI 604 When virtual services are created and enabled it will also display in Firewall Rules Firewall Rules contains all network firewall rules pertaining to IP Internet Protocol In the Firewall Rules List at the bottom of the screen the priorities of the rules are from top the highest priority to the bottom the lowest priority Note The DI 604 MAC Address filtering rules have prece...

Page 36: ...ss is used only for the duration of that specific connection With the DI 604 you can setup your DDNS service and the DI 604 will automatically update your DDNS server every time it receives a different IP address Provider Select from the list of DDNS servers available Host name Enter in your DDNS account host name Username E mail Enter in your DDNS account username Password Key Enter in your DDNS ...

Page 37: ...o unrestricted Internet access It allows a computer to be exposed to the Internet This feature is useful for gaming purposes Enter the IP address of the internal computer that will be the DMZ host Adding a client to the DMZ Demilitarized Zone may expose your local network to a variety of security risks so only use this option as a last resort ...

Page 38: ... only access User can only view the settings but cannot make any changes Remote Management Remote Management allows the DI 604 to be configured from the Internet by a web browser A username and password is still required to access the Web Management interface In general only a member of your network can browse the built in web pages to perform Administrator tasks This feature enables you to perfor...

Page 39: ...ty for your network If you elect to enable Remote Management enter the IP Address of your remote location Port The port number used to access the Broadband Router Select from the pull down menu Example http x x x x 8080 where x x x x is the WAN IP address of the Broadband Router and 8080 is the port used for the Web Management interface TOOLS TIME Time The system time is the time used by the DI 60...

Page 40: ...e current system settings can be saved as a file onto the local hard drive The saved file or any other saved setting file can be loaded back on the Broadband Router To reload a system settings file click on Browse to browse the local hard drive and locate the system file to be used You may also reset the Broadband Router back to factory settings by clicking on Restore ...

Page 41: ... can upgrade the firmware of the Broadband Router at this page Make sure the firmware you want to use is on the local hard drive of the computer Click on Browse to browse the local hard drive and locate the firmware to be used for the update ...

Page 42: ...uter Ping Test This useful diagnostic utility can be used to check if a computer is on the Internet It sends ping packets and listens for replies from the specific host Restart Device If for any reason the Broadband Router is not responding correctly you may want to restart the Broadband Router ...

Page 43: ...ork SPI Mode When this feature is enabled the router will record the packet information pass through the router like IP address port address ACK SEQ number and so on And the router will check every incoming packet to detect if this packet is valid UPnP UPnP is short for Universal Plug and Play which is a networking architecture that provides compatibility among networking equipment software and pe...

Page 44: ... WAN connection is set up for Dynamic IP address there will be a Release button and Renew button Use Release to disconnect from your ISP and use Renew to connect to your ISP If your WAN connection is set up for PPPoE there will be a Connect button and Disconnect button Use Disconnect to drop the PPPoE connection and use Connect to establish the PPPoE connection ...

Page 45: ...dress Domain Name Server WAN Public DNS IP Address Wan Status WAN Connection Status LAN IP Address LAN Private IP Address of the DI 604 Subnet Mask LAN Private Subnet Mask of the DI 604 Firmware version Displays the current firmware version WAN MAC Address Displays the WAN port MAC hardware address LAN MAC Address Displays the LAN port MAC hardware address STATUS LOG ...

Page 46: ...s rebooted the logs are automatically cleared You may save the log files under Log Setting First Page The first page of the log Last Page The last page of the log Previous Moves back one log page Next Moves forward one log page Clear Clears the logs completely Log Settings Brings up the page to configure the logs ...

Page 47: ...ess The address of the SMTP server that will be used to send the logs Email Address The email address the logs will be sent to Click on Email Log Now to send the email STATUS STATS Traffic Statistics The Broadband Router keeps statistic of traffic that passes through it You are able to view the amount of packets that passes through the Router on both the WAN port and the LAN port The traffic count...

Page 48: ... 48 device is rebooted ...

Page 49: ...P address from the gateway Click the Start button select Settings and select Control Panel Double click the Network icon In the configuration tab select the TCP IP protocol line that has been associated with your network card adapter If there is no TCP IP line listed you will need to install TCP IP now Click the Properties button ...

Page 50: ... IP configuration MAC address and default gateway WINIPCFG for Windows 95 98 Inside the windows 95 98 Start button select Run and type winipcfg In the example below this computer has an IP address of 192 168 0 100 and the default gateway is 192 168 0 1 The default gateway should be the network device IP address The MAC address in windows 95 98 is called the Adapter Address NOTE You can also type w...

Page 51: ... 51 IPCONFIG for Windows 2000 NT XP At the command prompt type IPCONFIG and press Enter Your PC IP information will be displayed as shown below ...

Page 52: ...ng DHCP Dynamic Host Configuration Protocol technology If you are using a DHCP capable Gateway Router you will not need to assign Static IP Addresses If you are not using a DHCP capable Gateway Router or you need to assign a Static IP Address please follow these instructions Go to START Double click on Control Panel Double click on Network Connections ...

Page 53: ... 53 Right click on Local Area Connections Double click Properties Highlight Internet Protocol TCP IP Click Properties ...

Page 54: ... 168 0 2 the other computers should have IP Addresses that are sequential like 192 168 0 3 and 192 168 0 4 The subnet mask must be the same for all the computers on the network Input your DNS server addresses The DNS server information will be provided by your ISP Internet Service Provider Click OK You have completed the assignment of a Static IP Address You do not need to assign a Static IP Addre...

Page 55: ...or work using Microsoft Windows XP Note Please refer to websites such as http www homenethelp com and http www microsoft com windows2000 for information about networking computers using Windows 2000 ME or 98 Go to Start Control Panel Network Connections Select Set up a home or small office network When this screen appears Click Next ...

Page 56: ...llow all the instructions in this window Click Next In the following window select the best description of your computer If your computer connects to the Internet through a gateway router select the second option as shown Click Next ...

Page 57: ... 57 Networking Basics Enter a Computer description and a Computer name optional Click Next Enter a Workgroup name All computers on your network should have the same Workgroup name Click Next ...

Page 58: ...rking Basics Please wait while the Network Setup Wizard applies the changes When the changes are complete click Next Please wait while the Network Setup Wizard configures the computer This may take a few minutes ...

Page 59: ... best option In this example Create a Network Setup Disk has been selected You will run this disk on each of the computers on your network Click Next Insert a disk into the Floppy Disk Drive in this case drive A Format the disk if you wish and click Next ...

Page 60: ...d copies the files Please read the information under Here s how in the screen below After you complete the Network Setup Wizard you will use the Network Setup Disk to run the Network Setup Wizard once on each of the computers on your network To continue click Next ...

Page 61: ...ettings will take effect when you restart the computer Click Yes to restart the computer You have completed configuring this computer Next you will need to run the Network Setup Disk on all the other computers on your network After running the Network Setup Disk on all your computers your new wireless network will be ready to use ...

Page 62: ...indows XP Click Start in the lower left corner of the screen Right click on My Computer Select Properties and click Select the Computer Name Tab in the System Properties window You may enter a Computer description if you wish this field is optional To rename the computer and join a domain Click Change ...

Page 63: ...g the IP Address in Windows XP 2000 Go to Start All Programs Accessories Command Prompt In this window enter the Computer name Select Workgroup and enter the name of the Workgroup All computers on your network must have the same Workgroup name Click OK ...

Page 64: ...dress in Windows XP 2000 Type Command Click OK Checking the IP Address in Windows XP 2000 Type ipconfig all at the prompt Click Enter All the configuration settings are displayed as shown below D Link AirPlus DWL 650 Wireless Cardbus Adapter ...

Page 65: ...a new IP Address Assigning a Static IP Address Note Residential Gateways Broadband Routers will automatically assign IP Addresses to the computers on the network using DHCP Dynamic Host Configuration Protocol technology If you are using a DHCP capable Gateway Router you will not need to assign Static IP Addresses If you are not using a DHCP capable Gateway Router or you need to assign a Static IP ...

Page 66: ... 66 Networking Basics Assigning a Static IP Address Double click on Network Connections Right click on Local Area Connections Double click Properties ...

Page 67: ...192 168 0 4 The subnet mask must be the same for all the computers on the network Input your DNS server addresses Note If you are entering a DNS server you must enter the IP Address of the Default Gateway The DNS server information will be provided by your ISP Internet Service Provider ghlight Internet rotocol TCP IP Select Use the following IP address in the Internet Protocol TCP IP Properties wi...

Page 68: ...network printer a printer connected to your network through a Gateway Router use the Add Printer Wizard you can find the directions below First make sure that you have run the Network Setup Wizard on all of the computers on your network We will show you 3 ways to use the Add Printer Wizard 1 Adding a local printer 2 Sharing an network printer 3 Sharing an LPR printer Adding a local printer A print...

Page 69: ... 69 Networking Basics Adding a local printer Go to Start Printers and Faxes Click on Add a printer ...

Page 70: ... to this computer Deselect Automatically detect and install my Plug and Play printer if it has been selected Click Next Select Use the following port From the pull down menu select the correct port for your printer Most computers use the LPT1 port as shown in the illustration Click Next ...

Page 71: ...ick Next If the correct driver is not displayed insert the CD or floppy disk that came with your printer and click Have Disk At this screen you can change the name of the printer optional Select Yes to print a test page A successful printing will confirm that you have chosen the correct driver Click Next ...

Page 72: ... 72 Networking Basics Adding a local printer Click Finish This screen gives you information about your printer When the test page has printed Click OK ...

Page 73: ...ork you can run the Add Printer Wizard on all the computers on your network Please follow these directions to use the Add Printer Wizard to share a printer on your network Go to Start Printers and Faxes A successful installation will display the printer icon as shown at right You have successfully added a local printer Go to Start Printer and Faxes ...

Page 74: ... 74 Networking Basics Sharing a network printer Click on Add a Printer Click Next Select Network Printer Click Next ...

Page 75: ... 75 Networking Basics Sharing a network printer Select Browse for a printer Click Next Select the printer you would like to share Click Next Click Finish ...

Page 76: ...per installation You have completed adding the printer To share this printer on your network Remember the printer name Run the Add Printer Wizard on all the computers on your network Make sure you have already run the Network Setup Wizard on all the network computers After you run the Add Printer Wizard on all the computers in the network you can share the printer ...

Page 77: ... Server such as the DP 101P Please make sure that you have run the Network Setup Wizard on all the computers on your network To share an LPR printer please follow these directions Go to Start Printers and Faxes Click on Add a Printer The screen to the right will display Click Next Select Local printer Click Next ...

Page 78: ...n LPR printer Select Create a new port From the pull down menu select Standard TCP IP Port as shown Click Next Please read the instructions on this screen Click Next Enter the Printer IP Address and the Port Name as shown Click Next ...

Page 79: ...an LPR printer In this screen select Custom Click Settings Enter the Port Name and the Printer Name or IP Address Select LPR Enter a Queue Name if your Print Server Gateway has more than one port you will need a Queue name Click OK ...

Page 80: ...w you information about your printer Click Finish Select the printer you are adding from the list of Printers Insert the printer driver disk that came with your printer Click Have Disk If the printer driver is already installed Select Keep existing driver Click Next ...

Page 81: ...he other computers on your network Click Next Select Yes to print a test page Click Next This screen will display information about your printer Click Finish to complete the addition of the printer Please run the Add Printer Wizard on all the computers on your network in order to share the printer Note You must run the Network Setup Wizard on all the computers on your network before you run the Ad...

Page 82: ...2 3 10Base T Ethernet IEEE 802 3u 100Base TX Fast Ethernet IEEE 802 3 Nway Auto Negotiation VPN Pass Through Multi Sessions PPTP L2TP IPSec Device Management Web Based requires at least Microsoft Internet Explorer v5 or later Netscape Navigator v4 or later or other Java enabled browsers Media Access Control CMSA CA with ACK LEDS Power WAN Local Network 10 100 Operating Temperature 32 F to 131 F 0 ...

Page 83: ... 83 Power Input External power Supply DC 5V 2 0A Safety Emissions FCC UL Dimensions L 5 6in 142mm W 4 3in 109mm H 1 2in 31mm Weight 0 44 lbs 200g Warranty One Year ...

Page 84: ...y period on this product U S customers can contact D Link technical support through our web site or by phone D Link Technical Support over the Telephone 877 453 5465 24 hours a day seven days a week D Link Technical Support over the Internet http support dlink com When contacting technical support please provide the following information Serial number of the unit Model number or product name Softw...

Page 85: ...respects to the defective Hardware The Warranty Period shall extend for an additional ninety 90 days after any repaired or replaced Hardware is delivered If a material defect is incapable of correction or if D Link determines in its sole discretion that it is not practical to repair or replace the defective Hardware the price paid by the original purchaser for the defective Hardware will be refund...

Page 86: ...ink to confirm the same The original product owner must obtain a Return Material Authorization RMA number from the Authorized D Link Service Office and if requested provide written proof of purchase of the product such as a copy of the dated purchase invoice for the product before the warranty service is provided After an RMA number is issued the defective product must be packaged securely in the ...

Page 87: ...ENTAL OR CONSEQUENTIAL INCLUDING BUT NOT LIMITED TO DAMAGES FOR LOSS OF GOODWILL WORK STOPPAGE COMPUTER FAILURE OR MALFUNCTION LOSS OF INFORMATION OR DATA CONTAINED IN STORED ON OR INTEGRATED WITH ANY PRODUCT RETURNED TO D LINK FOR WARRANTY SERVICE RESULTING FROM THE USE OF THE PRODUCT RELATING TO WARRANTY SERVICE OR ARISING OUT OF ANY BREACH OF THIS LIMITED WARRANTY EVEN IF D LINK HAS BEEN ADVISE...

Page 88: ...s no guarantee that interference will not occur in a particular installation If this equipment does cause harmful interference to radio or television reception which can be determined by turning the equipment off and on the user is encouraged to try to correct the interference by one or more of the following measures Reorient or relocate the receiving antenna Increase the separation between the eq...

Reviews: