background image

3

E

N

G

LIS

H

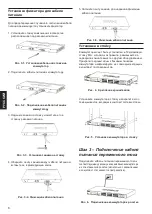
5.  Fasten the tie of the Retainer until the power cord is 

secured.

Figure 3-5.  Secure the power cord

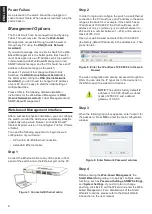
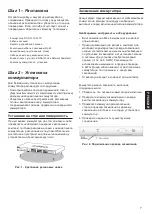
Rack Installation

The switch can be mounted in an EIA standard size 

19-inch rack, which can be placed in a wiring closet with 

other equipment. To install, attach the mounting brackets 

to the switch’s side panels (one on each side) and 

secure them with the screws provided.

Figure 4. Attaching the mounting brackets

Then, use the screws provided with the equipment rack 

to mount the switch in the rack.

Figure 5.   Installing the switch in a standard-sized 

equipment rack

Step 3 – Plugging in the AC 

Power Cord

You can now connect the AC power cord into the rear of 

the switch and to an electrical outlet (preferably one that 

is grounded and surge protected).

Figure 6. Plugging the switch into an outlet

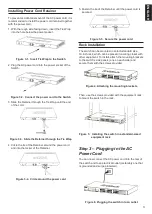
Installing Power Cord Retainer

To prevent accidental removal of the AC power cord, it is 

recommended to install the power cord retainer together 

with the power cord.

1.  With the rough side facing down, insert the Tie Wrap 

into the hole below the power socket.

Figure 3-1.  Insert Tie Wrap to the Switch

2.  Plug the AC power cord into the power socket of the 

Switch.

Figure 3-2.  Connect the power cord to the Switch

3.  Slide the Retainer through the Tie Wrap until the end 

of the cord.

Figure 3-3.  Slide the Retainer through the Tie Wrap

4.  Circle the tie of the Retainer around the power cord 

and into the locker of the Retainer.

Figure 3-4.  Circle around the power cord

Summary of Contents for DXS-1210-16TC

Page 1: ...C Layer 2 SmartPro Switch with 12 10GBase T Ports 2 10GBase X SFP Ports and 2 10GBase T SFP Combo Ports Getting Started Guide Настраиваемый коммутатор SmartPro уровня 2 с 12 портами 10GBase T 2 портами 10GBase X SFP и 2 комбо портами 10GBase T SFP ...

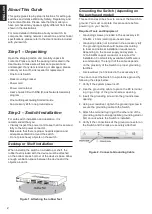
Page 2: ...he device must be attached on the bottom at each corner of the device s base Allow enough ventilation space between the device and the objects around it Figure 1 Attaching the rubber feet Grounding the Switch depending on the purchased model This section describes how to connect the Switch to ground You must complete this procedure before powering on your Switch Required Tools and Equipment Ground...

Page 3: ... the AC power cord into the rear of the switch and to an electrical outlet preferably one that is grounded and surge protected Figure 6 Plugging the switch into an outlet Installing Power Cord Retainer To prevent accidental removal of the AC power cord it is recommended to install the power cord retainer together with the power cord 1 With the rough side facing down insert the Tie Wrap into the ho...

Page 4: ...e switch should be unplugged in case of power failure When power is resumed plug the switch back in Management Options The D Link Switch can be managed in band by using Telnet The user may also choose the Web based Management accessible through a web browser or through any PC using the DNA D Link Network Assistant If you want to manage only one D Link Switch the Web Based Management is the better ...

Page 5: ...Programs D Link DNA and open the DNA D Link Network Assistant 6 Just connect the Switch to the same L2 network segment of your PC and use the DNA D Link Network Assistant to discover the Switch For detailed information of DNA please refer the user manual Telnet Management depending on the purchased model Users may also access the switch through Telnet using your PC s Command Prompt To access it fr...

Page 6: ...ствовать параметрам электропитания указанным в технических характеристиках устройства Не вскрывайте корпус устройства Перед очисткой устройства от загрязнений и пыли отключите питание устройства Удаляйте пыль с помощью влажной салфетки Не используйте жидкие аэрозольные очистители или магнитные статические устройства для очистки Избегайте попадания влаги в устройство Устройство должно также быть за...

Page 7: ... достаточное пространство для вентиляции между устройством и объектами вокруг него Рис 1 Крепление резиновых ножек Заземление коммутатора Данный раздел содержит информацию о способе заземления коммутатора Данную процедуру необходимо выполнить перед включением питания коммутатора Необходимые инструменты и оборудование Винт заземления M4 x 6 мм входит в комплект для монтажа Провод заземления не вход...

Page 8: ...татора и к электрической розетке желательно с заземлением Рис 6 Подключение коммутатора к розетке Установка фиксатора для кабеля питания Для предотвращения случайного отключения кабеля питания рекомендуется установить фиксатор 1 Установите стяжку замком вниз в отверстие расположенное под разъемом питания Рис 3 1 Установка кабельной стяжки на коммутатор 2 Подключите кабель питания к коммутатору Рис...

Page 9: ...ork Assistant DNA Telnet или SNMP Если необходимо осуществлять управление только одним коммутатором D Link серии Smart то наилучшим решением является использование Web интерфейса Каждому коммутатору должен быть назначен собственный IP адрес который будет использоваться для управления через Web интерфейс Однако если необходимо осуществлять управление несколькими коммутаторами D Link то наилучшим ре...

Page 10: ...ручную 1 Вставьте компакт диск входящий в комплект поставки в привод CD ROM 2 В меню Пуск на рабочем столе Windows выберите пункт Мой Компьютер 3 Дважды нажмите на значке привода CD ROM DVD ROM чтобы открыть меню автозапуска или нажмите правой кнопкой мыши на значке привода чтобы открыть папку Выберите DNA D Link Network Assistant и дважды нажмите на файле setup exe 4 Следуйте инструкциям на экран...

Page 11: ...нтиляции 2 вентилятора Smart Температура Рабочая от 5 до 50 C Хранения от 40 до 70 C o o Влажность При эксплуатации от 0 до 95 без конденсата При хранении от 0 до 95 без конденсата EMI CE FCC C Ticket VCCI BSMI CCC Безопасность cUL CB CE CCC BSMI 11 РУССКИЙ Стандарты IEEE 802 3 10Base T IEEE 802 3u 100Base TX IEEE 802 3ab 1000Base T IEEE 802 3an 10GBase T IEEE 802 3z 1000Base X IEEE 802 3ae 10GBas...

Page 12: ...495 744 00 99 E mail mail dlink ru Україна Київ вул Межигірська 87 А Тел 38 044 545 64 40 E mail ua dlink ua Moldova Chisinau str C Negruzzi 8 Tel 373 22 80 81 07 E mail info dlink md Беларусь Мінск пр т Незалежнасці 169 Тэл 375 17 218 13 65 E mail support dlink by Қазақстан Алматы Құрманғазы к cі 143 үй Тел 7 727 378 55 90 E mail almaty dlink ru Հայաստան Երևան Դավթաշեն 3 րդ թաղամաս 23 5 Հեռ 374 1...

Reviews: