background image

NETWORKING BASICS

Sharing Files 

With your computers connected together on a network, you

may now open and save files on another computer.  You will 

be able to specify particular folders or disk drives to "share" 

and even password protect them.  The steps below will enable

you to share specific files and folders with other computers on

your network. 

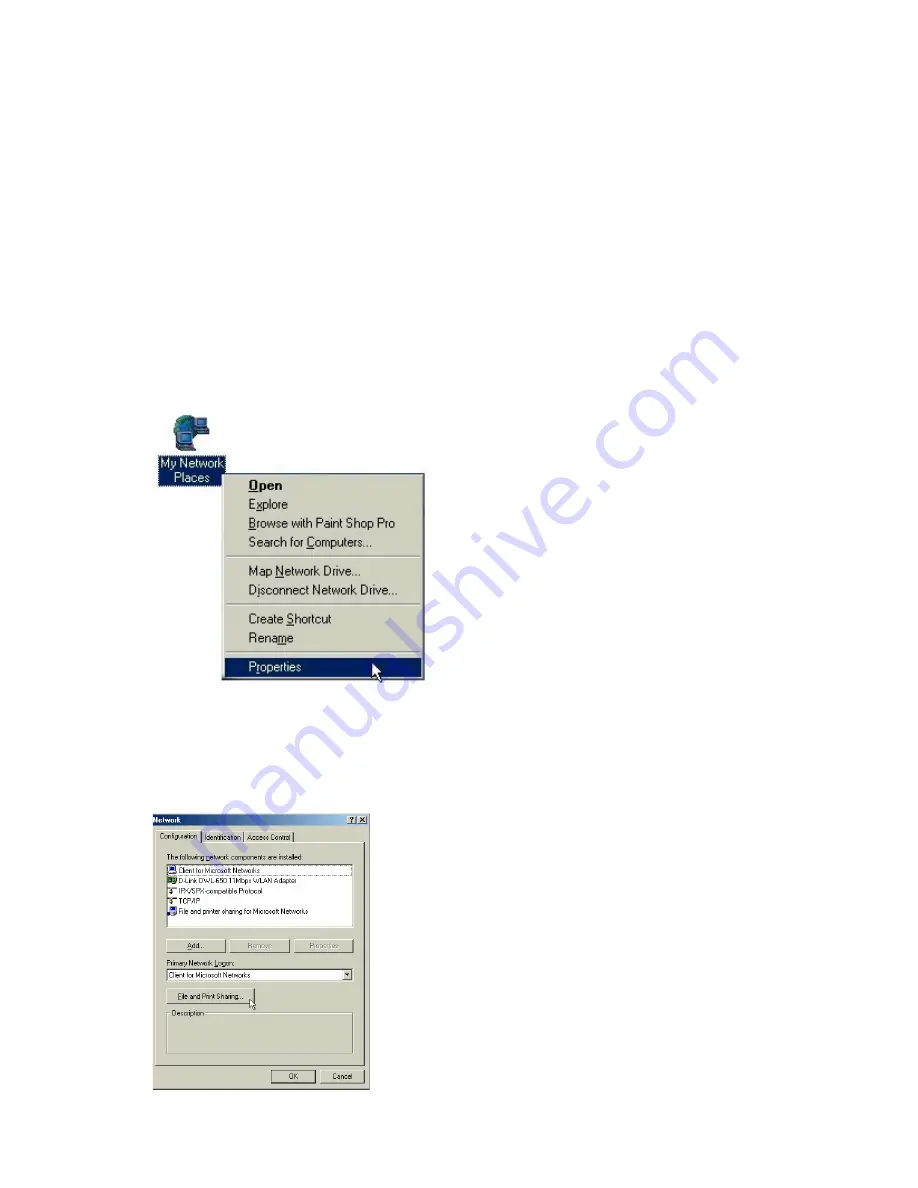
A. On your Desktop, right-click the icon "Network

Places" and select "Properties" from the context menu.

B. This dialog box is where you will come to configure most 

of your computers network settings.  It is also available through

the "Network" icon in the Control Panel. 

C. Click the "File and Print Sharing·" button. 

41

Summary of Contents for DWL-500

Page 1: ...DWL 500 PCI Wireless Adapter User s Manual ...

Page 2: ... 500 PCI Wireless Adapter Introduction i Contents of Package ii Wireless Basics 1 Getting Started 3 Configuration Utility 10 Troubleshooting 18 Networking Basics 38 Technical Support 65 Specifications 66 Warranty 70 Registration 75 ...

Page 3: ...gned to help you connect your laptop to a network when running Windows 98 Windows ME NT 4 0 or 2000 in either Ad Hoc mode without an Access Point or Infrastructure mode with an Access Point Yet the IEEE802 11b standards compliance means this adapter gives you the flexibility to connect it to any 802 11b network The IEEE 802 11b Ethernet standard allows you to connect computers and devices at speed...

Page 4: ...pter Package Contents A DWL 650 PCMCIA Wireless Adapter PCI Cardholder B Driver CD C User s Manual D Quick Install Guide Note Please insert only the DWL 650 PC Card into the provided PCI Holder Use of other cards could result in damage to your computer ...

Page 5: ...kly or even watch a Movie in MPEG format over your network without noticeable delays This technology works by using multiple frequencies in the 2 4GHz range utilizing Direct Sequence Spread Spectrum DSSS technology D Link Air prod ucts will automatically sense the best possible connection speed to ensure the greatest speed and range possible with the technology Installation Considerations Designed...

Page 6: ...minum studs may have a neg ative effect on range Again try to position Access Points Residential Gateways and Computers so that the signal passes through drywall or open doorways and not other materials 4 Make sure that the antenna is positioned for best reception by using the software signal strength tools included with your product 5 Keep your product away at least 1 2 meters from electrical dev...

Page 7: ...dministrators with Dynamic IPs should follow these instructions I have 2 or more computers and or laptops and want to share files printers and Internet access using a Residential Gateway Router or Firewall or I want to connect to an Ethernet network that uses Dynamic DHCP IP addresses requires a Wireless Router or Access Point and Ethernet capable Gateway Router or Firewall or an existing Ethernet...

Page 8: ...n please follow these steps 1 Using the provided Ethernet cable connect the router to the Cable DSLmodem Also connect the Access Point to the Router 2 Install the wireless adapter see the Quick Install Guides 3 Check the wireless connection see Configuration Utility and Networking Basics section 4 Check IP Address for the Wireless Adapter see Networking Basics section NOTE The default settings for...

Page 9: ...iles printers and Internet access using multiple IP addresses that I have purchased from my Internet Service Provider or I want to connect to an Ethernet network that uses Static IP addresses requires Access Point Ethernet capable Broadband modem and multiple IP address Internet Account or an existing Ethernet network When you have installed your wireless network it will look like this 5 ...

Page 10: ...hese steps 1 Install the access point and connect it to your cable DSL modem 2 Install the wireless adapter see the Quick Install Guides 3 Check the wireless connection see Configuration Utility and Networking Basics section 4 Set Static IP Address for the wireless adapter see Networking Basics section NOTE If you are using a PPPoE client go to Networking Basics section instead Verify the settings...

Page 11: ... it will look like this To complete this installation please follow these steps 1 Install the wireless adapter see the Quick Install Guides 2 Set Static IP Address for the wireless adapter see Networking Basics section 3 Check the wireless connection see Configuration Utility and Networking Basics section 4 Learn to share printers and file See Networking Basics 7 ...

Page 12: ...ve installed your Wireless network it will look like this To share an Internet connection with Internet Sharing software you will need to purchase Internet Sharing software or use Windows 98SE s or ME s Internet Connection Sharing ICS utility Please follow your software documentation to properly configure the Internet sharing software after you install your wireless networking adapters To install ...

Page 13: ...ing Basics section 4 Learn to share printers and file See Networking Basics 5 Install your Internet Sharing Software If the Internet Sharing Software is installed on a different computer follow these steps 1 Install the wireless adapter see the Quick Install Guides 2 Check IP Address for the wireless adapter see Networking Basics section NOTE The default settings for the wireless adapter is set to...

Page 14: ...n Utility Another way to start the Configuration Utility is to click on Start Programs D Link DWL 650 Control Utility Configuration Utility If the utility icon appears with a red X in the toolbar then the utili ty did not install properly and will need to be reinstalled Sometimes the icon will be red This happens when the wireless adapter is set to a different channel or the communication mode is ...

Page 15: ... NOTE This field will also display an error message if for some reason the driver failed to initialize Rescan Pressing the rescan button will cause the wireless adapter to look for a connection When the wireless adapter is set to Infrastructure mode the wireless adapter will scan all available channels continuously until it finds one or more Access Points with a matching SSID At that point it will...

Page 16: ...Excellent The wireless adapter will start looking for a better Access Point if the Link Quality becomes Poor Link Quality is a measure of receive and transmit errors over the radio channel Signal Strength The Signal Strength bar graph is only active when the node is in Infrastructure Mode The bar graph displays normalized signal strength as reported by the radio averaged over all frames over 100 b...

Page 17: ... value Apply Changes or OK button must be pressed before the default values are restored Undo Changes Pressing this button reverts all fields in the panel back to the previ ously saved values Apply Changes This button becomes active only when one of the fields has been modified Pressing this button applies the changed settings and saves the settings to the registry 13 ...

Page 18: ...nly Prism2 adapters to communicate with one another without an Access Point regardless of the SSID assigned to the wireless adapters 3 Infrastructure This mode of operation requires the presence of an 802 11b Access Point All communication is done though the Access Point which relays packets to other wireless clients as well as to nodes on a wired network SSID Service Set Identification The field ...

Page 19: ... the Infrastructure mode is selected However the option for channel selection is available in AdHoc or 802 11b AdHoc mode Encryption tab Figure 4 Configuration Utility with opened Encryption tab If an additional measure of security is desired on the wireless net work WEP Wired Equivalent Privacy encryption can be enabled WEP encrypts each frame transmitted from the wireless adapter using one of th...

Page 20: ...ies The Configuration Utility will not apply keys that are not entered cor rectly Passphrase Alternatively a Passphrase can be entered which is used as a seed to randomly generate the four keys Using the Passphrase saves considerable time since the same keys must be entered into each node on the wireless network Manual Entry Key 1 Key 4 These four fields can be used to manually enter the encryptio...

Page 21: ... displayed in Key field The keys are updated in the driv er registry for permanent storage until another key is selected About tab Figure 5 Configuration Utility with opened ABOUT tab About tab shows the product version including the details of the Driver Configuration Utility and NIC firmware version 17 ...

Page 22: ... might go wrong The best approach to troubleshooting network problems is to start at the very simplest level and work your way up On the following pages we have covered many of the common troubleshooting situations Please read through these pages or skip to the specific one that interests you 18 ...

Page 23: ...tion about your network traffic and help you determine prob lems when troubleshooting The DWL 650 PC Card has an indicator labeled LINK on the top panel a steady green LINK light indicates a good connection with the network A flashing green LINK light indicates that the Network Adapter is sending or receiving data 19 ...

Page 24: ...TROUBLESHOOTING VERIFYING DRIVER INSTALLATION To check that the wireless network adapter drivers are loaded properly A Go to Start Settings Control Panel 20 ...

Page 25: ...TROUBLESHOOTING 21 B Double click on System ...

Page 26: ...TROUBLESHOOTING F Click on Properties 22 D Click on the symbol in front of Network Adapters E Highlight D Link DWL 650 11 Mbps WLAN Adapter C Click on the Device Manager Tab ...

Page 27: ...TROUBLESHOOTING H Click on the Resources tab 23 G Check under Device Status to see if the DWL 650 is working properly ...

Page 28: ... there is an existing IRQ conflict please refer to the How to Free an IRQ section of Troubleshooting TROUBLESHOOTING 24 I Check under Conflicting device list to identify if there are any existing conflicts ...

Page 29: ...TROUBLESHOOTING CHECKING THE WIRELESS ADAPTER CONFIGURATION A Go to START Programs D Link Air DWL 650 Utility D Link DWL 650Control Utility 25 ...

Page 30: ... D Check that the Network mode is set properly to Infrastructure mode when there is an Access Point in the network Otherwise the mode should be set to Ad Hoc E To change any settings click on the arrow for the drop down menu Highlight the desired setting Click on the Apply Changes box and click OK 26 B Select the Configuration Tab ...

Page 31: ...ed by the DHCP server When using D Link routers the DHCP server will assign an IP range of 192 168 0 2 192 168 0 254 C Check that the Channel setting for the Wireless Adapter is the same channel setting as that of the Access Point D Check that the Network ID matches the SSID name of the Wireless Adapter E Check that Security setting is the same for both the Wireless Adapter and the Access Point 27...

Page 32: ...TROUBLESHOOTING CHECKING PCMCIA SOCKET CONTROLLER A Goto START SETTINGS CONTROLPANEL 28 ...

Page 33: ...TROUBLESHOOTING CHECKING PCMCIA SOCKET CONTROLLER cont 29 B Double click on System ...

Page 34: ...TROUBLESHOOTING CHECKING PCMCIA SOCKET CONTROLLER continued 30 C Click on the Device Manager Tab D Click on the symbol in front of PCMCIA Socket E Highlight CardBus Controller F Click on Properties ...

Page 35: ...tically please contact the laptop manufacturer Another option is to try loading the socket controller available within the OS or a socket controller provided by a third party software manufacturer I Click on the Resources tab 31 G Check under Device Status to see if the CardBus Controller is working properly ...

Page 36: ...CMCIA SOCKET CONTROLLER continued J Check under Conflicting device list to identify if there are any existing conflicts K If there is an existing IRQ conflict please refer to the How to Free an IRQ section of Troubleshooting 32 ...

Page 37: ...e settings may be listed on your system using different words that mean the same thing Refer to your motherboard s manual or contact the manu facturer if you are unsure Perform the following steps to check for a Plug and Play Motherboard and to reset the configuration 1 Reboot your computer 2 When your computer is going through its POST Power On Self Test enter into your BIOS Basic Input Output Sy...

Page 38: ...e configuration information for your Plug and Play hardware It is reset to Disabled so that Windows will not perform the reconfiguration each time you start your computer 6 Save the new settings and Exit your BIOS This will allow your computer to boot up and load Windows 7 After Windows loads check in the Device Manager to see if there is an available IRQ TROUBLESHOOTING HOW TO FREE AN IRQ What to...

Page 39: ...isable your COM Ports 1 Reboot your computer 2 When your computer is going through its POST Power On Self Test enter into your BIOS Basic Input Output System 3 Under the heading Integrated Peripherals look for Serial Port 1 or 2 or COM Port 1 or 2 4 Change the setting to Disable 5 Go to the heading PNP PCI Configuration 6 Make sure the setting for Resources Controlled By is set to Auto 7 Change th...

Page 40: ...boot your computer 2 When your computer is going through its POST Power On Self Test enter into your BIOS Basic Input Output System 3 Under the heading Integrated Peripherals look for a setting Modem COM Port 4 Change the setting to Disable Note Only disable your Built On Modem if you know that you have upgraded your Modem you have had a Broadband connection Cable DSL installed or if youdo not use...

Page 41: ... above steps can be followed to remove a Built On Sound Card as well Another option for freeing up an IRQ is switching your Mouse either PS 2 or USB This will free up the IRQs for your COM Ports and you should follow the above steps for disabling the COM Ports in your BIOS Note You might need to contact your computer manufacturer for more information on freeing up an IRQ on your specific system TR...

Page 42: ...rehensive guide to networking it is just an outline of a few networking basics If you are interested in learning more about networking we have identified some Internet resources that may be of interest D Link Systems Inc http www dlink com D Link is one of the largest manufacturers of Ethernet products in the world D Link s technological expertise and dedication to providing quality products at a ...

Page 43: ...puters names or if you are using Windows 98 you may need to verify that each computer has a unique name and common workgroup name A On your Desktop right click the icon Network Places and select Properties from the context menu B Click the Identification tab on the top of the dialog box 39 ...

Page 44: ...result The computer s name should be 15 or fewer characters with no spaces D Type the workgroup name this computer will be a part of in the Workgroup box All of the computers on your network should have an identical Workgroup name E The Computer Description box is optional You may enter a description that will help you identify this computer on your network Then click Close F Repeat this process f...

Page 45: ...rd protect them The steps below will enable you to share specific files and folders with other computers on your network A On your Desktop right click the icon Network Places and select Properties from the context menu B This dialog box is where you will come to configure most of your computers network settings It is also available through the Network icon in the Control Panel C Click the File and...

Page 46: ... able to give others access to my files E Click OK on the File and Print Sharing dialog box F Click OK on the Network dialog box G Provide the Windows 98 installation CD or diskette s if prompted or direct Windows to the proper location of the installation files Reboot if prompted 42 ...

Page 47: ...t to share a CD ROM drive so your other computer that does not have one can read CD s Both of these processes are the same Only the disk drives and folders that you specifically identify as shared will be accessible to other computers on your network I Find the disk drive or folder you want to share with Windows Explorer or the My Computer icon on your desktop J Right click on the disk drive or fo...

Page 48: ... network are shared M The Comment box is optional You can use this box to further describe the disk drive or folder for others on the network N Access Type allows you to designate how much someone else on the network can do with this disk drive or folder Read Only allow others to only look at or open the files on the disk drive or in the folder Full allows others to read write open save copy move ...

Page 49: ...ing the disk drive or folder Two passwords are used to give two levels of security or access to others on the network using the Depends on Password setting Leaving the Password boxes empty gives everyone on the network access to the disk drive or folder P Click OK to continue You will be prompted to enter the password s you provided for verification Retype the password s just as you entered them t...

Page 50: ...word when sharing this disk drive or folder you will be prompted for the password S You can access a disk drive or folder shared over the network from most Windows applications To make this process easier Windows allows you to map these disk drives and folders to a drive letter on another computer For example on a computer where you are accessing a shared folder from another computer inside Window...

Page 51: ...ther computers on you network can be very convenient allowing you to print from any computer on the network The steps below will enable you to print with other computers on your network A On your Desktop right click the icon Network Places and select Properties from the context menu 47 ...

Page 52: ...rs B Click the File and Print Sharing button C Click to place a check mark next to I want to be able to allow others to print to my printer s D Click OK on the File and Print Sharing dialog box E Click OK on the Network dialog box 48 ...

Page 53: ... other computers on the network Comment and Password are optional Then click OK For a computer to access a Network Printer the device driver or software for that printer must be installed and pointed to the proper location of the printer This is done much the same way you installed the printer on the computer it is connected to H Go to a computer that does not have the printer connected to it From...

Page 54: ...e printer Click OK when you have selected the desired printer Finish the installation by continuing the Add Printer Wizard normally M You may now use the Network Printer as if it was connected directly Note the computer that the printer is connected to must be on to use the printer If you find this inconvenient devices known as Network Print Servers are available from D Link including the DP 301 a...

Page 55: ...NETWORKING BASICS How to Install TCP IP Go to START Settings Control Panel Double click on Network 51 ...

Page 56: ...NETWORKING BASICS How to Install TCP IP Select the D Link DWL 650 Wireless Adapter Click on Add Select Protocol Click Add 52 ...

Page 57: ...WORKING BASICS How to Install TCP IP Select Microsoft Scroll down and Select TCP IP Click Ok Now the TCP IP for D Link DWL 650 Wireless Adapter will be available The TCP IP Installation is now complete 53 ...

Page 58: ...P Address When the drivers are installed the default setting is set to obtain IP dynamically through a DHCP server If you need to check or change the settings then do the following Go to START Settings Control Panel Double Click on Network 54 ...

Page 59: ...NETWORKING BASICS Configuring a Dynamic IP Address Highlight TCP IP for the DWL 650 Click on Properties NOTE If TCP IP is not present see Section 1 How to Install TCP IP 55 ...

Page 60: ...g a Dynamic IP Address When the TCP IP window opens choose IP Address tab Select Obtain an IP Address Automatically Click OK When the network properties window comes back up click OK Windows will ask you to reboot and click Yes 56 ...

Page 61: ...NETWORKING BASICS Configuring a Static IP Address Go to START Settings Control Panel Double Click on Network 57 ...

Page 62: ...NETWORKING BASICS Configuring a Static IP Address Highlight TCP IP for the DWL 650 Scroll down if you cannot see it Click on Properties NOTE IfTCP IPisnotpresentseeSection1 HowtoInstallTCP IP 58 ...

Page 63: ...ess Enter an IP address into the empty field Suggested IP Range 192 168 0 2 to 192 168 0 254 NOTE IP Addresses must be signed sequentially to each computer Suggested Subnet Mask of 255 255 255 0 Click OK When the Network Properties window comes back up click OK Insert Windows CD if prompted Windows will ask you to reboot and click Yes 59 ...

Page 64: ...NETWORKING BASICS Checking TCP IP Address of the wireless Adapter Click on the Start button and click Run Figure 11 Start Run 60 ...

Page 65: ...IP Address of the Wireless Adapter Type winipcfg in the Open box Click OK The IP Configuration screen will be displayed The IP address will be displayed in the IP Address box 61 Click on More Info to display additional IP information ...

Page 66: ...NETWORKING BASICS Checking TCP IP Address of the Wireless Adapter 62 Additional IP information ...

Page 67: ...NETWORKING BASICS Checking the Connection by Pinging Click on the Start button and click Run Type command in the Open box Click OK to get to a DOS prompt 63 ...

Page 68: ...NETWORKING BASICS Checking the Connection by Pinging Type ping 192 168 0 1 which is the IP address of the Gateway in this case and hit the Enter key A successful ping will show four replies 64 ...

Page 69: ...h Friday from 6 00 a m to 6 00 p m PST Web http www dlink com E mail support dlink com Phone 949 788 0805 option 4 Thank you for purchasing the D Link DWL 500 We like to receive feedback from our customers concerning our products Please take a moment to visit our web site You can register your purchase on line learn more about the newest networking products and let us know the things your new netw...

Page 70: ...ing WiFi Certification Adapter Type PCI Local Bus 2 2 compliant Transport Protocols TCP IP IPX SPX NetBEUI NDIS3 4 TCP IP Protocols BOOTP DHCP Telnet FTP Supported OS Windows 95 OSR 2 Windows 98 Windows ME Windows 2000 Windows NT 4 or newer Data Security 40 bit WEP Wired Equivalent Privacy Encryption Data Rate Mbps channel 11 CCK 5 5 CCK 2 DQPSK 1 DBSK 66 ...

Page 71: ...10 dBm min Transmit Power 2 7V to 3 0V 13 dBm max 10 dBm min Frequency Range 2 400 2 4835 GHz Direct Sequence Spread Spectrum DSSS Network Architecture Supports Ad Hoc Mode Peer to Peer without Access Point Supports Infrastructure Mode Communications to wired networks via Access Points with Roaming Compliant with IEEE 802 11b Standards Operating Channels 1 11 United States FCC 1 11 Canada DOC 1 14...

Page 72: ...0 C to 50 C Storing 20 C to 70 C Humidity Max 95 non condensing Emissions FCC CE ETSI 300 328 ARIB Telec Safety UL Warranty Lifetime Warranty and Free Technical Support Standards IEEE 802 11b All major networking standards including IP IPX Currently undergoing WiFi Certification Port 1 RJ 45 10Base T 1 Power 5V DC 1 5A Center on Positive 68 ...

Page 73: ... are registered trademarks of D Link Microsoft Windows 98 Windows ME Windows 2000 and Windows NT are trademarks of the Microsoft Corporation All other trademarks are registered trademarks or trademarks of their respective holders All specifications are subject to change without notice 69 ...

Page 74: ...ninety 90 days from the date of purchase D Link s sole obligation shall be to repair or replace the defective Hardware at no charge to the original owner Such repair or replacement will be rendered by D Link at an Authorized D Link Service Office The replacement Hardware need not be new or of an identical make model or part D Link may in its discretion may replace the defective Hardware or any par...

Page 75: ...ich a refund is given automatically terminates What You Must Do For Warranty Service Registration Card The Registration Card provided at the back of this manual must be completed and returned to an Authorized D Link Service Office for each D Link product within ninety 90 days after the product is purchased and or licensed The addresses telephone fax list of the nearest Authorized D Link Service Of...

Page 76: ...EREIN THE ENTIRE RISK AS TO THE QUALITY SELECTION AND PER FORMANCE OF THE PRODUCT IS WITH THE PURCHASER OF THE PRODUCT Limitation of Liability TO THE MAXIMUM EXTENT PERMITTED BY LAW D LINK IS NOT LIABLE UNDER ANY CONTRACT NEGLIGENCE STRICT LIABILITY OR OTHER LEGAL OR EQUITABLE THEORY FOR ANY LOSS OF USE OF THE PRODUCT INCON VENIENCE OR DAMAGES OF ANY CHARACTER WHETHER DIRECT SPECIAL INCI DENTAL OR...

Page 77: ...erferencias de radio en cuyo case puede requerirse al usuario para que adopte las medidas adecuadas Attention Ceci est un produit de classe B Dans un environnement domestique ce produit pourrait causer des interférences radio auquel cas l utilisateur devrait prendre les mesures adéquates Attenzione Il presente prodotto appartiene alla classe B Se utilizzato in ambiente domestico il prodotto può ca...

Page 78: ... measures Reorient or relocate the receiving antenna Increase the separation between the equipment and receiver Connect the equipment into an outlet on a circuit different from that to which the receiver is connected Consult the dealer or an experienced radio TV technician for help VCCI Warning 74 ...

Page 79: ...oTCP IP oIPX SPX oOthers_____________________________ 4 What network operating system s does your organization use oNovell NetWare oSCO Unix Xenix oLinux oSolaris oWindows NT oWindows 2000 oWindows 98 ME oOthers_________________ 5 What network management program does your organization use oD View oHP OpenView Windows oHPOpenView Unix oSunNet Manager oNovell NMSoNetView 6000 oOthers 6 What network ...

Page 80: ...76 ...

Reviews: