background image


bit stream into other standard formats such as AVI, MPEG4,VCD and DVD. 
Please read the information below which is aimed to assist you in using the 

DVD Plus


software with your 

DUB-AV200 Video Converter


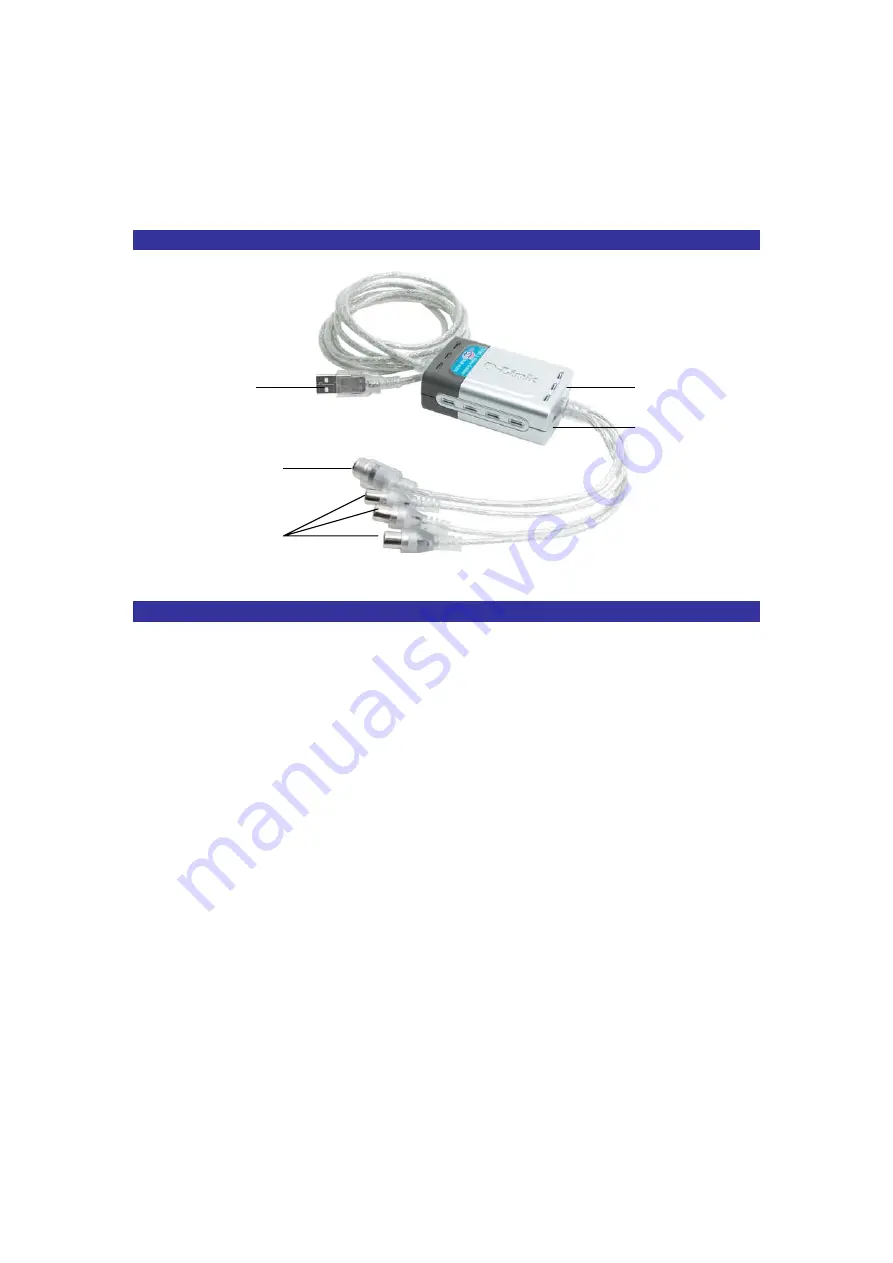
Getting To Know Your USB 2.0 MPEG 1/2/4 Video Converter 


Features and Benefits 


Professional Snap-Shot Still Image Capture 


Analog to Digital Video Convert 


704 x 480 (NTSC) @ 30fps High Quality Resolution 


704 x 576 (PAL) @ 25fps High Quality Video 


Audio Capture & A/V Synchronization Function 


Saturation/Contrast/Hue/Brightness Adjustment 


Create MPEG Movies 


Direct Burn-to-Disc of Recorded MPEG1 /2 with CD/DVD Burner 


Video Editing Software Include 


USB  
Connector 

S-Video 
Jack 

Composite 
Video Jacks 

Indicator 
Light 

Reset 
Button 

Summary of Contents for DUB-AV200

Page 1: ...onverter 2 Features and Benefits 2 Recording Video to a Recordable Disc 3 Reference Table 3 Tutorial I Quality Oriented 3 Step 1 Record Videos 3 Step 2 Convert Recorded Files 5 Step 3 Make a DVD SVCD VCD DATA VCD 8 Tutorial II Time Savings Solution 12 Step 1 Record and Convert Videos 12 Step 2 Make a VCD 14 ...

Page 2: ...AM Introduction The D Link DUB AV200 is an advanced video capture and display device which provides you with a high quality PC Theater solution The D Link DUB AV200 allows you to capture 30 frames per second fps while giving you up to 704x480 resolution for a high quality video image on a PC or notebook using USB2 0 The DUB AV200 captures CD quality stereo audio with a 16 bit 48KHz sampling rate a...

Page 3: ... Features and Benefits Professional Snap Shot Still Image Capture Analog to Digital Video Convert 704 x 480 NTSC 30fps High Quality Resolution 704 x 576 PAL 25fps High Quality Video Audio Capture A V Synchronization Function Saturation Contrast Hue Brightness Adjustment Create MPEG Movies Direct Burn to Disc of Recorded MPEG1 2 with CD DVD Burner Video Editing Software Include USB Connector S Vide...

Page 4: ...torial condenses the previously complex task of making a video CD or DVD of your own into the following three step processvia using DVD Plus 1 Recording video clips via DVR 2 Converting recorded files via MPEG Encoder 3 Making a CD via DVD Maker Follow the sequence of the three applications above found on the application bar on the DVD Plus software to easily create your own video CD or DVD Step 1...

Page 5: ...Video Settings tab drag the Brightness Contrast Hue and Saturation sliders in the Fine Adjustment field to make adjustments of the video image You can choose Default to accept the default video settings 4 Click the Record Settings tab to adjust the following configuration settings i Specify the Recording type as Video Audio ii Define the video format as D Link 704x480 MPEG1 352x240 MPEG4 352x240 o...

Page 6: ...ation panel 6 Press to start recording and press it again to stop recording The recorded file has been added to the system and can be accessed from the Video Folder window after stopping the recording Step 2 Convert Recorded Files The recorded video clip needs to be converted into video formats to be played and MPEG Encoder performs the conversion of video files into MPEG 1 or MPEG 2 files With a ...

Page 7: ...ch MPEG Encoder 2 Choose the Add button on the MPEG Encoder interface to open the Open window from which you can indicate the directory and video files you want to open for encoding Click Open when you are done 3 After choosing the Open button in the Open window the Option dialog box will be displayed as shown in the screen below ...

Page 8: ...or the encoded file you can directly edit a new name in the Output box or keep the default location and file name 4 In the Profile management pane define the target file format as MPEG 1 Profiles or MPEG 2 Profiles for the chosen video file Next click one option from the submenu of the preferred profile item The screens below illustrate the differences between the submenus of both profiles ...

Page 9: ...e displayed in the upper pane of the MPEG Encoder s interface Click the file name you want to encode and then choose the Encoding button to start converting the file into desired file format The Encoding button becomes the Stop button During the process of encoding you may choose the Stop button if to terminate the conversion 8 When the Status column in the upper pane displays Done the process of ...

Page 10: ...proceed Note If you chose to make a DVD at step 2 you will be led to the step of Authoring a menu template which will be shown as the startup page while playing your DVD on a DVD player Check Step 5 to proceed Otherwise please skip to Step 6 to start burning a CD 5 Select a menu template that you want to change on the Page pane and choose a template from the images displayed below the thumbnail wi...

Page 11: ... burning session i Determine the video type as NTSC PAL or Both ii Select Support XVCD and XSVCD if needed Note that both formats are non standard deviations of VCD and SVCD A standard DVD player is not capable of playing these formats iii The Perform writing test before recording command will check if the data is acceptable before actually burning the file to disc iv You may specify a location fo...

Page 12: ...nd the titles 9 Select your burner recorder from the Device list box 10 Click on the Eject button to insert a blank recordable disc into the recorder 11 Click to begin burning your CD When the process of burning is complete the recorded disc will be ejected from the drive ...

Page 13: ...rt Videos The process of capturing and converting video from the input video source is a Launch DVR b Choose Property Settings to adjust settings for recording and converting c Select an input source d Click the REC button to start recording and click it again to stop e The captured video clips have been recorded to your system Step by step instructions to start recording 1 Double click DVR on the...

Page 14: ...52x240 The recorded video files will then be saved in the VCD format iii Click Browse in the Working Directory field to specify a location to save the recorded video clips In the opened Change Folder dialog box select the intended directory and click OK iv Click OK to activate the new settings and to exit the Property Settings dialog box 2 Select input source as Composite or S Video on the left si...

Page 15: ...Launch DVD Maker b Define disc format as VCD c Add video files d Burn the videos to the disc Step by step instructions to Make a VCD 1 Double click DVD Maker on the application bar of the DVD Plus interface to launch DVD Maker 2 Specify the disc type as VCD 3 Click to open the Open window From the window choose the desired video files and then click Open to add them to the thumbnail window 4 When ...

Page 16: ...15 6 Choose the Eject button to insert a CD R disc into the recorder 7 Click to begin burning your VCD When the process of burning is finished the disc will be ejected ...

Page 17: ...nd is given automatically terminates What You Must Do For Warranty Service Registration Card The Registration Card provided at the back of this manual must be completed and returned to an Authorized D Link Service Office for each D Link product within ninety 90 days after the product is purchased and or licensed The addresses telephone fax list of the nearest Authorized D Link Service Office is pr...

Page 18: ...finden sind zu beachten 12 Wird das Gerät über einen längeren Zeitraum nicht benutzt sollten Sie es vom Stromnetz trennen Somit wird im Falle einer Überspannung eine Beschädigung vermieden 13 Durch die Lüftungsöffnungen dürfen niemals Gegenstände oder Flüssigkeiten in das Gerät gelangen Dies könnte einen Brand bzw Elektrischen Schlag auslösen 14 Öffnen Sie niemals das Gerät Das Gerät darf aus Grün...

Page 19: ...tiene alla classe B Se utilizzato in ambiente domestico il prodotto può causare interferenze radio nel cui caso è possibile che l utente debba assumere provvedimenti adeguati F FC CC C W Wa ar rn ni in ng g This equipment has been tested and found to comply with the limits for a Class B digital device pursuant to part 15 of the FCC Rules These limits are designed to provide reasonable protection a...

Page 20: ...AIR LINE 00800 7250 8000 E MAIL info dlink de URL www dlink de IBERIA D LINK IBERIA Gran Via de Carlos III 84 3 Edificio Trade 08028 BARCELONA TEL 34 93 4090770 FAX 34 93 4910795 E MAIL info dlinkiberia es URL www dlinkiberia es INDIA D LINK INDIA Plot No 5 Kurla Bandra Complex Road Off Cst Road Santacruz E Bombay 400 098 India TEL 91 22 652 6696 FAX 91 22 652 8914 E MAIL service dlink india com U...

Page 21: ... product 1 Where and how will the product primarily be used Home Office Travel Company Business Home Business Personal Use 2 How many employees work at installation site 1 employee 2 9 10 49 50 99 100 499 500 999 1000 or more 3 What network protocol s does your organization use XNS IPX TCP IP DECnet Others_____________________________ 4 What network operating system s does your organization use D ...

Page 22: ......

Reviews: