background image

16

D-Link Systems, Inc.

DSM-G600 Install Guide

Configuration

Configuration (continued)

Click 

Next

.

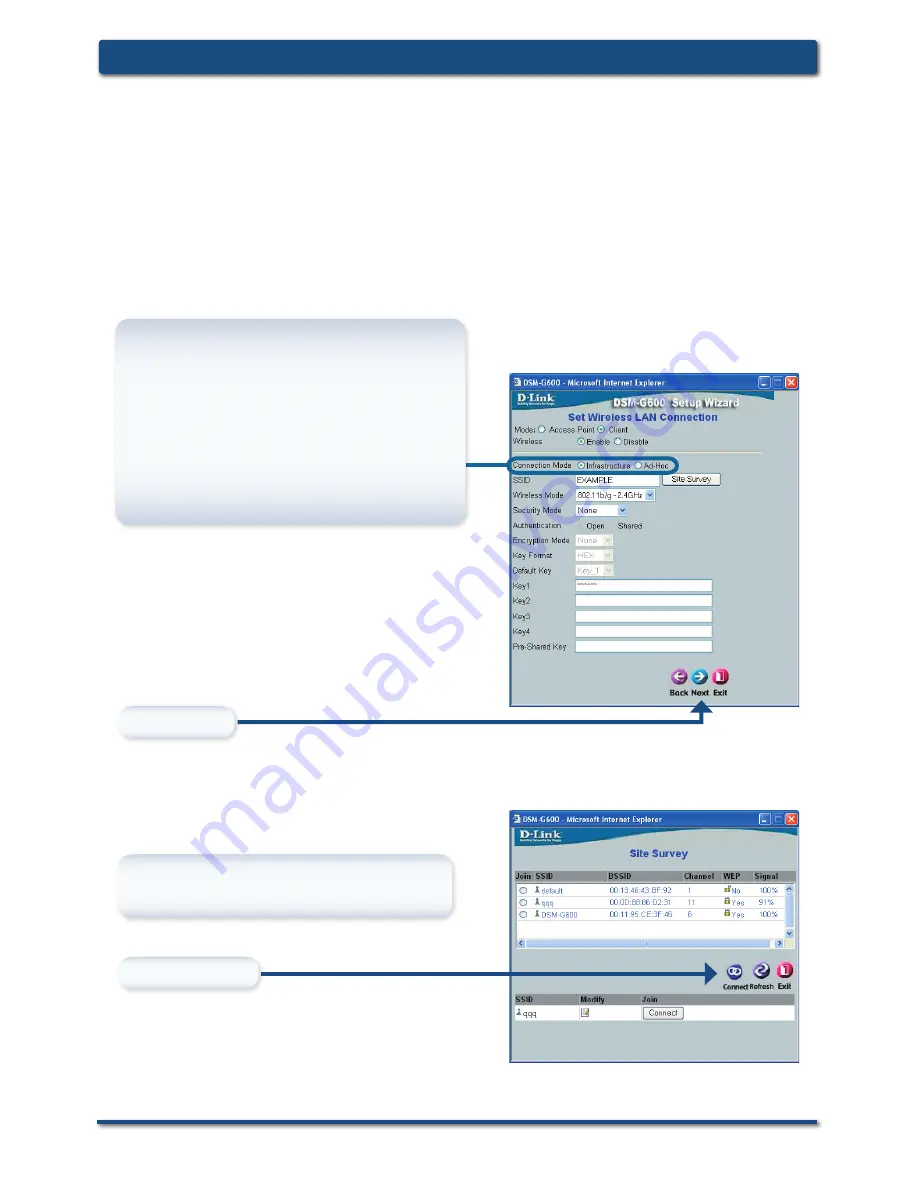
When selecting 

Client

 mode, you will need 

to choose the connection mode:

Infrastructure 

-  Connect  to  an  access 

point or wireless router.

Ad-Hoc

  -  Connect  to  a  wireless  client 

directly such as a laptop with a wireless 

adapter. 

Skip to page 18 for 

Access Point

 mode.

Click 

Site Survey

 to select a network from a list 

of available wireless networks or you may enter 

the wireless settings manually. The SSID must 

be the same for all devices in the network.

Click the radio button next to the wireless 

network you want to connect to.

Click 

Connect

.

If you have configured the wireless settings using Windows® Connect Now (WCN), click 

Next on the following screen without any configuration changes. Refer to page 10 for 

WCN setup instructions.

Note:

 The DSM-G600 cannot bridge or extend a wireless network via wireless. Plugging 

the unit into a router, switch, or hub using an Ethernet cable will allow you to create a 

wireless network or segment.

Summary of Contents for DSM-G600 - MediaLounge Wireless G Network Storage Enclosure NAS...

Page 1: ...Version 2 0 DSM G600 Wireless Network Storage Enclosure ...

Page 2: ...ware on CD Package Contents D Link DSM G600 Wireless Storage Enclosure Ethernet Cable 12V 3A Power Supply It is required that an Ethernet cable is used during initial setup Once your wireless configuration is set you may disconnect the Ethernet cable and begin communicating wirelessly with your DSM G600 System Requirements Note Using a power supply with a different voltage will cause damage and voi...

Page 3: ...ood power source Blinking indicates startup rebooting or formatting WLAN LED A solid light indicates that wireless is ready This LED blinks during wireless data transmission USB LED A solid light indicates that a USB drive is connected Blinking indicates the USB drive is being detected when first plugged in HDD Full LED Indicates that the internal hard drive is out of space Power Button Press to tu...

Page 4: ...2 0 Ports Use these ports to connect USB 2 0 drives USB 1 1 drives may also be connected but will be limited to USB 1 1 speed Power Receptor Receptor for the supplied power adapter LAN Port Connects to your Ethernet network The LAN port supports Auto MDI MDI X allowing you to connect a straight through or crossover cable Dismount Button Press to safely remove USB drives from the DSM G600 Fan Vent ...

Page 5: ...stems Inc 5 DSM G600 Install Guide Installation Overview Installation Overview Once you ve completed your DSM G600 installation your network may appear similar to the diagram below Client Mode Access Point Mode ...

Page 6: ...screw the two screws on the back panel of the DSM G600 to remove the cover B Connect the IDE cable to the IDE cable connector on your hard drive Note Make sure the jumper setting on your hard drive is set to Master or Cable Select C Connect the power cable to the power connector on your hard drive ...

Page 7: ... the DSM G600 D While facing the back of the DSM G600 insert the right side of the hard drive into the case Once in place snap down the left side F Connect an Ethernet cable to the Ethernet port located on the back of the DSM G600 Note It is required that an Ethernet cable is used during initial setup Once your wireless configuration is set you may disconnect the Ethernet cable and begin communicat...

Page 8: ...Connect the antenna to the antenna connector located on the back of the DSM G600 Installing the Hardware continued Note When you first power on the DSM G600 will offer to format your hard drive if it is unformatted This process may take several minutes depending on the size of your hard drive During this process the power LED will blink Once the power LED is solid you may then access the web based ...

Page 9: ...5 meters at a 45 degree angle appears to be almost 3 feet 1 meter thick At a 2 degree angle it looks over 42 feet 14 meters thick Position devices so that the signal will travel straight through a wall or ceiling instead of at an angle for better reception 2 3 Keep your product away at least 3 6 feet or 1 2 meters from electrical devices or appliances that generate RF noise Building Materials make...

Page 10: ...ireless setup on the DSM G600 If you do not have Windows XP with Service Pack 2 or do not wish to use WCN skip to page 13 Windows Connect Now WCN C l i ck S t a r t A c c e s s o r i e s Communications Wireless Network Setup Wizard If you have already used WCN to configure other wireless devices on your network and would like to use the same settings on your DSM G600 click Add new computers or devi...

Page 11: ...o use WPA PSK select Use WPA Encryption instead of WEP Enter the Network Name SSID Click Next This screen appears if you choose to set the WEP key manually Enter the desired encryption key in the space provided and then enter the key again to confirm Windows Connect Now Continued Click Next This screen appears if you choose to set the WPA key manually Enter the desired encryption key in the space p...

Page 12: ...ation of the DSM G600 Your wireless setup using WCN is now complete This screen appears after the settings are successfully transferred to the USB flash drive Follow the directions on the screen When inserting the USB flash drive into the USB port on the DSM G600 the USB LED will blink slowly as it detects the USB flash drive and then turn off The USB LED will then quickly blink 3 times and turn off ...

Page 13: ...Config To access the web based configuration insert the DSM G600 CD into your CD ROM drive Type admin for the user name and leave the password field blank Highlight an available DSM G600 and click Configuration to access the web based utility Click Launch D Link Easy Search Utility ...

Page 14: ...on continued Enter and confirm a new password Click Next Click on Run Wizard The Wizard will guide you through five steps Password Time Zone LAN Settings Additional Settings Wireless Configuration Click Next Select the appropriate Time Zone in the pulldown menu Click Next ...

Page 15: ...e DSM G600 In Wireless Mode select Client or Access Point mode Select Enable to use the wireless function or Disable to turn wireless off Configuration continued Select either Static or Dynamic IP address When Static is selected you will fill in these fields Static IP Address Subnet Mask Gateway Address Usually the LAN address of your router DNS Address A Domain Name Server translates Domain names in...

Page 16: ...ailable wireless networks or you may enter the wireless settings manually The SSID must be the same for all devices in the network Click the radio button next to the wireless network you want to connect to Click Connect If you have configured the wireless settings using Windows Connect Now WCN click Next on the following screen without any configuration changes Refer to page 10 for WCN setup instruc...

Page 17: ...ameencryption settings as your wireless router or access point Security Mode Select WEP Authentication Select Open or Shared Encryption Mode Select the level of encryption 64 or 128 bit Key Format Select Hex or ASCII Default Key Select which key you want to use Key 1 4 Enter your WEP key You may enter up to 4 different keys If you select WPA PSK enter the same encryption settings as your wireless ...

Page 18: ...are 802 11g otherwise select Disabled SSID Broadcast Select Enabled to allow your SSID to be seen by any wireless device Security Select to enable WEP WPA or WPA PSK security Click Next If you select WEP enter the following settings Security Mode Select WEP Authentication Select Shared Encryption Mode Select the level of encryption 64 or 128 bit Key Format Select Hex or ASCII Default Key Select wh...

Page 19: ...ents Click Next Configuration continued For more information on WEP and WPA security please refer to section on Wireless Security in your manual located on the D Link CD ROM Click Next If you select WPA PSK enter the following settings Security Mode Select WPA PSK Encryption Select TKIP or AES Pre Shared Key The key or passphrase is an alpha numeric password between 8 and 63 characters long The pas...

Page 20: ...20 D Link Systems Inc DSM G600 Install Guide Configuration You have completed the basic configuration using the setup wizard Click Restart Configuration continued ...

Page 21: ...icon on your desktop and double click on the folder that represents your internal USB drive By default all users on your network will have read write permissions to all folders and files on the internal USB drive s For more information on creating users and assigning permissions please refer to the Using the Configuration Utility section in the manual included on your DSM G600 CD ...

Page 22: ...top Double click the mapped drive to access the drive Available shares will be displayed Highlight the share you want to map Select an available drive letter from the drop down menu and click Connect You can assign a drive letter e g E to a specific folder on your internal USB drive s that are connected to your DSM G600 Highlight an available DSM G600 You can assign a drive letter e g E to a specifi...

Page 23: ...D Link Systems Inc 23 DSM G600 Install Guide Notes Notes ...

Page 24: ...00am EST World Wide Web http support dlink ca E mail support dlink ca Version 2 0 Revised 07 26 2005 Copyright 2005 D Link Corporation D Link Systems Inc All rights reserved D Link the D Link logo are registered trademarks of D Link Corporation or its subsidiaries in the United States and other countries Other trademarks are the property of their respective owners Maximum wireless signal rate base...

Reviews: