background image


13

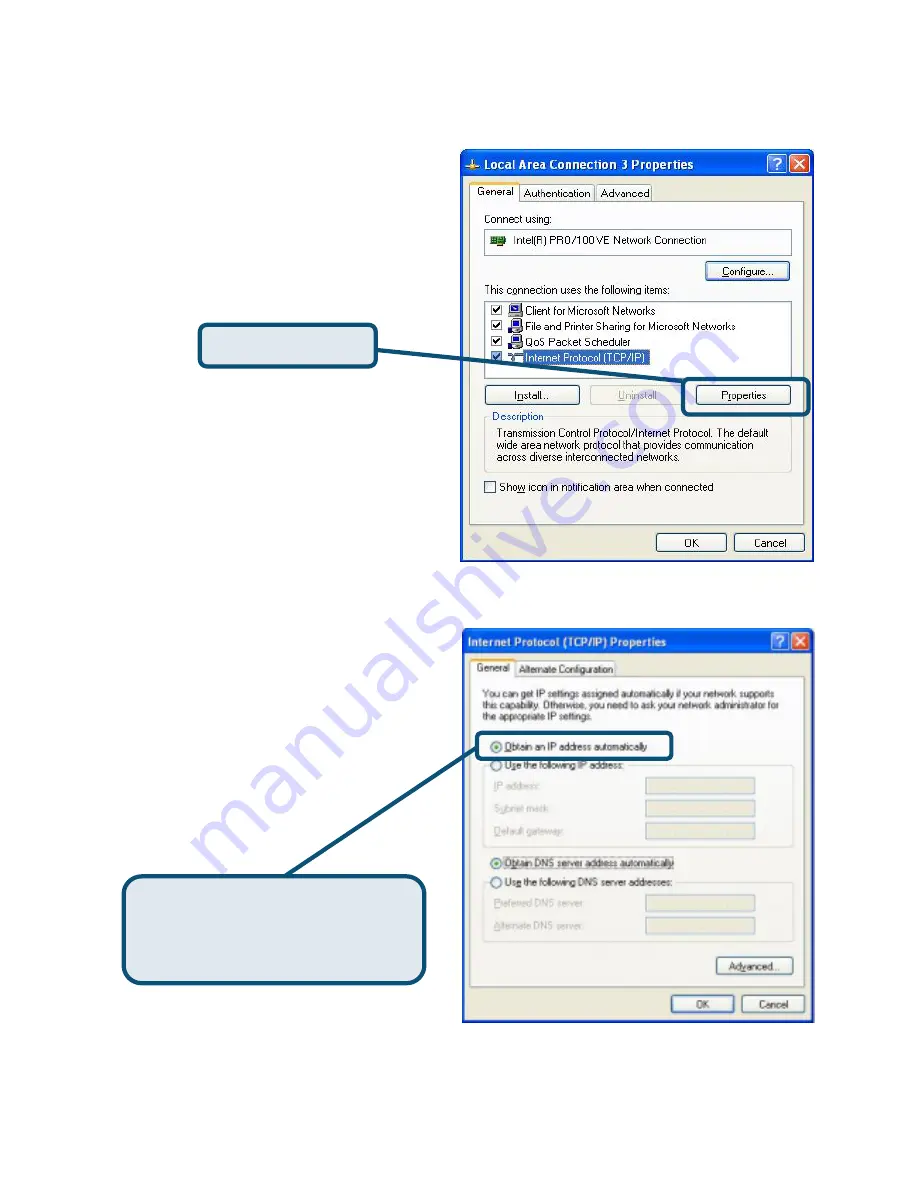
3. 

In the 

General

 tab of the 

Local Area Connection Properties

 menu, highlight 

Internet 

Protocol (TCP/IP)

 under “This connection uses the following items:” by clicking on it 

once. Click on the 

Properties

 button. 


4. Select “

Obtain an IP address automatically

” by clicking once in the circle. Click the 

OK button.   


Your computer is now ready to use the Router’s DHCP server. 


Click


Properties 

Select


Obtain an IP address 

automatically 

in the Internet 

Protocol (TCP/IP) Properties window

Summary of Contents for DSL-504G

Page 1: ...DSL Router 2004 D Link Systems Inc All rights reserved Trademarks or registered trademarks are the property of their respective holders Software and specifications subject to change without notice DSL 504G ADSL Router CD ROM containing User Manual Ethernet CAT5 UTP Cable Telephone Cable Power Adapter If any of the above items are missing please contact your reseller Using a power supply with a dif...

Page 2: ...port on the back panel of the DSL 504G and the other end of the cable to an Ethernet Adapter or available Ethernet port on your computer C Insert one end of the Telephone cable into the ADSL port on the rear panel of the Router and insert the other end into the ADSL phone line wall socket If you need to install a low pass filter follow the instructions come with the filter or from your ISP ADSL po...

Page 3: ...you are using Windows XP and do not know how to change your network settings skip ahead to Appendix at the back and read the instructions provided You may also read the User Manual for instructions on changing IP settings for computers running Windows operating systems Open your Web browser and type http 10 1 1 1 into the URL address box Then press the Enter or Return key The Login page appears Ty...

Page 4: ...he Run Wizard button in the middle of the web page A pop up menu will appear This pop up menu is the Setup Wizard The Setup Wizard procedure consists of four general steps 1 Set the system admin password 2 Set the time zone 3 Set the Internet connection 4 Restart the Router When you setup the Internet connection you will need to enter the information provided to you from your ISP The type of infor...

Page 5: ...or to configure the Router You have already used the default Password admin to access the web manager You can choose another Password The login User Name admin cannot be changed Type in the new Password and type it a second time to Verify Password Click Next to continue Click the Next button Type the new Password used by the Router administrator and type it again in Verify Password Click the Next ...

Page 6: ... ISP should have given this information to you If you do not know what type of connection to use exit the Setup Wizard and contact your ISP for the information The Setup wizard menu that appears when you click the Next button depends on what connection type you select Select the Time Zone you are located and set the appropriate Daylight Savings Time On Off Select the Connection Type used for your ...

Page 7: ...you are ready to proceed to the Setup Completed menu In Australia the most common settings for PPPoE PPPoA are VPI 8 VCI 35 and Connection Type PPPoA VC Mux or VPI 8 VCI 35 and Connection Type PPPoE LLC In New Zealand the most common settings for PPPoE PPPoA are VPI 0 VCI 100 and Connection Type PPPoA VC Mux If you are not sure what Connection Type VPI and VCI to use please check with your ISP Typ...

Page 8: ...e the VPI number and VCI number type in the new values In Australia most users will use the default values VPI 8 and VCI 35 In New Zealand most users will use VPI 0 and VCI 100 Click Next when you are ready to proceed to the Setup Completed menu Select the Connection Type Click the Next button Skip ahead to the Setup Completed menu below If you have been told to change the VPI or VCI number Type t...

Page 9: ...ucted to change the VPI number and VCI number type in the new values In Australia most users will use the default values VPI 8 and VCI 35 In New Zealand most users will use VPI 0 and VCI 100 Click Next when you are ready to proceed to the Setup Completed menu Select the Connection Type Click the Next button Skip ahead to the Setup Completed menu below If you have been told to change the VPI or VCI...

Page 10: ... number and VCI number type in the new values In Australia most users will use the default values VPI 8 and VCI 35 In New Zealand most users will use VPI 0 and VCI 100 Click Next when you are ready to proceed to the Setup Completed menu Select the Connection Type Click the Next button Skip ahead to the Setup Completed menu below If you have been told to change the VPI or VCI number Type the new va...

Page 11: ...and restart the Router It will take about two minutes to restart the Router The screens pictured here will appear during the save and restart process Do not turn off the Router Click the Exit button when the message appears informing you that The device has rebooted successfully You can now launch your web browser to access the Internet Click the Restart button ...

Page 12: ... in Windows XP Use the following steps to configure a computer running Windows XP to be a DHCP client 1 From the Start menu on your desktop go to Settings then click on Network Connections 2 In the Network Connections window right click on LAN Local Area Connection then click Properties Right click on the Local Area Connection icon and Select the Properties option from the pull down menu ...

Page 13: ...e following items by clicking on it once Click on the Properties button 4 Select Obtain an IP address automatically by clicking once in the circle Click the OK button Your computer is now ready to use the Router s DHCP server Click Properties Select Obtain an IP address automatically in the Internet Protocol TCP IP Properties window ...

Page 14: ...n on the D Link website Australia D Link Australia 1 Giffnock Avenue North Ryde NSW 2113 Sydney Australia TEL 61 2 8899 1800 FAX 61 2 8899 1868 Australia 1800 177 100 New Zealand 0800 900 900 URL www dlink com au www dlink co nz E MAIL support dlink com au info dlink com au ...

Reviews: