background image

9

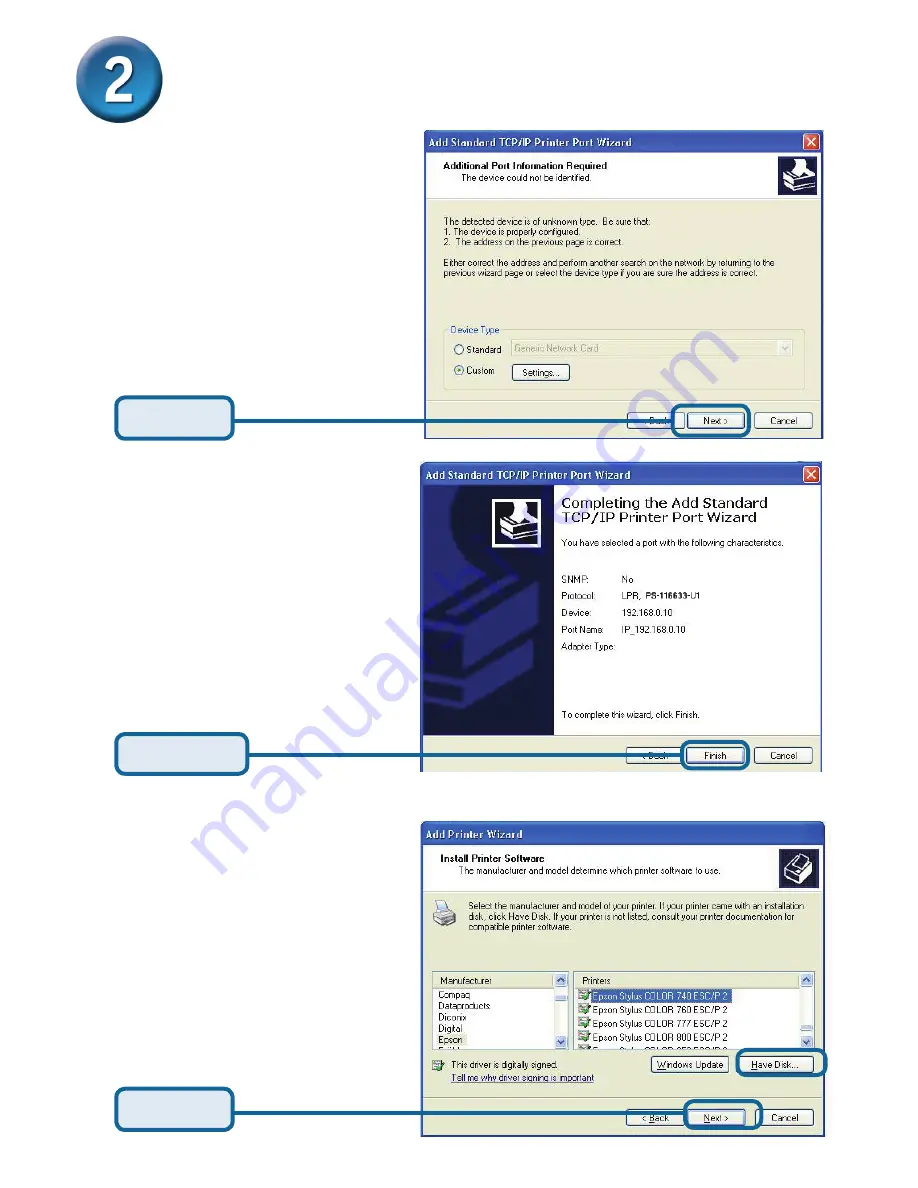
In  this  window,  scroll  down 

to find your printer. (If it is not 

listed,  insert  the  driver  CD  or 

diskette  that  came  with  your 

printer.)  

Click on “

Have Disk

.”  

Then, scroll down and highlight 

the printer.

Click 

Finish

Setting up your DP-301U for network 

printing in Windows XP 

(continued)

Click 

Next

Click 

Next

Summary of Contents for DP 301U

Page 1: ...PRINT SERVER WITH USB PORT DP 301U Quick Installation Guide Руководство по быстрой установке Guía de Instalación Rápida Guia de Instalação Rápida 快速安裝指南 Petunjuk Pemasangan Cepat ...

Page 2: ...B Print Server Check Your Package Contents DP 301U D Link Fast Ethernet Print Server 5V DC 2 5A Power Adapter Using a power supply with a different voltage rating will damage this product and void its warranty This product can be setup using any current web browser i e Internet Explorer 6 or Netscape Navigator 7 0 You will need an Ethernet enabled device such as a laptop or desktop computer and a ...

Page 3: ...ge the unit voiding the warranty for this product First insert one end of a straight through CAT5 Ethernet RJ 45 cable into the Network Port shown below Connect the other end of the cable to the LAN port of the gateway or switch Note Do not connect the power cord to the DP 301U until you are advised to do so Then plug one end of the power adapter into the DP 301U and the other end into your electr...

Page 4: ... assign an IP address on one of the PC s on your network to the same subnet as the print server For additional Windows operating system setup or information on the web management interface refer to the manual located on the CD ROM Go to Start right click on My Network Places select Properties Double click on the Network Connection associated with your Network Adapter Input a static IP address in t...

Page 5: ...lt the IP address is set to 192 168 0 10 The IP address of the DP 301U can be modified on the Network tab of the Web configuration menu The following instructions use the print server s default IP address as an example Make the appropriate changes if you have modified the DP 301Us IP address Click OK to apply IP address settings Click OK ...

Page 6: ...se For Windows XP Go to Start Printers and Faxes Add a Printer or Go to Start Control Panel Printers and Faxes Double click on the Add Printer icon Click on the Configure tab to view the current Port Settings Setting up your DP 301U for network printing in Windows XP continued ...

Page 7: ...menu highlight Standard TCP IP Port Select Local Printer Setting up your DP 301U for network printing in Windows XP continued Click Next Click Next Click Next Please make sure to deselect Automatically detect and install my Plug an Play printer ...

Page 8: ...ype in the IP address of the print server i e 192 168 0 10 The port name will automatically be filled in This may take a few seconds Setting up your DP 301U for network printing in Windows XP continued Click Next Click OK Select Custom Then click on Settings Click Settings ...

Page 9: ...r If it is not listed insert the driver CD or diskette that came with your printer Click on Have Disk Then scroll down and highlight the printer Click Finish Setting up your DP 301U for network printing in Windows XP continued Click Next Click Next ...

Page 10: ...now ready for printing with Windows XP on your network Click Finish Select Yes to print a test page At this screen you can input a name for this printer Setting up your DP 301U for network printing in Windows XP continued Click Next Click Next ...

Page 11: ...p www dlink co in support productsupport aspx Indonesia Malaysia Singapore and Thailand Tel 62 21 5731610 Indonesia Tel 1800 882 880 Malaysia Tel 65 66229355 Singapore Tel 66 2 719 8978 9 Thailand Monday to Friday 9 00am to 6 00pm http www dlink com sg support e mail support dlink com sg Korea Tel 82 2 890 5496 Monday to Friday 9 00am to 6 00pm http www d link co kr e mail lee d link co kr New Zea...

Page 12: ...l support e mail support dlink co il Pakistan Tel 92 21 4548158 or 92 21 4548310 Sunday to Thursday 9 00am to 6 00pm http support dlink me com e mail support pk dlink me com South Africa and Sub Sahara Region Tel 27 12 665 2165 08600 DLINK for South Africa only Monday to Friday 8 30am to 9 00pm South Africa Time http www d link co za Turkey Tel 90 212 2895659 Monday to Friday 9 00am to 6 00pm http...

Page 13: ......

Page 14: ...ьте комплектацию поставки DP 301U Многопортовый принт сервер Fast Ethernet D Link Адаптер питания 5В постоянного тока 2 5 А Использование источника питания с другими характеристиками и напряжением может повлечь выход из строя устройства и потерю гарантии Этот продукт может быть настроен через любой web браузер например Internet Explorer 6 или Netscape Navigator 7 0 Вам понадобится устройство с сет...

Page 15: ...орту т к это может повлечь выход устройства из строя и потерю гарантии Подключите один конец кабеля Ethernet CAT5 к сетевому порту принт сервера см ниже Другой конец кабеля подключите к порту коммутатора или шлюза Примечание не подключайте кабель питания к DP 301U до тех пор пока это не будет указано в инструкции Затем подключите шнур питания к DP 301U и включите устройство в электрическую розетку...

Page 16: ... одному из компьютеров IP адрес из той же подсети что иIP адрес принт сервера За информацией по установке в других версиях ОС Windows пожалуйста обратитесь к руководству пользователя на CD ROM Нажмите Пуск правой кнопкой щелкните на Мое сетевое окружение выберите Свойства дважды щелкните на Подключение по локальной сети для вашего адаптера Введите статический IP адрес из той же подсети что и IP ад...

Page 17: ... IP адрес 192 168 0 10 IP адрес DP 301U может быть изменен на вкладке Network меню настройки Web интерфейса Следующие инструкции используют настройки по умолчанию для IP адреса принт сервера Выполните необходимые изменения если вы поменяли IP адрес DP 301U Нажмите OK для того чтобы применить настройки IP адреса Нажмите OK ...

Page 18: ...Windows XP Нажмите Пуск Принтеры Добавить принтер или Пуск Панель управления Принтеры Дважды щелкните на иконке Добавить принтер Нажмите на вкладку Configuration чтобы посмотреть текущие настройки Port Settings Настройка DP 301U для сетевой печати в Windows XP продолжение ...

Page 19: ...е Standard TCP IP Port Выберите Локальный принтер Настройка DP 301U для сетевой печати в Windows XP продолжение Нажмите Далее Нажмите Далее Пожалуйста убедитесь что отключена функция Автоматическое определение и установка принтера Plug and Play Нажмите Далее ...

Page 20: ...LPR Наберите IP адрес принт сервера например 192 168 0 10 Имя порта заполнится автоматически Это может занять несколько минут Настройка DP 301U для сетевой печати в Windows XP продолжение Нажмите Далее Нажмите OK Выберите Особое Затем кликните Настройка Нажмите Настройка ...

Page 21: ... ваш принтер Если не отображается вставьте CD ROM или дискету поставляемую с вашим принтером Нажмите Установить с диска Нажмите Готово Настройка DP 301U для сетевой печати в Windows XP продолжение Нажмите Далее Нажмите Далее ...

Page 22: ... принтер готов к сетевой печати из Windows XP Нажмите Готово Нажмите Да для печати пробной страницы В этом меню вы можете задать имя принтера Настройка DP 301U для сетевой печати в Windows XP продолжение Нажмите Далее Нажмите Далее ...

Page 23: ...Link D Link предоставляет бесплатную поддержку для клиентов в течение гарантийного срока Клиенты могут обратиться в группу технической поддержки D Link по телефону или через Интернет Техническая поддержка D Link 495 744 00 99 Техническая поддержка через Интернет http www dlink ru e mail support dlink ru ...

Page 24: ... Print Server Adaptador de alimentación 5V DC 2 5A El uso de una fuente de alimentación con distinto voltaje puede ser perjudicial y anular la garantía para este producto Este producto puede instalarse usando cualquier navegador p ej Internet Explorer 6 o Netscape Navigator 7 0 Se necesita un dispositivo con conexión Ethernet como un portátil u ordenador de sobremesa y un puerto de impresora paral...

Page 25: ...nectar ningún otro dispositivo USB en el puerto USB podría ser perjudicial y anular la garantía de este producto Primero introducir uno de los extremos del cable RJ 45 Ethernet straight through CAT5 en el Network Port como se muestra más abajo Conectar el extremo del cable al puerto LAN de la puerta de enlace o del conmutador Nota No se debe conectar todavía el cable de tensión al DP 301U se indic...

Page 26: ... red a la misma subred que el servidor de impresión Respecto a la configuración en otros sistemas operativos Windows o para obtener información sobre la interfaz de gestión basada en Web consúltese el manual disponible en el CD ROM Ir a Start hacer clic con el botón de la derecha en My Network Places seleccionar Properties Hacer doble clic en la opción Network Connection asociada con el adaptador ...

Page 27: ...2 168 0 10 La dirección IP del DP 301U puede cambiarse en la ficha Network del menú de configuración Web En las instrucciones siguientes se ha tomado como ejemplo la dirección IP por defecto del servidor de impresión Si se modifica la dirección IP del DP 301U deben hacerse los cambios correspondientes Hacer clic en OK para aplicar los parámetros de la dirección IP Hacer clic en OK ...

Page 28: ...ara Windows XP Ir a Start Printers and Faxes Add a Printer o ir a Start Control Panel Printers and Faxes Hacer doble clic en el icono Add Printer Hacer clic en la ficha Configuration para ver los valores actuales en Port Settings Configurar el DP 301U para la impresión en red en Windows XP continuación ...

Page 29: ... marcar Standard TCP IP Port Seleccionar Local Printer Configurar el DP 301U para la impresión en red en Windows XP continuación Hacer clic en Next Hacer clic en Next Hacer clic en Next Deseleccionar Automatically detect and install my Plug and Play printer ...

Page 30: ...ción IP address del servidor de impresión p ej 192 168 0 10 El nombre del puerto se mostrará automáticamente Esto puedo tardar unos segundos Configurar el DP 301U para la impresión en red en Windows XP continuación Hacer clic en Next Hacer clic en OK Seleccionar Custom Luego hacer clic en Settings Hacer clic en Settings ...

Page 31: ... en la lista deberá usarse el disquete o CD del controlador proporcionado con la impresora Hacer clic en Have Disk Luego desplazar el scroll y marcar la impresora Hacer clic en Finish Setting up your DP 301U for network printing in Windows XP continued Hacer clic en Next Hacer clic en Next ...

Page 32: ...r con Windows XP en la red Hacer clic en Finish Seleccionar Yes para imprimir una página de prueba En esta pantalla se puede introducir un nombre para esta impresora Configurar el DP 301U para la impresión en red en Windows XP continuación Hacer clic en Next Hacer clic en Next ...

Page 33: ... Desk Colombia Teléfono 01800 9525465 Lunes a Viernes 07 00 am a 20 00 pm Soporte Técnico Help Desk Ecuador Teléfono 1800 035465 Lunes a Viernes 07 00 am a 20 00 pm Soporte Técnico Help Desk El Salvador Teléfono 800 6335 Lunes a Viernes 06 00 am a 19 00 pm Soporte Técnico Help Desk Guatemala Teléfono 1800 8350255 Lunes a Viernes 06 00 am a 19 00 pm Soporte Técnico Help Desk Panamá Teléfono 00800 0...

Page 34: ...çar DP 301U USB Print Server Confira o Conteúdo da Embalagem DP 301U D Link Fast Ethernet Print Server Adaptador 5V DC 2 5A Usar uma fonte de energia com a voltagem diferente pode danificar o produto e violar a garantia Este produto pode ser configura do usando qualquer versão atual de Browser Ex Internet Explorer 6 or Netscape Navigator 7 0 Você precisa de um dispositivo com uma porta Ethernet at...

Page 35: ...poderá danificar a unidade e violar a garantia do produto Primeiro insira um cabo Ethernet RJ 45 na porta Network Port mostrado abaixo Conecte a outra extremidade do cabo na porta LAN do Gateway ou Switch Nota Não conecte o cabo de energia ao DP G301U sem que seja avisado Conecte uma extremidade do adaptador de energia no DP G301U e a outra em sua tomada de energia eletrica ou estabilizador O DP G...

Page 36: ...dos PC s da sua rede com a mesma sub rede do print server Para configuração adicional no sistema operacional Windows ou informações sobre a interface de gerenciamento web consulte o manual localizado no CD ROM Clique em Start clique com o botão direito sobre My Network Places selecione Properties Duplo clique em Network Connection associado com o seu adaptador de rede Coloque o endereço IP com a m...

Page 37: ...reço IP da unidade está como 192 168 0 10 O endereço IP do DP G301U pode ser alterado na guia Network do menu de configuração Web As instruções a seguir estão com o endereço IP padrão do DP G301U como um exemplo Faça as alter ações apropriadas se você modificar o endereço IP do DP G301U Clique em OK para aplicar as configurações de endereço IP Clique em OK ...

Page 38: ...ows XP Vá para Start Printers and Faxes Add a Printer ou Vá para Start Control Panel Printers and Faxes Duplo clique sobre o ícone Add Printer Clique sobre a guia Configuration para visualizar as Configurações de Port Settings Configurando o DP G301U para impressão em Rede com Windows XP Continuação ...

Page 39: ...ne Standard TCP IP Port Selecione Local Printer Configurando o DP G301U para impressão em Rede com Windows XP Continuação Clique em Next Clique em Next Clique em Next Certifique se de desmarcar a opção Automatically detect and install my Plug and Play printer ...

Page 40: ...P do Print Server i e 192 168 0 10 O nome da porta ser preenchido automaticamente ser preenchido Isto pode demorar alguns segundos Configurando o DP G301U para impressão em Rede com Windows XP Continuação Clique em Next Clique em OK Selecione Custom Clique sobre Settings Clique em Settings ...

Page 41: ...a Se não estiver listada insira o CD com o driver correspondente Clique sobre Have Disk Localize e selecione a impressora Clique em Finish Configurando o DP G301U para impressão em Rede com Windows XP Continuação Clique em Next Clique em Next ...

Page 42: ...a imprimir com Windows XP na sua rede Clique em Finish Selecione Yes para imprimir a página de teste Nesta tela você irá colocar o nome para esta impressora Setting up your DP 301U for network printing in Windows XP continued Clique em Next Clique em Next ...

Page 43: ...brasil com br A D Link fornece suporte técnico gratuito para clientes no Brasil durante o período de vigência da garantia deste produto Suporte Técnico para clientes no Brasil Telefone São Paulo 11 2185 9301 Segunda à sexta Das 8h30 às 18h30 Demais Regiões do Brasil 0800 70 24 104 E mail e mail suporte dlinkbrasil com br ...

Page 44: ...3 以上物件如有任何缺失 請聯繫經銷商 CD ROM 軟體 使用手冊 準備 DP 301U USB介面列印伺服器 檢查包裝內物品 DP 301U D Link高速乙太網路 印表機伺服器 5V DC 2 5A電源供應器 使用不同電壓 規格的電源會損壞 該產品 且不在保 固範圍內 該產品可使用當前任何WEB瀏覽器進 行安裝 如 Internet Explorer 6 或 Netscape Navigator 7 0 需要一台支援乙太網路的設備 如筆記型電腦或桌上型電腦 一個連接至DP 301U的 USB或平行埠印表機 注意 安裝DP 301U前請關閉印表機電源 ...

Page 45: ...台USB印表機可以連接到DP 311U的USB埠上 不要把另外的USB設備 與此USB埠連接 這樣做會損害設備 使本產品的保固失效 首先 將CAT5乙太網路RJ 45直線的一端插入 網路埠 如下所示 將 另一端插入閘道器或交換器的LAN埠 Note Do not connect the power cord to the DP 301U until you are advised to do so 然後 將電源供應器的一端插入DP 301U 另一端插入電源插座 DP 301U將會開啟 開始自我檢測 將DP 301U連接至網路 USB 埠 網路埠 關於Mac OS列印 請參考光碟上的使用手冊 ...

Page 46: ... IP 地址 IP 地址可以手動分配或通過 DHCP BOOTP 或 RARP 自 動分配 如要連接印表伺服器的 WEB 設定 手動為網路上的 PC 設置 IP 地址 確 保其與印表伺服器在同一個子網段 如需獲得其他web管理介面的Windows作業系統的安裝及資訊 請參考 光碟上的使用手冊 進入開始 右擊網路連線 選擇內容 雙擊 與網路卡相關的區域連線 輸入一個與印表伺服器在同一範圍的靜態 IP地址 單擊 Internet Protocol TCP IP 單擊 Properties 選擇使用下列的IP地址 IP地址 192 168 0 52 子網路遮罩 255 255 255 0 單擊確定 ...

Page 47: ...47 在Windows XP下為DP 301U安裝 網路列印 繼續 使用WEB瀏覽器輸入DP 301U 的IP地址 預設IP地址為 192 168 0 10 DP 301U的IP位址可在WEB設定功能表的 Network 網路 選項中修改 使用印表伺服器的預設IP地址為例來做說 明 如果你改變了DP 301U的IP地址 請 做相對應的改變 單擊OK使IP位址設定生效 單擊確定 ...

Page 48: ...48 單擊下一步 在一張紙上寫下你希望使用 的埠名稱 對於Windows XP 進入開始 印表機和傳真 新增印表機 或進入 開始 控制台 印表機和傳真 雙擊 新增印表機 圖示 單擊設定標簽查看當前埠設置 在Windows XP下為DP 301U安裝 網路列印 繼續 ...

Page 49: ...49 選擇 建立新的連接埠 選擇 本機印表機 在Windows XP下為DP 301U安裝 網路列印 繼續 單擊下一步 單擊下一步 單擊下一步 請確認取消選定自動偵測並 安裝我的隨插即用印表機 ...

Page 50: ...50 輸入印表機所使用的埠 名稱 選擇 LPR 輸入印表伺服器的IP地址 如 192 168 0 10 埠名稱會自動填上 這可能需要幾秒鐘 單擊下一步 單擊是 選擇 設定 然後單擊設置 單擊設置 在Windows XP下為DP 301U安裝 網路列印 繼續 ...

Page 51: ...51 在這個畫面中 往下拉尋找印表機 如果沒出現在列表中 插入印表機 的驅動CD或磁片 單擊 由磁片安裝 然後 往下拉選擇印表機 單擊完成 單擊下一步 單擊下一步 在Windows XP下為DP 301U安裝 網路列印 繼續 ...

Page 52: ...52 安裝完成 在Windows XP下該網路上的印表機 準備開始列印 單擊完成 選擇 Yes 列印測試頁 在這個螢幕中 請輸入該印表機的 名稱 單擊下一步 單擊下一步 在Windows XP下為DP 301U安裝 網路列印 繼續 ...

Page 53: ...與D Link台灣 地區技術支援工程師聯絡 D Link 免付費技術諮詢專線 0800 002 615 服務時間 週一至週五 早上8 30 到 晚上9 00 不含周六 日及國定假日 網 站 http www dlink com tw 電子郵件 dssqa_service dlink com tw 如果您是台灣地區以外的用戶 請參考D Link網站 全球各地 分公司的聯絡資訊以取得相關支援服務 產品保固期限 台灣區維修據點查詢 請參考以下網頁說明 http www dlink com tw 產品維修 使用者可直接送至全省聯強直營維修站或請洽您的原購買經銷商 ...

Page 54: ...U D Link Fast Ethernet Print Server 5V DC 2 5A Power Adapter Menggunakan power supply yang tegangannya berbedadenganpowersupply yang termasuk dalam paket ini dapatmenyebabkankerusakan danakanmembatalkangaransi produk ini Produk ini bisa diseting menggunakan Web Browser yang ada sekarang seperti Internet Explorer 6 atau Netscape Navigator 7 0 Anda membutuhkan perangkat yang mempunyai kartu jaringan...

Page 55: ...kin akan merusakkan unit membatalkan garansi dari produk ini Pertama masukkan salah ujung kabel Ethernet CAT5 straight through ke Network Port seperti gambar dibawah Hubungkan ujung satunya lagi ke port LAN pada router atau hubungkan ke sebuah switch Catatan Jangan hidupkan DP 301U sebelum ada perintah untuk menghidupkannya Kemudian masukkan power adapter ke DP 301U dan colokkan power adapter ke c...

Page 56: ...as dengan print server secara manual pada salah satu PC di jaringan anda Untuk informasi tambahan mengenai seting sistem operasi Windows atau informasi pada manajemen antar muka berbasiskan web silah kan melihat pada petunjuk penggunaan yang ada di CD Pergi ke Start Klik kanan pada My Network Places Pilih Properties Klik dua kali pada Network Connection yang terasosiasi dengan kartu jaringan anda ...

Page 57: ...efault alamat IP nya adalah 192 168 0 10 Alamat IP dari DP 301U dapat dimodifikasi pada bagian Network dari Menu konfigurasi Web Instruksi berikut menggunakan alamat IP default dari print server sebagai contoh Silahkan lakukan penyesuaian yang diperlukan jika anda merubah alamat IP dari DP 301U Klik OK untuk mengaktifkan konfigurasi alamat IP Klik OK ...

Page 58: ...indows XP Pergi ke Start Printers and Faxes Add a Printer atau Pergi ke Start Control Panel Printers and Faxes Klik dua kali pada simbol Add Printer Klik pada menu System untuk menampilkan Port Settings Mengatur DP 301U anda untuk mencetak melalui jaringan pada Windows XP Lanjutan ...

Page 59: ... down pilih Standard TCP IP Port Pilih Local Printer Mengatur DP 301U anda untuk mencetak melalui jaringan pada Windows XP Lanjutan Klik Next Klik Next Klik Next Pastikan anda menon aktifkan Automatically detect and install my Plug and Play printer ...

Page 60: ... secarik kertas tadi Pilih LPR Masukkan alamat IP dari print server misal 192 168 0 10 Nama Port akan otomatis terisi Tunggu beberapa detik Mengatur DP 301U anda untuk mencetak melalui jaringan pada Windows XP Lanjutan Klik Next Klik OK Pilih Custom Kemudian klik Settings Klik Settings ...

Page 61: ...nakan jika tidak ada maka masukkan CD driver atau disket yang ada pada paket penjualan printer anda Klik Have Disk Kemudian cari dan pilih printer Klik Finish Mengatur DP 301U anda untuk mencetak melalui jaringan pada Windows XP Lanjutan Klik Next Klik Next ...

Page 62: ...dagunakanuntukmencetak melalui jaringan anda Klik Finish Pilih Yes untuk mengetes printer anda Pada layar ini anda dapat memasukkan sebuah nama untuk printer ini Mengatur DP 301U anda untuk mencetak melalui jaringan pada Windows XP Lanjutan Klik Next Klik Next ...

Page 63: ...okumentasi pengguna dapat diperoleh pada situs web D Link Dukungan Teknis untuk pelanggan Dukungan Teknis D Link melalui telepon Tel 62 21 5731610 Dukungan Teknis D Link melalui Internet Email support dlink co id Website http support dlink co id ...

Page 64: ...Ver 2 00 I 2007 12 27 6DP301UQ ML2G ...

Reviews: