background image

provided.

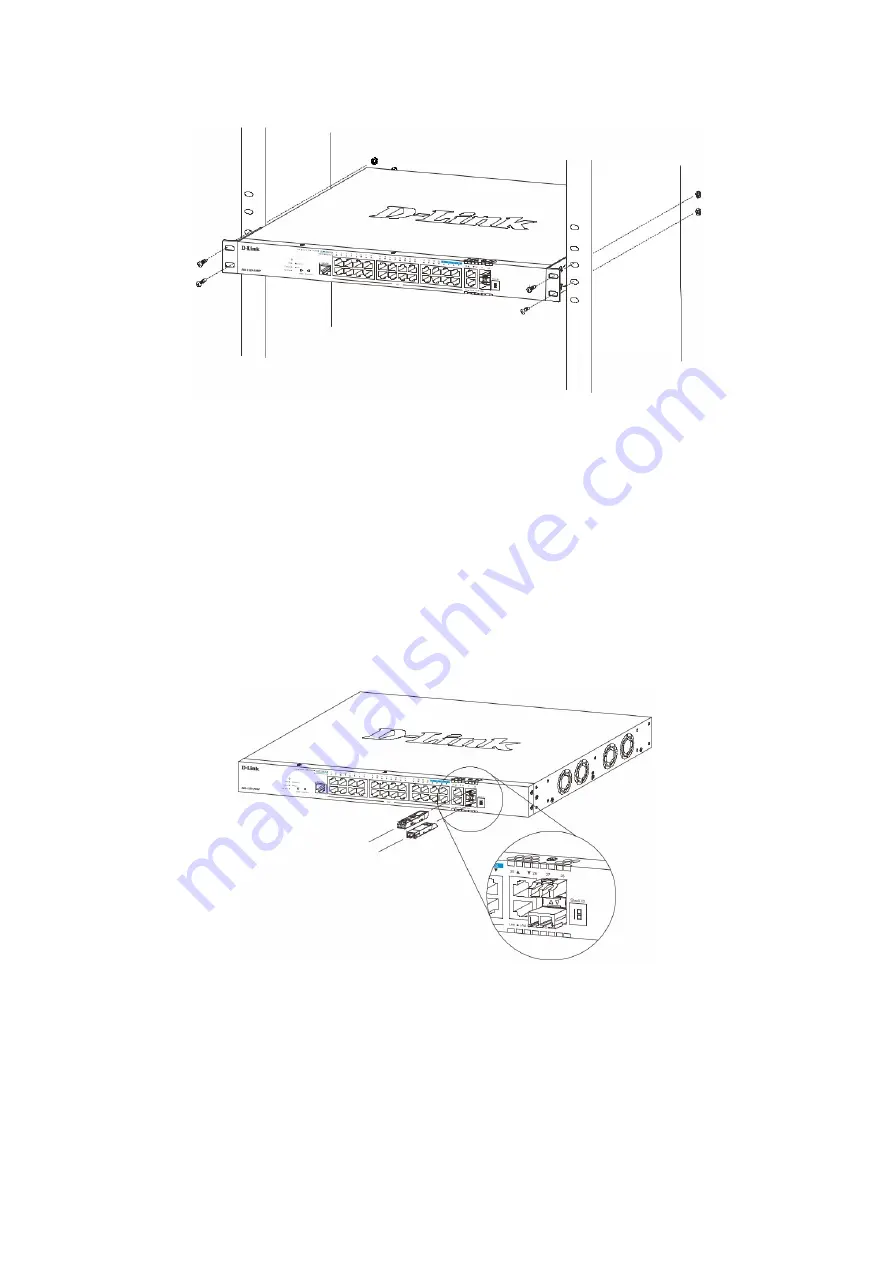
Figure 6 — Installing the switch in a rack

Installing Transceivers into the Transceiver Ports

The   switch   is   equipped   with   Small   Form-factor   Pluggable   (SFP)   and   Enhanced   Small
Form-factor Pluggable (SFP+) ports that can be used to connect various other networking
devices to this switch that do not support the standard RJ-45 wiring connection. These
ports are generally used to connect this switch to optical fiber connections and can be
used to connect devices to the switch over great distances. The maximum distance that
the RJ-45 wiring connection can reach is 100 meters. Fiber optic connections can span
several kilometers.

Figure 7 — Inserting transceivers into the transceiver ports

Connecting AC Power to the Switch

Plug one end of the AC power cord into the power socket of the switch and the other end
into the local power source outlet.

7

Summary of Contents for DGS-1520-28MP

Page 1: ...Base X SFP Ports Stackable Smart Managed Switch Управляемый L3 стекируемый коммутатор с 20 портами 10 100 1000Base T 4 портами 100 1000 2 5GBase T 2 портами 10GBase T и 2 портами 10GBase X SFP 24 порта PoE 802 3af at PoE бюджет 370 Вт 740 Вт с DPS 700 Quick Installation Guide Краткое руководство по установке ...

Page 2: ...and screws Four rubber feet with adhesive backing One Quick Installation Guide Front Panel Description The front panel of the switch contains the following items 20 10 100 1000Base T PoE ports 4 100 1000 2 5GBase T PoE ports 2 10GBase T ports 2 10GBase X SFP ports RJ 45 console port LEDs Power RPS Console Fan Error Link Activity Speed Mode PoE Mode Link Activity Speed per port PoE OK PoE Fail per ...

Page 3: ... Mode button Off Link Activity Speed mode selected via Mode button Stack ID Green Solid 1 8 The stacking ID number of the switch in the stack Solid H The switch is the master switch in the stack Solid h The switch is the backup master switch in the stack Solid e There was an error in the system s self test Solid G The Safeguard engine entered the exhausted mode Per 10 100 1000Base T port Link Acti...

Page 4: ...received at 10 Gbps through the port Off Inactive connection or no link present Amber Solid Active connection at 1000 Mbps through the port Blinking Data transmitted and received at 1000 Mbps through the port Off Inactive connection or no link present Per 10GBase X SFP port Link Activity Speed Green Solid Active connection at 10 Gbps through the port Blinking Data transmitted and received at 10 Gb...

Page 5: ...nt Power Supply port Figure 2 DGS 1520 28MP rear panel Side Panel Description The left hand panel of the switch has heat vents to dissipate heat Do not block these openings and leave at least 15 cm of space at the rear and sides of the switch for proper ventilation Be reminded that without proper heat dissipation and air circulation system components might overheat which could lead to system failu...

Page 6: ...feet These markings are usually found in each corner on the bottom of the device The rubber feet cushion the switch protecting the casing from scratches and preventing it from scratching other surfaces Figure 4 Attaching rubber feet to the switch Install the switch on a sturdy level surface that can support the weight of the switch Do not place any heavy objects on the switch Make sure that there ...

Page 7: ...J 45 wiring connection These ports are generally used to connect this switch to optical fiber connections and can be used to connect devices to the switch over great distances The maximum distance that the RJ 45 wiring connection can reach is 100 meters Fiber optic connections can span several kilometers Figure 7 Inserting transceivers into the transceiver ports Connecting AC Power to the Switch P...

Page 8: ...r To prevent accidental removal of the AC power cord it is recommended to install the power cord retainer together with the power cord With the rough side facing down insert the tie wrap into the hole below the power socket Figure 8 Insert tie wrap into the switch Plug the AC power cord into the power socket of the switch Figure 9 Connect the power cord to the switch Slide the retainer through the...

Page 9: ... the tie wrap Circle the tie of the retainer around the power cord and into the locker of the retainer Figure 11 Circle around the power cord Fasten the tie of the retainer until the power cord is secured Figure 12 Secure the power cord 9 ...

Page 10: ...ices attached to its ports or an entire network CAUTION Do not connect the RPS to AC power before the DC power cable is connected This might damage the internal power supply CAUTION Leave at least 15 cm 6 inches of space at the rear of the switch when an RPS is installed to prevent cable damage DPS 700 Redundant Power Supply The DPS 700 is connected to the Master Switch using a 22 pin DC power cab...

Page 11: ...ternet Explorer Mozilla Firefox Google Chrome or Safari The MGMT port offers an Out Of Band OOB connection to the Web UI and the LAN ports offers an in band connection to the Web UI using HTTP or HTTPS SSL Connecting to the Console Port The console port is used to connect to the CLI of the switch To use the RJ 45 console port the following equipment is needed A terminal or a computer with both an ...

Page 12: ...r account use the username command in the Global Configuration Mode In the example below a user account with the username NewUser password 12345 and privilege level 15 is created Figure 16 Creating a new user account NOTE Usernames can be up to 32 characters in length Passwords can be up to 32 plain text characters in length Passwords are case sensitive To configure the IP address of the Switch us...

Page 13: ... address bar of the browser and press the Enter key To access the Web UI from normal LAN ports the default IP address is 10 90 90 90 with the subnet mask of 255 0 0 0 When the login screen is displayed enter username and password the default username and password for the CLI and Web UI is admin Figure 18 Web UI Login Window NOTE For security reasons it is highly recommended to configure a personal...

Page 14: ...нным в технических характеристиках устройства Для подключения необходима установка легкодоступной розетки вблизи оборудования Не вскрывайте корпус устройства Перед очисткой устройства от загрязнений и пыли отключите питание устройства Удаляйте пыль с помощью влажной салфетки Не используйте жидкие аэрозольные очистители или магнитные статические устройства для очистки Избегайте попадания влаги в ус...

Page 15: ...аткое руководство по установке Описание передней панели На передней панели коммутатора расположены следующие компоненты 20 портов 10 100 1000Base T с поддержкой PoE 4 порта 100 1000 2 5GBase T с поддержкой PoE 2 порта 10GBase T 2 порта 10GBase X SFP Консольный порт с разъемом RJ 45 Индикаторы Power RPS Console Fan Error Link Activity Speed Mode PoE Mode Link Activity Speed на порт PoE OK PoE Fail ...

Page 16: ... с помощью кнопки Mode Не горит Выбран режим PoE с помощью кнопки Mode PoE Mode Зеленый Горит Выбран режим PoE с помощью кнопки Mode Не горит Выбран режим Link Activity Speed с помощью кнопки Mode Stack ID Зеленый Горит 1 8 Идентификационный номер коммутатора в стеке Stacking ID Горит H Коммутатор является основным master в стеке Горит h Коммутатор является резервным backup master в стеке Горит e ...

Page 17: ...На порт 10GBase T Link Activity Speed Зеленый Горит К порту подключено устройство на скорости 10 Гбит с Мигает На порту выполняется передача или прием данных на скорости 10 Гбит с Не горит К порту не подключено устройство Желтый Горит К порту подключено устройство на скорости 1000 Мбит с Мигает На порту выполняется передача или прием данных на скорости 1000 Мбит с Не горит К порту не подключено ус...

Page 18: ...беля питания SWITCH GND винт заземления предназначен для крепления клеммы заземляющего провода к коммутатору Слот для кенсингтонского замка Порт RPS для подключения резервного источника питания Рисунок 2 Задняя панель DGS 1520 28MP Описание боковых панелей На левой боковой панели коммутатора находятся вентиляционные отверстия для рассеивания тепла Не закрывайте эти отверстия и оставьте около 15 см...

Page 19: ...ерхность При установке коммутатора на стол или какую либо поверхность необходимо прикрепить входящие в комплект поставки резиновые ножки к нижней панели коммутатора расположив их по углам Рисунок 4 Крепление резиновых ножек Установите устройство на твердой и ровной поверхности которая способна выдержать его вес Не размещайте тяжелые предметы на поверхности коммутатора Убедитесь в наличии пространс...

Page 20: ...в стойку и закрепите его с помощью винтов входящих в комплект поставки стойки Рисунок 6 Установка коммутатора в стойку Подключение трансиверов Коммутатор DGS 1520 28MP оснащен портами для подключения трансиверов SFP и SFP Рисунок 7 Подключение трансиверов к коммутатору 20 ...

Page 21: ...ния питания включите коммутатор снова Установка фиксатора для кабеля питания Для предотвращения случайного отключения кабеля питания рекомендуется установить фиксатор Установите стяжку замком вниз в отверстие расположенное под разъемом питания Рисунок 8 Установка кабельной стяжки на коммутатор Подключите кабель питания к коммутатору Рисунок 9 Подключение кабеля питания к коммутатору Наденьте зажим...

Page 22: ...жима на стяжку Оберните ленту зажима вокруг кабеля питания и вставьте ее в фиксирующий замок Рисунок 11 Фиксация кабеля питания Затяните ленту зажима для надежной фиксации кабеля питания Рисунок 12 Фиксация кабеля питания 22 ...

Page 23: ...может привести к повреждению внутреннего источника питания ПРЕДУПРЕЖДЕНИЕ При подключении резервного источника питания оставьте не менее 15 см свободного пространства сзади коммутатора во избежание повреждения кабеля Резервный источник питания DPS 700 Резервный источник питания DPS 700 подключается к порту RPS коммутатора с помощью кабеля питания постоянного тока с 22 контактным разъемом Стандартн...

Page 24: ...виде графиков Подключение к консольному порту Консольный порт с разъемом RJ 45 на передней панели коммутатора предназначен для подключения компьютера который будет использоваться для настройки устройства Для подключения к консольному порту потребуется консольный кабель с разъемом RJ 45 входящий в комплект поставки коммутатора Для подключения к консольному порту потребуется следующее Терминал или к...

Page 25: ...новой учетной записи пользователя используйте команду username в режиме глобальной конфигурации Global Configuration Mode В приведенном ниже примере показано создание новой учетной записи NewUser пароля 12345 иNewUser пароля NewUser пароля 12345 и12345 и уровня прав доступа 15 Рисунок 16 Создание новой учетной записи ПРИМЕЧАНИЕ Пароли чувствительны к регистру Длина имени пользователя и пароля може...

Page 26: ...ода в Web интерфейс откройте Web браузер введите в адресной строке IP адрес коммутатора и нажмите Enter После того как появится окно аутентификации введите имя пользователя и пароль именем пользователя и паролем по умолчанию является admin Нажмите Login Рисунок 18 Окно аутентификации пользователя ПРИМЕЧАНИЕ После первоначальной авторизации настоятельно рекомендуется создать новую учетную запись с ...

Page 27: ...резервного источника питания DPS 700 Функционал Стандарты и функции IEEE 802 3 10Base T IEEE 802 3u 100Base TX IEEE 802 3ab 1000Base T IEEE 802 3bz 2 5GBase T IEEE 802 3an 10GBase T IEEE 802 3z 1000Base X IEEE 802 3ae 10GBase X IEEE 802 3az Energy Efficient Ethernet Управление потоком IEEE 802 3x Автоматическое определение MDI MDIX на всех медных портах Производительность Оперативная память 256 МБ...

Page 28: ...ть 453 3 Вт функция PoE включена 45 2 Вт функция PoE выключена Потребляемая мощность в режиме ожидания 37 2 Вт 100 В 37 3 Вт 240 В Тепловыделение 1 545 8 БТЕ час MTBF часы 333 946 Уровень шума При высокой скорости вентилятора 57 1 дБ При низкой скорости вентилятора 44 5 дБ Система вентиляции 4 вентилятора Температура Рабочая от 5 до 50 CC Хранения от 40 до 70 CC Влажность При эксплуатации от 10 до...

Page 29: ... представитель импортер ООО Д Линк Трейд 390043 г Рязань пр Шабулина д 16 Тел 7 4912 575 305 Россия Москва Графский переулок 14 Тел 7 495 744 00 99 E mail mail dlink ru Україна Київ вул Межигірська 87 А Тел 38 044 545 64 40 E mail ua dlink ua Moldova Chisinau str C Negruzzi 8 Tel 373 22 80 81 07 E mail info dlink md Беларусь Мінск пр т Незалежнасці 169 Тэл 375 17 218 13 65 E mail support dlink by ...

Reviews: