background image

D-Link DGS-1100 Series Switch User Manual


Click the 

View Detail

 button to view more detailed information about the VLAN on the specific 

interface. 

Click the 

Edit 

button to re-configure the specific entry. 


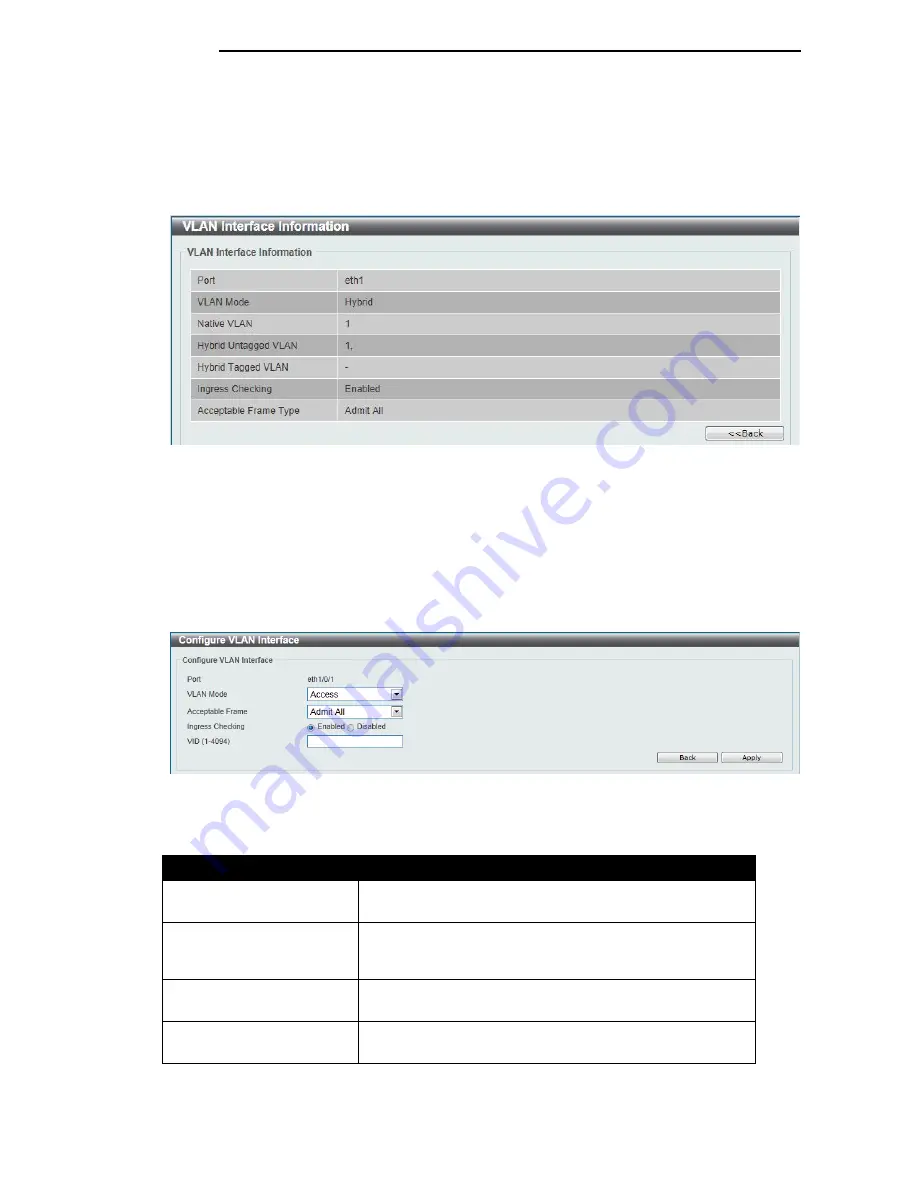
After clicking the 

VLAN Detail

 button, the following page will appear. 


Figure 7-11 VLAN Interface Information window 


More detailed information about the VLAN of the specific interface is displayed. 

Click the 

Back

 button to return to the previous window. 


After click the 

Edit

 button, the following window will appear. This is a dynamic window that will 

change when a different 

VLAN Mode 

was selected. When 

Access

 was selected as the 

VLAN Mode

the following page will appear. 


Figure 7-12 Configure VLAN Interface - Access window 


The fields that can be configured are described below: 

Parameter 

Description 

VLAN Mode 

Select the VLAN mode option here. Options to choose from 
are 

Access

Hybrid

, and 

Trunk

Acceptable Frame 

Select the acceptable frame behavior option here. Options to 
choose from are 

Tagged Only

Untagged Only

, and 

Admit 

All

Ingress Checking 

Select this option to enable or disable the ingress checking 
function. 

VID 

Enter the VLAN ID used for this configuration here. This 
value must be between 1 and 4094. 

Click the 

Apply

 button to accept the changes made. 

4

4

1

1


Summary of Contents for DGS-1100-18

Page 1: ...1 ...

Page 2: ...lled and used in accordance with this user s guide may cause harmful interference to radio communications Operation of this equipment in a residential area is likely to cause harmful interference in which case the user will be required to correct the interference at his own expense CE Mark Warning This is a Class A product In a domestic environment this product may cause radio interference in whic...

Page 3: ...re Installation 8 Step 1 Unpacking 8 Packing contents of DGS 1100 16 18 24 24P 26 8 Step 2 Switch Installation 8 Desktop or Shelf Installation 8 Rack Installation 9 Step 3 Plugging in the AC Power Cord 10 Power Failure 10 Grounding the Switch 10 4 Web based Switch Configuration 12 Management Options 12 Connecting using the Web User Interface 12 Logging onto the Web Manager 13 Smart Wizard 14 Web U...

Page 4: ... Table Settings 33 SNMP Host Table Settings 34 HTTP HTTPS 35 D Link Discovery Protocol 35 7 Layer 2 Features 36 FDB 36 Static FDB 36 MAC Address Table Settings 37 MAC Address Table 38 VLAN 39 802 1Q VLAN 39 Port based VLAN 39 Management VLAN 40 Asymmetric VLAN 40 VLAN Interface 40 Auto Surveillance VLAN 43 Voice VLAN 45 Spanning Tree 48 STP Global Settings 49 STP Port Settings 49 Loopback Detectio...

Page 5: ...guration 72 Firmware Information 72 Firmware Upgrade Backup 72 Firmware Upgrade from HTTP 73 Firmware Upgrade from TFTP 73 Firmware Backup to HTTP 73 Firmware Backup to TFTP 74 Configuration Restore Backup 75 Configuration Restore from HTTP 75 Configuration Restore from TFTP 75 Configuration Backup to HTTP 76 Configuration Backup to TFTP 76 Log Backup 77 Log Backup to HTTP 77 Log Backup to TFTP 77...

Page 6: ...ctions 82 Physical Environment 82 Emission EMI Certifications 82 Safety Certifications 82 Features 82 L2 Features 82 L2 Multicasting 82 VLAN 82 QoS Quality of Service 83 Security 83 Management 83 Power Saving 83 16 Appendix C Rack mount Instructions 84 vi ...

Page 7: ...the switch All the documents are available either from the CD bundled with this switch or from the D Link website Other documents related to this switch are Getting started Guide D Link Network Assistant DNA User Guide Conventions Convention Description Boldface Font Indicates a button a toolbar icon menu or menu item For example Open the File menu and choose Cancel Used for emphasis May also indi...

Page 8: ...d pay special attention to these indicators Each example below provides an explanatory remark regarding each type of indicator NOTE A note indicates important information that helps you make better use of your device NOTICE A notice indicates either potential damage to hardware or loss of data and tells you how to avoid the problem CAUTION A caution indicates a potential for property damage person...

Page 9: ...if a packet is received the switch wakes and works immediately Connecting to EEE compliant devices such as PCs and servers the network can save energy without compromising any performance While connecting to legacy devices which do not support IEEE 802 3az D Link Green Technologies can reduce power consumption by changing the power state of the link DGS 1100 16 16 Port 10 100 1000Mpbs Switch Front...

Page 10: ...witch is either sending or receiving data to the port Solid Amber Indicates that the port is running at 10 100Mbps Light off No link Link Act Speed LED Ports 17 18 Solid Green There is a secure 1000Mbps connection at the port Blinking Green There is reception or transmission occurring at the port Light off No link Reset By pressing the Reset button until the power LED turns amber the Switch will c...

Page 11: ...secure 1000Mbps connection at the port Blinking Green or Amber Indicates that the Switch is either sending or receiving data to the port Solid Amber Indicates that the port is running at 10 100 Mbps Light off No link Reset By pressing the Reset button until the power LED turns amber the Switch will change back to the default configuration and all changes will be lost Rear Panel Figure 2 6 DGS 1100...

Page 12: ...00Mbps Light off No link PoE Mode Ports 1 12 Green Indicates that PoE mode is active Amber Indicates that there is an issue with the PoE mode activating properly Light off Indicates that PoE mode is not active LED Mode Button Pressing this button will change the LED behavior from Link mode and PoE Mode Reset By pressing the Reset button until the power LED turns amber the Switch will change back t...

Page 13: ... Switch is either sending or receiving data to the port Solid Amber Indicates that the port is running at 10 100Mbps Light off No link Link Act Speed LED Ports 25 26 Solid Green There is a secure 1000Mbps connection at the port Blinking Green There is reception or transmission occurring at the port Light off No link Reset By pressing the Reset button until the power LED turns amber the Switch will...

Page 14: ... screw One Multi lingual Getting Started Guide One CD with User Manual If any item is found missing or damaged please contact the local reseller for replacement Step 2 Switch Installation For safe switch installation and operation it is recommended that you Visually inspect the power cord to see that it is secured fully to the AC power connector Make sure that there is proper heat dissipation and ...

Page 15: ...fore consideration should be given to installing the equipment in an environment compatible with the maximum ambient temperature Tma specified by the manufacturer B Reduced Air Flow Installation of the equipment in a rack should be such that the amount of air flow required for safe operation of the equipment is not compromised C Mechanical Loading Mounting of the equipment in the rack should be su...

Page 16: ...onal installation requirements Depending on the power supply and system a 12 to 6 AWG copper conductor is required for U S installation Commercially available 6 AWG wire is recommended The length of the cable depends on the proximity of the switch to proper grounding facilities A screwdriver not included in the accessory kit The following steps let you connect the switch to a protective ground Ste...

Page 17: ...D Link DGS 1100 Series Switch User Manual Figure 3 5 Ground cable screw and 8 terminal lug rings 1 11 1 ...

Page 18: ...esponds to requests with MIB objects stored in the database The SNMP agent updates the MIB objects to generate statistics and counters D Link Network Assistant DNA D Link Network Assistant included on the installation CD is a program for discovering DGS 1100 Series Switches with the same L2 network segment connected to your PC This tool can support windows 2000 XP Vista and Windows 7 Connecting us...

Page 19: ...nto the address bar of the browser and press the Enter key NOTE The default IP address of this switch is 10 90 90 90 with a subnet mask of 255 0 0 0 Figure 4 2 Displays entering the IP address in Internet Explorer This will open the user authentication window as seen below Figure 4 3 User Authentication window By default the username is admin and the password is also admin Click the Login button 1...

Page 20: ...this window the user can configure the IP address assignment method the static IP address Netmask and Gateway address Figure 4 4 System IP Information window The fields that can be configured are described below Parameter Description Static Select this option to manually configure and use IP address settings on this switch DHCP Select this option to obtain IP address settings from a DHCP server IP...

Page 21: ... to accept the changes made and continue to the next step Step 2 Admin Password In this window the user can set the password used with the admin account Figure 4 5 Admin Password Tick the Ignore the wizard next time option to skip the Smart Wizard on the next login Click the Exit button to discard the changes made exit the Smart Wizard and continue to the Web UI Click the Next button to accept the...

Page 22: ...eter Description SNMP Select the Enabled option to enable the SNMP function Select the Disabled option to disable the SNMP function Tick the Ignore the wizard next time option to skip the Smart Wizard on the next login Click the Exit button to discard the changes made exit the Smart Wizard and continue to the Web UI Click the Apply Save button to accept the changes made and then continue to the We...

Page 23: ...d in the table Figure 4 7 Main Web UI window Area Number Description AREA 1 In this area a folder tree layout is displayed of functions that can be configured using the Web UI Open folders and click the hyperlinked menu buttons to access each individual page for configuration The DGS 1100 24 link is the default page that will display basic monitoring settings for this switch AREA 2 In this area th...

Page 24: ... DGS 1100 24P Only System Log Time Time Profile Device Information In this window the Device Information CPU and Used status are displayed It appears automatically when you log in the Switch To return to the Device Information window after viewing other windows click the DGS 1100 24 link Figure 5 1 Device Information window 1 18 8 ...

Page 25: ...ontact Enter a contact name for the Switch if so desired Click the Apply button to accept the changes made IPv4 Interface This window is used to configure the IPv4 settings of the switch To view the following window click System System Information Settings IPv4 Interface as shown below Figure 5 3 Peripheral Settings window The fields that can be configured are described below Parameter Description...

Page 26: ...This window is used to configure the IPv6 settings of the switch To view the following window click System System Information Settings IPv6 Interface as shown below Figure 5 4 Peripheral Settings window The fields that can be configured are described below Parameter Description IPv6 State Select whether to Enable or Disable IPv6 functionality Static IPv6 Address If enabled enter the static IPv6 ad...

Page 27: ... Ports configured for full duplex use 802 3x flow control half duplex ports use back pressure flow control and Auto ports use an automatic selection of the two Duplex Select the duplex mode used here Options to choose from are Auto Half and Full Speed Select the port speed option here This option will manually force the connected on the selected port to only connect at the speed specified here Opt...

Page 28: ...n be configured are described below Parameter Description From Port To Port Select the appropriate port range used for the configuration here Jumbo Frame Enable Select whether to Enable or Disable support for Jumbo Frames on the switch Click the Apply button to accept the changes made 2 22 2 ...

Page 29: ... to it The Auto disable feature occurs under two conditions firstly if the total power consumption exceeds the system power limit and secondly if the per port power consumption exceeds the per port power limit Active circuit protection automatically disables the port if there is a short Other ports will remain active Based on 802 3af at PDs receive power according to the following classification P...

Page 30: ...n Trap State Select this option to enable or disable the sending of PoE notifications Click the Apply button to accept the changes made PoE Status This window displays the PoE status of each port To view the following window click System PoE PoE Status as shown below Figure 5 8 PoE Status window Note For the PoE Status table if the classification was shown as Legacy PD it will be classified to non...

Page 31: ...lass 3 and Class 4 Max Wattage When selecting Auto in the Mode drop down list this option appears Tick the check box and enter the maximum wattage of power that can be provisioned to the auto detected PD If the value is not entered the class of the PD automatically determines the maximum wattage which can be provisioned The valid range for maximum wattage is between 1000 mW and 30000 mW Time Profi...

Page 32: ...ble the System Log functionality Click the Apply button to accept the changes made The fields that can be configured for Buffer Log Settings are described below Parameter Description Buffer Log State Select whether the enable or disable the buffer log s global state here Options to choose from are Enable Disabled Click the Apply button to accept the changes made System Log Server Settings This win...

Page 33: ...l 0 to Local 7 Severity Select the severity value of the type of information that will be logged Options to choose from are Warning informational and All The possible levels are Warning The lowest level of a device warning The device is functioning but an operational problem has occurred Informational Provides device information All Displays all levels of system logs Click the Apply button to acce...

Page 34: ...ng window click System Time Clock Settings as shown below Figure 5 13 Clock Settings window The fields that can be configured are described below Parameter Description Time HH MM SS Enter the current time in hours minutes and seconds Date DD MM YYYY Enter the current day month and year to update the system clock Click the Apply button to accept the changes made Time Zone Settings This window is us...

Page 35: ...t To Date of the Month Select date of the month that summer time will end To Month Select the month that summer time will end To Year Enter the year that the summer time will end To Time HH MM Select the time of the day that summer time will end Offset Enter the number of minutes to add during summer time The default value is 60 The range of this offset is 30 60 90 and 120 Click the Apply button t...

Page 36: ...window The fields that can be configured are described below Parameter Description Range Name Enter the name of the time range This name can be up to 8 characters long From Week To Week Select the starting and ending days of the week that will be used for this time range Tick the Daily option to use this time range for every day of the week Tick the End Week Day option to use this time range from ...

Page 37: ...depends on the account s Privilege Level NOTE By default the admin account is created on the Switch To view the following window click Management User Account Settings as shown below Figure 6 1 User Management Settings window The fields that can be configured are described below Parameter Description User Name Select the user account name here Password Enter the password for the account here Click...

Page 38: ...ion and the Switch SNMP must use the same community string SNMP packets from any station that has not been authenticated are ignored dropped Traps Traps are messages that alert network personnel of events that occur on the Switch The events can be as serious as a reboot someone accidentally turned OFF the Switch or less serious like a port status change The Switch generates traps and sends them to...

Page 39: ...on failure notifications Port Link Up Tick this option to control the sending of port link up notifications Port Link Down Tick this option to control the sending of port link down notifications Coldstart Tick this option to control the sending of SNMP ColdStart notifications Warmstart Tick this option to control the sending of SNMP WarmStart notifications Click the Apply button to accept the chan...

Page 40: ...te SNMP managers access to MIB objects in the Switch s SNMP agent Click the Apply button to accept the changes made SNMP Host Table Settings This window is used to configure and display the recipient of the SNMP notification To view the following window click Management SNMP SNMP Host Table Settings as shown below Figure 6 4 SNMP Host Table Settings The fields that can be configured are described ...

Page 41: ...he web session expires Click the Apply button to accept the changes made Note If the switch is in HTTPS mode the firmware or configuration cannot be upgraded using regular HTTP D Link Discovery Protocol This window is used to configure and display D Link Discovery Protocol DDP To view the following window click Management D Link Discovery Protocol as shown below Figure 6 6 D Link Discovery Protoco...

Page 42: ...1 Unicast Static FDB window The fields that can be configured are described below Parameter Description Port Allows the selection of the port number on which the MAC address entered resides VID Enter the VLAN ID on which the associated unicast MAC address resides MAC Address Enter the MAC address to which packets will be statically forwarded or dropped This must be a unicast MAC address Click the ...

Page 43: ...is 01 XX XX XX XX XX Click the Apply button to accept the changes made Click the Delete All button to remove all the entries Click the Delete button to remove the specific entry MAC Address Table Settings This window is used to view and configure the MAC address table s global settings To view the following window click L2 Features FDB MAC Address Table Settings as shown below Figure 7 3 MAC Addre...

Page 44: ...r this configuration here State Select to enable or disable the MAC address learning function on the ports specified here Click the Apply button to accept the changes made MAC Address Table This window is used to view the entries listed in the MAC address table To view the following window click L2 Features FDB MAC Address Table as shown below Figure 7 5 MAC Address Table window Click the Clear Al...

Page 45: ...ecific entry Click the Delete button to remove the specific entry Enter a page number and click the Go button to navigate to a specific page when multiple pages exist Port based VLAN This window is used to configure the asymmetric VLAN function To view the following window click L2 Features VLAN Port based VLAN as shown below Figure 7 7 Asymmetric VLAN window The fields that can be configured are ...

Page 46: ...N VID is a unique number between 1 and 4094 that identifies a particular VLAN Click the Apply button to accept the changes made Asymmetric VLAN This window is used to configure the asymmetric VLAN function To view the following window click L2 Features VLAN Asymmetric VLAN as shown below Figure 7 9 Asymmetric VLAN window The fields that can be configured are described below Parameter Description A...

Page 47: ...ic window that will change when a different VLAN Mode was selected When Access was selected as the VLAN Mode the following page will appear Figure 7 12 Configure VLAN Interface Access window The fields that can be configured are described below Parameter Description VLAN Mode Select the VLAN mode option here Options to choose from are Access Hybrid and Trunk Acceptable Frame Select the acceptable ...

Page 48: ... are Tagged Only Untagged Only and Admit All Ingress Checking Select the check box to enable or disable the ingress checking function VID Enter the VLAN ID used for this configuration here This value must be between 1 and 4094 Action Select the action that will be taken here Options to choose from are Remove Tagged and Untagged Allowed VLAN Range Enter the allowed VLAN range information here Click...

Page 49: ...k L2 Features VLAN Auto Surveillance VLAN Auto Surveillance Properties as shown below Figure 7 15 Auto Surveillance Properties window The fields that can be configured for Global Settings are described below Parameter Description Surveillance VLAN Select this option to enable or disable the surveillance VLAN state Surveillance VLAN ID Enter the surveillance VLAN ID The range is from 2 to 4094 Surv...

Page 50: ...eter Description Component Type Select the surveillance component type Options to choose from are Video Management Server VMS Client Remote Viewer Video Encoder Network Storage and Other IP Surveillance Device Description Enter the description for the user defined OUI with a maximum of 8 characters MAC Address Enter the OUI MAC address Mask Enter the OUI MAC address matching bitmask Click the Appl...

Page 51: ... as show below Figure 7 18 Voice VLAN Global window The fields that can be configured are described below Parameter Description Voice VLAN State Select this option to enable or disable the voice VLAN Voice VLAN ID Enter the voice VLAN ID The value is range from 2 to 4094 Voice VLAN CoS Select the priority of the voice VLAN from 0 to 7 Aging Time Enter the aging time of surveillance VLAN The range ...

Page 52: ...9 Voice VLAN Port window The fields that can be configured are described below Parameter Description From Port To Port Select the range of ports that will be used for this configuration here State Select this option to enable or disable the Voice VLAN state of the port Mode Choose the Voice VLAN mode for the port This can be Auto untagged Auto Tagged or Manually configured Click the Apply button t...

Page 53: ...d are described below Parameter Description OUI Address Enter the OUI MAC address Mask Enter the OUI MAC address matching bitmask Description Enter the description for the user defined OUI with a maximum of 8 characters Click the Apply button to accept the changes made Click the Delete button to remove the specified entry Voice VLAN Device This window is used to show voice devices that are connect...

Page 54: ...rcome some limitations of STP that impede the function of some recent switching innovations in particular certain Layer 3 functions that are increasingly handled by Ethernet switches The basic function and much of the terminology is the same as STP Most of the settings configured for STP are also used for RSTP This section introduces some new Spanning Tree concepts and illustrates the main differe...

Page 55: ...ured for Spanning Tree Mode are described below Parameter Description Spanning Tree Mode Select the STP mode used here Options to choose from are RSTP and STP Click the Apply button to accept the changes made The fields that can be configured for STP Traps are described below Parameter Description STP New Root Trap Select this option to enable or disable the STP new root trap option here STP Topol...

Page 56: ... occurs without waiting for the forward time delay If the interface receives a BPDU later its operation state changes to the non port fast state By default this option is Edge Click the Apply button to accept the changes made Loopback Detection The Loopback Detection LBD function is used to detect the loop created by a specific port This feature is used to temporarily shut down a port on the Switc...

Page 57: ...s Entering 0 will disable the Loop Detection Recover Time The default is 60 seconds Loopback Detection Trap Select to enable or disable the loopback detection trap state Click the Apply button to accept the changes made The fields that can be configured for Loopback Detection Port Settings are described below Parameter Description From Port To Port Select the appropriate port range used for the co...

Page 58: ...ped together and to act as a single link This gives a bandwidth that is a multiple of a single link s bandwidth Link aggregation is most commonly used to link a bandwidth intensive network device or devices such as a server to the backbone of a network All of the ports in the group must be members of the same VLAN and their STP status static multicast traffic control traffic segmentation and 802 1...

Page 59: ...ce can only join one channel group Mode Select the mode option here Options to choose from are On Active and Passive If the mode On is specified the channel group type is static If the mode Active or Passive is specified the channel group type is LACP A channel group can only consist of either static members or LACP members Once the type of channel group has been determined other types of interfac...

Page 60: ... DGS 1100 Series Switch User Manual After clicking the Channel Detail button the following page will be available Figure 7 267 Port Channel window Click the Back button to return to the previous window 5 54 4 ...

Page 61: ...ameter Description Global State Select this option to enable or disable IGMP snooping global state Click the Apply button to accept the changes made The fields that can be configured for VLAN Status Settings are described below Parameter Description VID Enter a VLAN ID from 1 to 4094 and select to enable or disable IGMP snooping on the VLAN Click the Apply button to accept the changes made The fie...

Page 62: ...ups Settings as shown below Figure 7 281 IGMP Snooping Groups Settings The fields that can be configured for IGMP Snooping Static Groups Settings are described below Parameter Description VID Enter a VLAN ID of the multicast group Group Address Enter an IP multicast group address From Port To Port Select the appropriate port range used for the configuration here Click the Apply button to accept th...

Page 63: ...n Multicast Filter Mode Select the multicast filter mode here Options to choose from are Forward Unregistered and Filter Unregistered When selecting the Forward Unregistered option registered multicast packets will be forwarded based on the forwarding table and all unregistered multicast packets will be flooded based on the VLAN domain When selecting the Filter Unregistered option registered packe...

Page 64: ...fields that can be configured for LLDP Global Settings are described below Parameter Description LLDP State Select this option to enable or disable the LLDP feature LLDP Trap State Select this option to enable or disable the LLDP trap state Click the Apply button to accept the changes made LLDP Neighbor Port Information This window is used to display the information learned from the neighbors The ...

Page 65: ...Method SP Denoting a Strict Priority scheduling will set the highest queue to be emptied first while the other queues will follow the weighted round robin scheduling scheme WRR Use the weighted round robin WRR algorithm to handle packets in an even distribution in priority classes of service Click the Apply button to accept the changes made The fields that can be configured Port Default CoS are de...

Page 66: ...t range used for the configuration here Direction Select the direction option here Options to choose from are Input and Output When Input is selected the rate limit for ingress packets is configured When Output is selected the rate limit for egress packets is configured Rate Limit Select the rate limit value here When Direction is Input this drop down menu allows you to select data rate from 8Kbps...

Page 67: ...unction helps protect the Smart Switch from being interrupted by malicious viruses or worm attacks Safeguard Engine Settings This window is used to view and configure the safeguard engine settings To view the following window click Security Safeguard Engine Safeguard Engine Settings as shown below Figure 9 1 Safeguard Engine Settings window The fields that can be configured for Safeguard Engine Se...

Page 68: ...ckets received by the port is not restricted To view the following window click Security Traffic Segmentation Settings as shown below Figure 9 2 Traffic Segmentation Settings window The fields that can be configured are described below Parameter Description From Port To Port Select the receiving port range used for the configuration here From Forward Port To Forward Port Select the forward port ra...

Page 69: ...attack will send packets with the TCP UDP source port equal to the destination port of the target device It may cause the target device to respond to itself TCP Null This type of attack involves port scanning by using specific packets which contain a sequence number of 0 and no flags TCP Xmas This type of attack involves port scanning by using specific packets which contain a sequence number of 0 ...

Page 70: ...global state here Action Select the action that will be taken when the DoS attack was detected here The only option to select here is Drop Click the Apply button to accept the changes made Zone Defense Settings This window is used to view and configure the Zone Defense setting To view the following window click Security Zone Defense Settings as shown below Figure 9 5 Zone Defense Settings window T...

Page 71: ...bal Settings This window is used to view and configure the SSL feature s global settings To view the following window click Security SSL SSL Global Settings as shown below Figure 9 5 SSL Global Settings window The fields that can be configured for SSL Global Settings are described below Parameter Description SSL Status Select to enable or disable the SSL feature s global status here Click the Appl...

Page 72: ...AM Cable Diagnostics as shown below Figure 10 1 Cable Diagnostics window The fields that can be configured are described below Parameter Description From Port To Port Select the appropriate port range used for the configuration here Click the Test button to test the specific port Click the Clear button to clear all the information for the specific port Click the Clear All button to clear all the i...

Page 73: ...t To Port Select the appropriate port range used for the configuration here TxOK Number of packets transmitted successfully RxOK Number of packets received successfully TxError Number of transmitted packets resulting in error RxError Number of received packets resulting in error Click the Find button to locate a specific entry based on the information entered Click the Refresh button to refresh th...

Page 74: ...ettings window The fields that can be configured for Mirror Settings are described below Parameter Description Destination Select one destination port from drop down menu Source Select From Port number and the To Port number as source port from drop down menu Lastly select the Frame Type option Options to choose from as the Frame Type are Both RX and TX When selecting Both traffic in both the inco...

Page 75: ...t this option to enable or disable applying the power saving by scheduled port shutdown Scheduled Hibernation Power Saving Select this option to enable or disable applying the power saving by scheduled hibernation power Scheduled Dim LED Power Saving Select this option to enable or disable applying the power saving by scheduled dimming LEDs Administrative Dim LED Select this option to enable or di...

Page 76: ...scribed below Parameter Description From Port To Port Select the appropriate port range used for the configuration here Time Range If a Time Profile was previously created select the desired profile from the drop down list Click the Apply button to accept the changes made Click the Delete button to remove the specified entry 7 70 0 ...

Page 77: ...een EEE as shown below Figure 12 3 EEE window The fields that can be configured are described below Parameter Description From Port To Port Select the appropriate port range used for the configuration here State Select this option to enable or disable the state of this feature here Click the Apply button to accept the changes made Note The EEE feature is only supported on the copper ports on all D...

Page 78: ...iew the following window click Tools Firmware Information as shown below Figure 13 2 Firmware Information window Boot Up Clicking the Boot Up button will set that firmware image as the active image to use upon the next system start up Note Changing the firmware only happens after the switch has been manually rebooted In order to boot with the newly selected firmware make sure that the switch is re...

Page 79: ...ade button to initiate the firmware upgrade Firmware Upgrade from TFTP This window is used to initiate a firmware upgrade from a TFTP server To view the following window click Tools Firmware Upgrade Backup firmware Upgrade from TFTP as shown below Figure 13 4 Firmware Upgrade from TFTP window The fields that can be configured are described below Parameter Description TFTP Server IP Enter the TFTP ...

Page 80: ... backup to a TFTP server To view the following window click Tools Firmware Upgrade Backup Firmware Backup to TFTP as shown below Figure 13 6 Firmware Backup to TFTP window The fields that can be configured are described below Parameter Description TFTP Server IP Enter the TFTP server s IPv4 address here Source Select the source image to use for the firmware backup Destination File Enter the destin...

Page 81: ...to navigate to the location of the configuration file located on the local PC Click the Restore button to initiate the configuration restore Click Effective immediately running config to have the uploaded configuration loaded immediately Click Take effect after the next boot startup config to load the configuration after the switch has been rebooted Configuration Restore from TFTP This window is u...

Page 82: ...to save the switch user accounts and passwords to the backup file Click the Backup button to initiate the configuration file backup Configuration Backup to TFTP This window is used to initiate a configuration file backup to a TFTP server To view the following window click Tools Configuration Restore Backup Configuration Backup to TFTP as shown below Figure 13 10 Configuration Backup to TFTP window...

Page 83: ... Log Backup to TFTP This window is used to initiate a system log backup to a TFTP server To view the following window click Tools Log Backup Log Backup to TFTP as shown below Figure 13 12 Log Backup to TFTP window The fields that can be configured are described below Parameter Description TFTP Server IP Enter the TFTP server s IPv4 address here Destination File Enter the destination path and locat...

Page 84: ... address configured in this window Users may enter a number of times between 1 and 255 Tick the Infinite check box to keep sending ICMP Echo packets to the specified IP address until the program is stopped Timeout Select a timeout period between 1 and 99 seconds for this Ping message to reach its destination If the packet fails to find the IP address in this specified time the Ping packet will be ...

Page 85: ...ch will be reset to its factory defaults including IP address option to reset the Switch s configuration to its factory default settings Click the Apply button to initiate the factory default reset and reboot the Switch Reboot System This window is used to reboot the Switch and alternatively save the configuration before doing so To view the following window click Tools Reboot System as shown belo...

Page 86: ...are able to perform 10 times the number of operations in the same amount of time In addition the phenomenal bandwidth delivered by Gigabit Ethernet is the most cost effective method to take advantage of today and tomorrow s rapidly improving switching and routing internetworking technologies And with expected advances in the coming years in silicon technology and digital signal processing that wil...

Page 87: ...etwork capacity available to users on a local area network A switch increases capacity and decreases network loading by dividing a local area network into different segments which won t compete with each other for network transmission capacity The switch acts as a high speed selective bridge between the individual segments The switch without interfering with any other segments automatically forwar...

Page 88: ...2 Supports Full half Duplex operations at 10 100Mbps Supports Full Duplex operation at 1000Mbps Supports IEEE 802 3x Flow Control Support Auto Negotiation Compliant to IEEE 802 3az Energy Efficiency Ethernet SFP ports compliant with the following standards IEEE 802 3u compliance IEEE 802 3z compliance Physical Environment DGS 1100 16 18 24 26 24P AC input 100 240 VAC 50 60Hz internal universal pow...

Page 89: ...ork Assistant Configuration backup restoration via Web based management Firmware backup upgrade via Web based management Reset Reboot system Factory reset by pressing reset button SNMP LLDP Dual Image 2 level user account SNTP Power Saving IEEE 802 3az Compliant Energy Efficient Ethernet D Link Green Technologies Power saving by link status Power Saving by LED Shut Off Power Saving by Port Shut Of...

Page 90: ...ment in a rack should be such that the amount of air flow required for safe operation of the equipment is not compromised C Mechanical Loading Mounting of the equipment in the rack should be such that a hazardous condition is not achieved due to uneven mechanical loading D Circuit Overloading Consideration should be given to the connection of the equipment to the supply circuit and the effect that...

Reviews: