background image

12

D-Link DCS-8350LH User Manual

Section 2 - Installation

Align the mounting bracket so that the arrow is pointing up. Use a pencil 

to make marks in the two holes.

Note

: The mounting bracket is attached to the bottom of the device. Turn 

the mounting bracket counterclockwise to detach it.

Use a 6 mm drill bit to drill two 26 mm deep holes over the pencil marks.

1

/

2

/

Hammer in the plastic anchors to support the screws.

3

/

Wall Mount

The device can be mounted onto a wall. 

Summary of Contents for DCS-8350LH

Page 1: ...DCS 8350LH User Manual 2K QHD Indoor Wi Fi Camera Hardware A1 Manual Version 1 02 12 29 2021...

Page 2: ...nformation Manual Overview Trademarks D Link and the D Link logo are trademarks or registered trademarks of D Link Corporation or its subsidiaries in the United States or other countries All other com...

Page 3: ...Front 3 Bottom 4 LED Behavior 5 Installation 6 Safety 6 Before You Begin 6 Wireless Installation Considerations 7 mydlink App Camera Setup 8 Device Placement 10 Mounting the Camera 11 Pole Mounting 1...

Page 4: ...any of the above items are missing please contact your reseller Note Using a power supply with a different voltage rating than the one included with your product will cause damage and void the warrant...

Page 5: ...otion so you only get alerts when it matters most Enhanced sound and motion detection help with the heavy lifting and with built in Bluetooth Low Energy BLE technology it s one of our easiest cameras...

Page 6: ...monitors lighting conditions and switches between color and infrared accordingly Status LED See LED Behavior on page 5 for more information Camera Lens Records video of the surrounding area IR LEDs I...

Page 7: ...your power adapter to this port to supply power to the device Reset Button Hold the recessed button down until the Status LED turns red to reset the camera to factory default settings microSD Card Slo...

Page 8: ...ction 1 Product Overview LED Behavior Status LED Connected to the network and mydlink Booting up Ready for set up Firmware being updated do not power off Timeout for setup please power cycle the devic...

Page 9: ...e a damp towel to gently wipe it down Before You Begin Plan the location of your camera Verify that your camera is electrically rated to operate with the power available in your location Connect the c...

Page 10: ...ters 3 to 90 feet Position your devices so that the number of walls or ceilings is minimized 2 Be aware of the direct line between network devices A wall that is 0 5 meters 1 5 feet thick at a 45 degr...

Page 11: ...you are asked about allowing the app to access your location or to send notifications select Allow Make sure location services and Bluetooth are turned on in your phone s settings 2 Download the mydl...

Page 12: ...lation Power on the device and wait for the Status LED to flash orange Note Make sure that your mobile device s Bluetooth is on 3 Place your device next to your mobile device A prompt will appear tap...

Page 13: ...idelines into consideration Height Place the camera 1 5 2 meters 4 to 6 5 feet from the ground Higher or lower installation points will greatly decrease person detection accuracy Person Detection Pers...

Page 14: ...he device Turn the mounting bracket counterclockwise to detach it Mounting the Camera Pole Mount 1 Thread the cable ties through the slots on the mounting bracket Make sure the textured side of the ca...

Page 15: ...make marks in the two holes Note The mounting bracket is attached to the bottom of the device Turn the mounting bracket counterclockwise to detach it Use a 6 mm drill bit to drill two 26 mm deep hole...

Page 16: ...the plastic anchors Drive the screws into the anchors to secure the mounting bracket Align the arrow on the camera base with the dot on the mounting bracket and turn clockwise to secure them together...

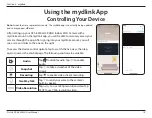
Page 17: ...ntrol options tap to watch the live view then tap again to access the control page The following controls are available Audio Tap to disable audio Tap to enable audio Snapshot Tap to take a snapshot o...

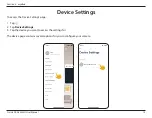
Page 18: ...To access the Device Settings page 1 Tap 2 Tap Device Settings 3 Tap the device you want to access the settings for The device page contains several options for you to configure your camera DCS 8350L...

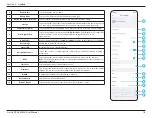
Page 19: ...licker in the video Tap 50 Hz or 60 Hz depending on the frequency of your lights 8 Invert Image Enable this to invert the camera view 9 Status LED Disabling this to turn off LED indicators 10 Designat...

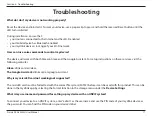
Page 20: ...rk with both Amazon Alexa and the Google Assistant For setup instructions on these services visit the following websites Alexa dlink com en alexa The Google Assistant dlink com en google assistant Why...

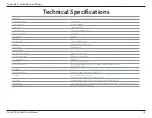
Page 21: ...reless 1T1R Wi Fi Operation Band Dual band 2 4 GHz 5 GHz Security Protocol WPA3 TLS Bluetooth Bluetooth Low Energy 4 2 Network Protocols IPv4 IPv6 DHCP DHCPv6 Client Bonjour mDNS and DNS SD ONVIF Prof...

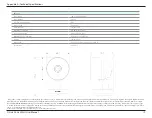
Page 22: ...cription required Subscription and One Year Free Plan offer subject to Terms and Conditions please visit the D Link website for more details D Link reserves the right to amend Terms and Conditions wit...

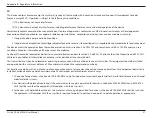
Page 23: ...Connect the equipment into an outlet on a circuit different from that to which the receiver is connected Consult the dealer or an experienced radio TV technician for help FCC Radiation Exposure State...

Page 24: ...l exemption des limites courantes d valuation dans la section 2 5 de RSS 102 et la conformit l exposition de RSS 102 rf utilisateurs peut obtenir l information canadienne sur l exposition et la confo...

Page 25: ...s la bande 5150 5250 MHz sont r serv s uniquement pour une utilisation l int rieur afin de r duire les risques de brouillage pr judiciable aux syst mes de satellites mobiles utilisant les m mes canaux...

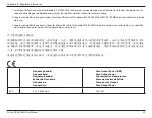
Page 26: ...t ja toote p sivara on allalaadimiseks saadaval tootelehel www dlink com English Hereby D Link Corporation declares that this product accessories and software are in compliance with directive 2014 53...

Page 27: ...gfelelnek a 2014 53 EU sz rendeletek rendelkez seinek Az EU Megfelel s gi nyilatkozat teljes sz vege s a term k firmware a term k oldal r l t lthet le a www dlink com c men Polski Polish D Link Corpor...

Page 28: ...r mi vi tilskipun 2014 53 EB S kja m ESB samr misyfirl singuna heild sinni og fastb na v runnar af vefs u v runnar www dlink com Norsk Norwegian Herved erkl rer D Link Corporation at dette produktet t...

Page 29: ...r your product uses 2 4 GHz and or 5 GHz wireless HINWEIS ZUR VERWENDUNG VON DRAHTLOS NETZWERK WLAN IN DER EUROP ISCHEN GEMEINSCHAFT NUR F R EIN DRAHTLOSES PRODUKT Der Betrieb dieses Ger ts in der Eur...

Page 30: ...ein de l UE Merci de vous r f rer au guide d utilisation ou de la fiche technique afin de v rifier si votre produit utilise 2 4 GHz et ou 5 GHz sans fil AVISO DE USO DE LA LAN DE RADIO INAL MBRICA EN...

Page 31: ...ieste per operare a 5 Ghz nell Unione europea Ti invitiamo a fare riferimento al manuale del prodotto o alla scheda tecnica per verificare se il tuo prodotto utilizza le frequenze 2 4 GHz e o 5 GHz KE...

Page 32: ...n Sicherheitsvorschriften dienen als Hilfe zur Gew hrleistung Ihrer eigenen Sicherheit und zum Schutz Ihres Produkts Weitere Details finden Sie in den Benutzeranleitungen zum Produkt Statische Elektri...

Page 33: ...ez toujours le produit de l alimentation avant de le nettoyer et utilisez uniquement un chiffon sec non pelucheux INSTRUCCIONES DE SEGURIDAD Las siguientes directrices de seguridad general se facilita...

Page 34: ...re sempre il prodotto dalla presa elettrica prima di pulirlo e usare solo un panno asciutto che non lasci filacce VEILIGHEIDSINFORMATIE De volgende algemene veiligheidsinformatie werd verstrekt om uw...

Page 35: ...ieses Symbol auf dem Produkt oder der Verpackung weist darauf hin dass dieses Produkt gem bestehender rtlicher Gesetze undVorschriftennicht berdennormalenHausm llentsorgtwerdensollte sonderneinerWiede...

Page 36: ...plus sur les produits et emballages respectueux de l environnement veuillez consulter le www dlinkgreen com ESPA OL ES Este s mbolo en el producto o el embalaje significa que de acuerdo con la legisl...

Page 37: ...ergia e a ridurre le emissioni di anidride carbonica Per ulteriori informazioni sui prodotti e sugli imballaggi D Link a ridotto impatto ambientale visitate il sito all indirizzo www dlinkgreen com NE...

Page 38: ...no ci zar wno w przypadku samych produkt w jak i opakowa Firma D Link zaleca aby Pa stwo zawsze prawid owo wy czali z u ytku swoje produkty D Link gdy nie s one wykorzystywane Post puj c w ten spos b...

Page 39: ...egtakar t s ban s a sz ndioxid kibocs t s nak cs kkent s ben K rnyezetbar t term keinkr l s csomagol sainkr l tov bbi inform ci kat a www dlinkgreen com weboldalon tudhat meg NORSK NO Dette symbolet p...

Page 40: ...reducere CO2 udledningerne Du kan finde flere oplysninger om vores milj m ssigt ansvarlige produkter og emballage p www dlinkgreen com SUOMI FI T m symboli tuotteen pakkauksessa tarkoittaa ett paikall...

Page 41: ...d F r mer information om v ra milj ansvariga produkter och f rpackningar www dlinkgreen com PORTUGU S PT Este s mbolo no produto ou embalagem significa que de acordo com as leis e regulamenta es locai...

Reviews: